Roomba Replacement Parts Schedule and Maintenance Intervals for Wear Parts
A Roomba replacement parts schedule defines maintenance intervals for each wear part as an interval range based on real-world usage patterns and part condition, rather than a fixed date. Replacement timing varies by model, home environment, and cleaning frequency. This guide covers timing and planning; detailed replacement instructions for each component appear on separate pages.
The right maintenance interval for any wear part depends on two recurring decision anchors: visual inspection cues and the part’s impact on cleaning performance. Actual intervals shift with home conditions, pet hair levels, and how often the robot runs, making condition-based checks of inspection cues and performance impact often more reliable than calendar-based schedules.
How a Roomba replacement schedule works for wear parts and performance maintenance
A Roomba replacement schedule is a maintenance plan that guides when to check and replace wear parts to support performance maintenance. It provides interval ranges, not exact dates or guarantees, because part longevity varies by usage, surface type, and debris levels.
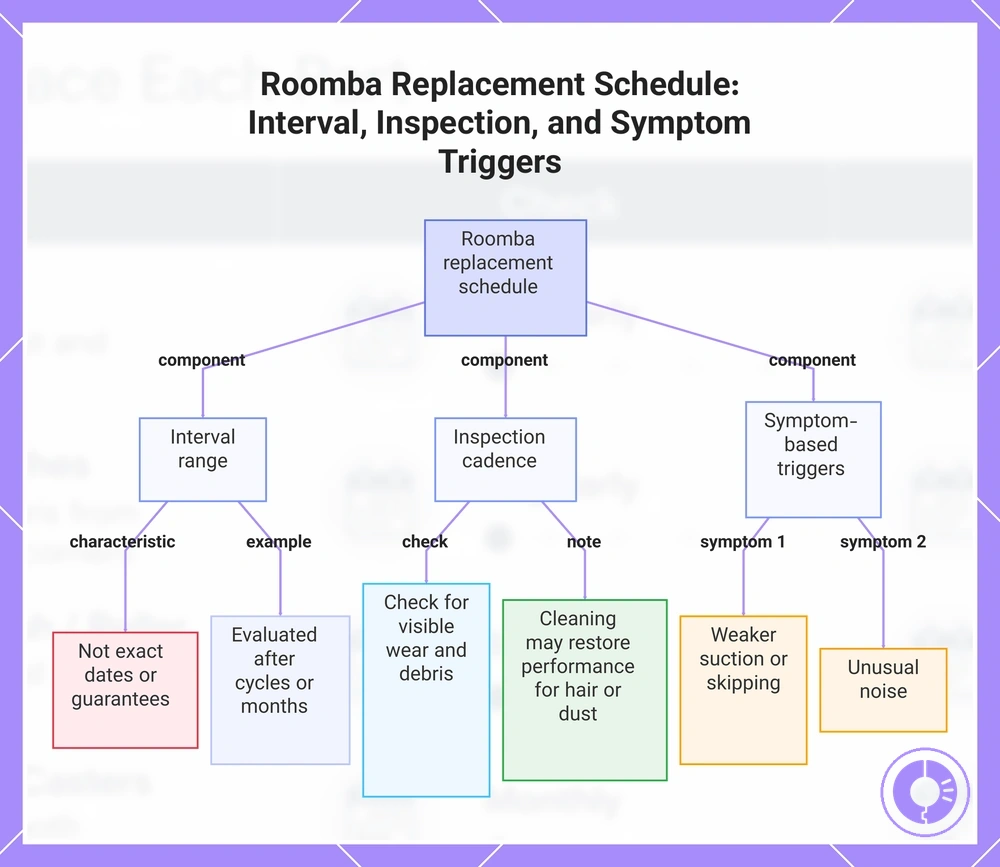
The schedule includes three main components:
- Interval range – a time window after which part condition should be evaluated, such as after a certain number of cleaning cycles or months.
- Inspection cadence – checking the part at regular intervals for visible wear, debris buildup, or reduced effectiveness.
- Symptom-based triggers – signs of performance decline, such as weaker suction, skipping, or unusual noise.
The conditional logic behind the schedule follows a predictable pattern: a wear part experiences a wear mechanism, which produces an observable cue, and that cue signals a performance outcome that may require replacement.
Cleaning can sometimes restore performance when the issue is accumulation of hair or dust rather than material degradation, but it does not always extend part life. The schedule guides timing and planning, not replacement steps.
This chart shows the three main components of a Roomba replacement schedule: interval ranges, inspection cadence, and symptom-based triggers, along with key details for each.
What changes how often Roomba parts need replacement across different homes and routines
Replacement frequency for Roomba parts depends on the home environment and usage load rather than a fixed calendar schedule. Each household's conditions shift the interval range for filters, brushes, and other components because wear progresses differently depending on how the robot is used. Recognizing which variables affect wear helps you time replacements based on actual part condition, as these variables shift ranges and provide inspection cues.
The comparison below illustrates how home conditions shift interval ranges for Roomba parts.

The main variables that change how quickly parts wear include:
- Pet hair load — Higher pet hair can cause tangles on rollers and brushes, increasing friction and wearing them faster. In homes with heavy shedding, the interval range for these parts shifts toward the shorter end.
- Floor type — Carpet can create more friction on rollers than hard floors, which can accelerate roller wear and affect cleaning effectiveness. Rollers on tile or wood may last longer before needing replacement.
- Run frequency — Running the Roomba daily versus a few times per week increases total usage load. Wear can accumulate faster with higher run frequency, so the interval range may contract.
- Fine dust — Accumulation of fine dust (e.g., from dry indoor air or frequent human activity) can clog filters more quickly, reducing airflow and pickup. Filters may need more frequent replacement in dusty homes.
- Maintenance habits — Regularly tapping out the filter and removing hair from extractors can extend part life. Without these habits, wear accelerates, shifting the interval range downward.
- Debris type — Coarse debris like sand or cat litter can abrade rollers and brushes, shortening their lifespan compared to homes with mostly soft debris.
Among these, pet hair load often has the most dramatic effect on wear acceleration, but its impact depends on the individual home. The table below compares how intervals shift under different load conditions.
| Higher load conditions | How intervals shift |
|---|---|
| High pet home, low run frequency | Filter tends to last longer; inspection cues like visible dirt or reduced suction remain normal for a longer period. |
| Multiple pets, daily runs | Filter often wears faster; inspection cues appear sooner, so replacement may be needed at a shorter interval. |
Inspection cues confirm when replacement is actually needed.
Roomba parts replacement schedule by part type with interval ranges and inspection cues
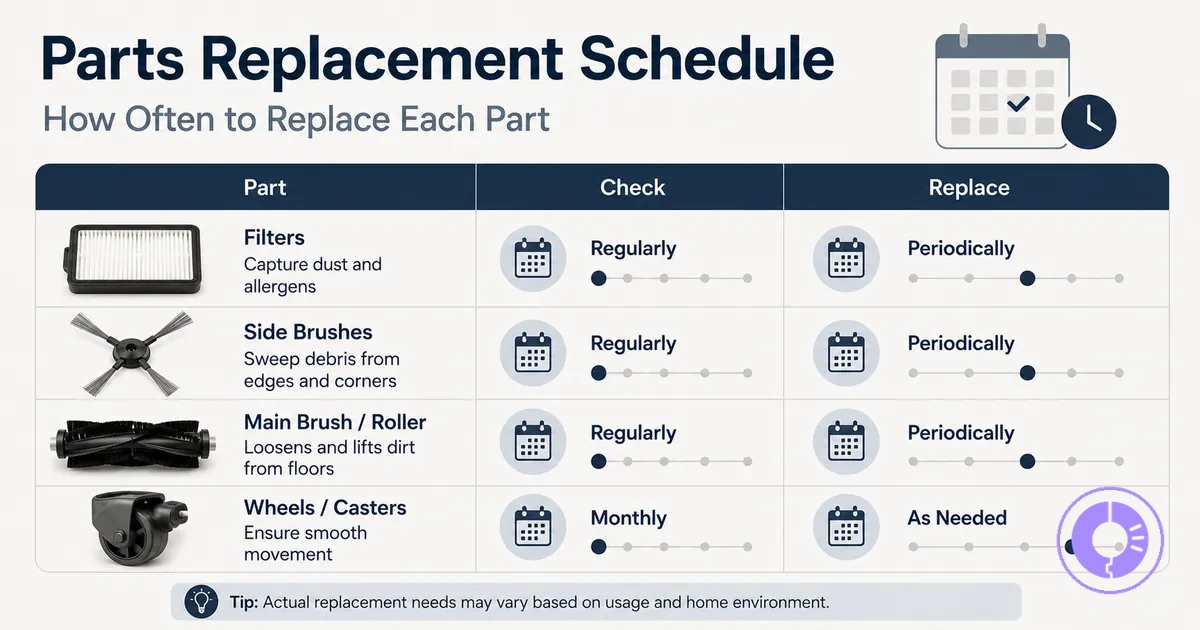
This replacement schedule by part type provides typical interval ranges and inspection cues for major Roomba wear parts, organized in the table by part, interval range, what to inspect, and performance changes. Use this combination of ranges and cues rather than a fixed schedule, because part life depends on usage, environment, and maintenance habits.
| Part | Typical interval range | What to inspect | Wear symptoms / performance changes |
|---|---|---|---|
| Filter | 2–3 months | Visible dirt accumulation, clogging in pleats | Reduced airflow, diminished pickup, motor strain |
| Rollers/brushes | 6–12 months | Wear patterns in bristles or rubber, fraying, missing material | Increased noise during operation, reduced debris pickup |
| Side brush | 6–12 months or when deformed | Bending, cracking, missing arms | Poor edge cleaning, visible deformation, skipping |
| Battery | 12–18 months (varies significantly) | Runtime decline, charging behavior, swelling | Shorter cleaning cycles, frequent return to dock, longer charge times |
| Wheels/caster | 12–18 months | Debris stuck around axle, free movement, tread wear | Reduced traction, navigation errors, erratic movement |
This replacement schedule by part type helps you locate each component on your Roomba. The image labels the filter, rollers/brushes, side brush, and wheels/caster so you can match inspection cues to the correct part.
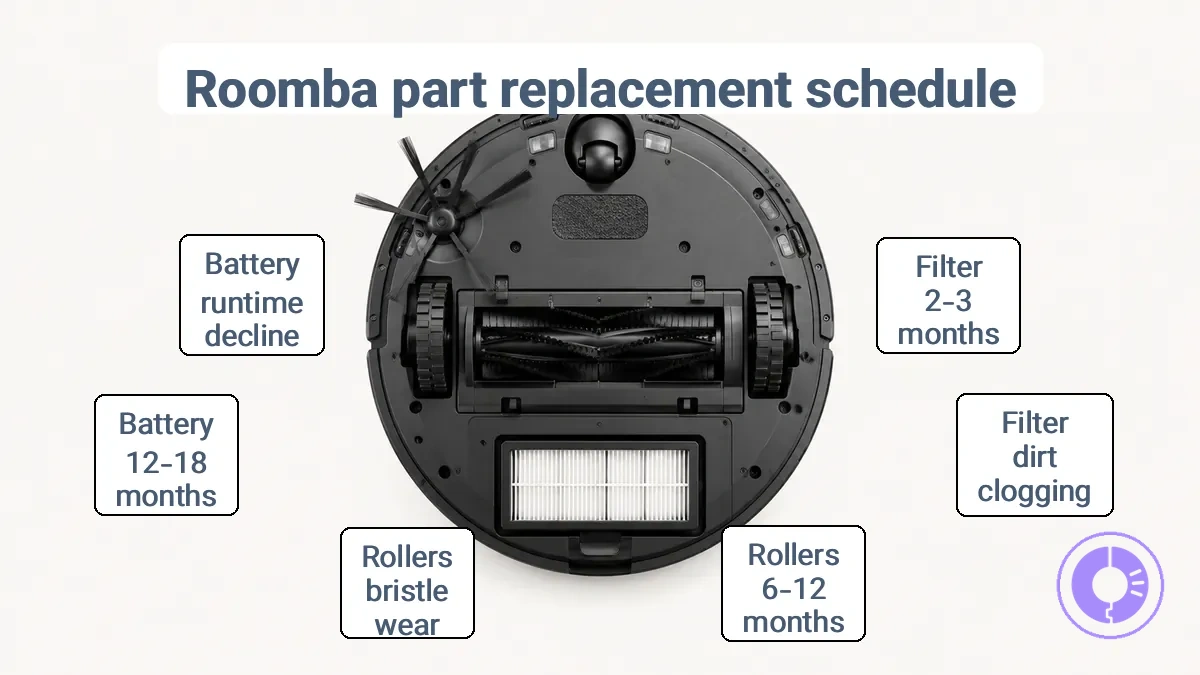
For example, a filter that looks clean after two months may still work, while one that is visibly clogged after one month already signals reduced performance. Similarly, if rollers/brushes produce unusual noise or leave debris behind, replacement is likely needed even if the calendar indicates it is too early.
Delaying replacement can lead to different consequences: a clogged filter can force the motor to work harder, worn rollers may miss more dirt, a deformed side brush can leave edges uncleaned, a declining battery reduces runtime and may cause the robot to dock mid-cycle, and stiff wheels can affect navigation. Prioritize the inspection cue over the interval range whenever a performance change is noticeable.
Filter replacement intervals and airflow-related inspection cues
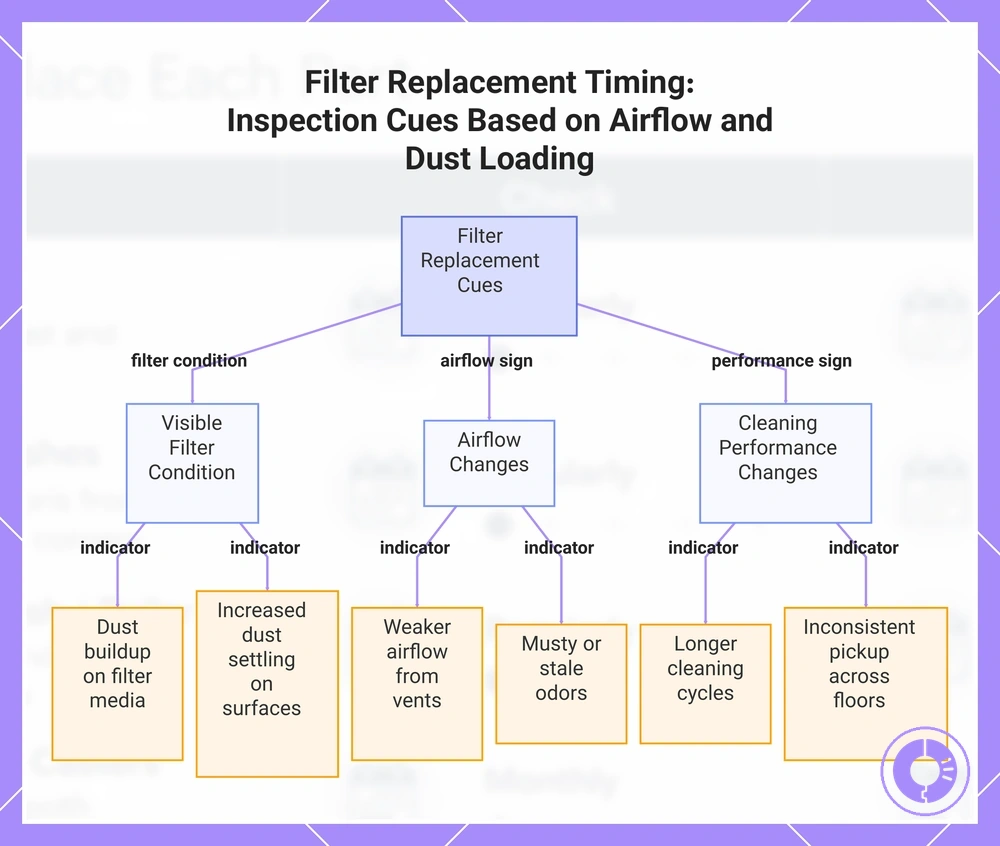
Filter replacement timing depends on airflow restriction and dust loading rather than a fixed timeline. A clogged filter reduces suction airflow and pickup performance. Look for visible dust buildup, weaker airflow from vents, and more dust settling on surfaces to decide when to replace the filter. Replace the filter when these cues persist after cleaning instead of relying on an arbitrary schedule.
The detailed filters replacement steps are covered separately.
- Visible dust buildup on the filter media: Indicates the filter is nearing dust-holding capacity. Clogging restricts airflow and can reduce pickup efficiency.
- Noticeably weaker airflow from vents or the vacuum inlet: Reduced suction suggests the filter is blocking airflow. Performance may drop noticeably until the filter is replaced.
- Increased dust settling on surfaces after cleaning: Suggests the filter is no longer capturing fine particles effectively. Dust loading has reached a level where the filter cannot maintain separation.
- Musty or stale odors when the system runs: Odor buildup from trapped dust and moisture often accompanies reduced airflow and indicates the filter should be checked.
- Longer cleaning cycles: When the system works harder against a clogged filter, cleaning time increases. This signals that the filter is restricting airflow beyond normal levels.
- Inconsistent pickup across different floor areas: A blocked filter can reduce airflow unevenly, leading to reduced cleaning effectiveness in some areas. This may indicate the filter is nearing its useful life.
Heavy pet hair loads filters faster than light dust, but the same inspection cues apply in both cases.
This chart outlines the key inspection cues that indicate when a filter should be replaced, based on observable signs of airflow restriction and dust loading rather than a preset schedule.
Brushes and rollers replacement timing based on wear patterns and cleaning limits
When to replace your Roomba's brushes and rollers depends more on visible wear and cleaning performance than on a set schedule. Bristle wear, tangles, and unusual noise signal when replacement is needed. For detailed replacement steps, refer to the brushes and rollers replacement steps.
Before replacing based on wear alone, clean the brush or roller and remove any tangled hair or debris. Cleaning sometimes restores performance, making replacement unnecessary. If cleaning does not resolve symptoms such as noise or reduced pickup, wear is likely the cause and replacement is warranted.
- Bristles worn down: Shortened or frayed bristles reduce floor contact and cleaning effectiveness.
- Missing bristles: Gaps in bristle rows cause streaking and leave debris in lines, reducing pickup performance.
- Tangled hair and debris: Hair tangles create resistance, causing a straining noise and increasing motor strain over time, which impacts cleaning ability.
- Split or cracked rubber on the roller: Cracked rubber causes chattering or ticking sounds and reduces pickup efficiency due to inconsistent contact.
- Uneven wear patterns: One side of the brush roll appears more worn than the other. This imbalance can cause vibration and reduce cleaning coverage, especially on hard floors.
Side brush replacement timing and when deformation stops being fixable
The side brush needs replacement when deformation degrades edge cleaning performance. Minor bends in the bristles or arms can sometimes be corrected with heat, but persistent deformation that does not respond to straightening signals a non-recoverable state that needs replacement.
Frequent collisions with furniture or walls can accelerate brush bending, making inspection more relevant in confined layouts.
- Bent side brush arms: Reduce sweep radius and leave debris along baseboards; if arms cannot be straightened, replacement is typically needed.
- Bristles curled inward or flattened: Lose ability to flick debris into the vacuum path; if heat reshaping fails, replacement is recommended.
- Cracks or missing bristle clusters: Weaken the brush and cause uneven rotation, reducing edge coverage; visual damage indicates replacement.
- Persistent wobble or poor fit on the mounting post: Even if bristles look fine, a deformed hub prevents consistent floor contact, necessitating a new brush when it no longer sits flush.
Battery replacement interval and capacity-decline signals that affect runtime
Battery replacement is best judged by capacity decline and runtime behavior rather than a strict calendar rule. Capacity decline reduces how long the battery can power a run. Repeatedly shortened runtime suggests the battery is no longer holding sufficient charge. When runtime consistently falls short of covering a full cleaning cycle, the robot may fail to complete coverage or return to its dock. Charging and storage habits can change the speed of this decline, but persistent decline across runs remains.
- Shorter run times than usual: The battery delivers less energy per charge, which reduces cleaning coverage and may interrupt cycles before docking.
- Frequent need to recharge mid-cycle: The robot returns to the dock sooner than expected, affecting the ability to finish a full area in one go.
- Inability to complete a return to dock: Capacity loss can leave insufficient power to navigate back, stranding the robot and impacting docking reliability.
- Longer charging times without improved runtime: The battery takes longer to refill but still provides short usage, indicating internal resistance or degradation.
- Noticeably reduced range after full charge: A drop in runtime that repeats across multiple cycles points to aging-related capacity decline rather than temporary factors.
Temporary runtime drops from heavy usage or extreme temperatures do not indicate aging-related decline; the key sign is whether the pattern persists after a full charge under normal conditions.
For deeper guidance on when to plan a replacement after persistent decline, see battery replacement planning.
Wheel modules and caster components replacement signals tied to traction and navigation
Traction loss, slipping, or navigation inconsistencies often signal that a wheel module or caster may need replacement.
- Traction slipping during straight runs → worn drive wheel tread or contamination on the caster surface → robot drifts or fails to maintain a straight path, reducing coverage efficiency.
- Intermittent resistance when turning → debris intrusion into the caster pivot or wheel module bearing → uneven movement and hesitation during navigation, which can cause missed areas.
- Wobbling or vibration from a wheel module → damaged caster wheel or loose mounting → unstable movement that degrades traction and leads to inconsistent cleaning patterns.
- Navigation errors that follow a specific wheel or caster → binding in the wheel module due to debris or wear → the robot misjudges its position and fails to complete planned coverage.
- Reduced traction on smooth floors → polished or contaminated caster surface → slipping during acceleration or turning, which forces the robot to reattempt paths and extends cleaning time.
Before replacing a wheel module or caster, cleaning trapped debris from the pivot area and wheel surface may resolve some symptoms. If traction or navigation issues persist after cleaning, replacement of the affected component is justified.
Cleaning and inspection checkpoints that prevent unnecessary part replacement
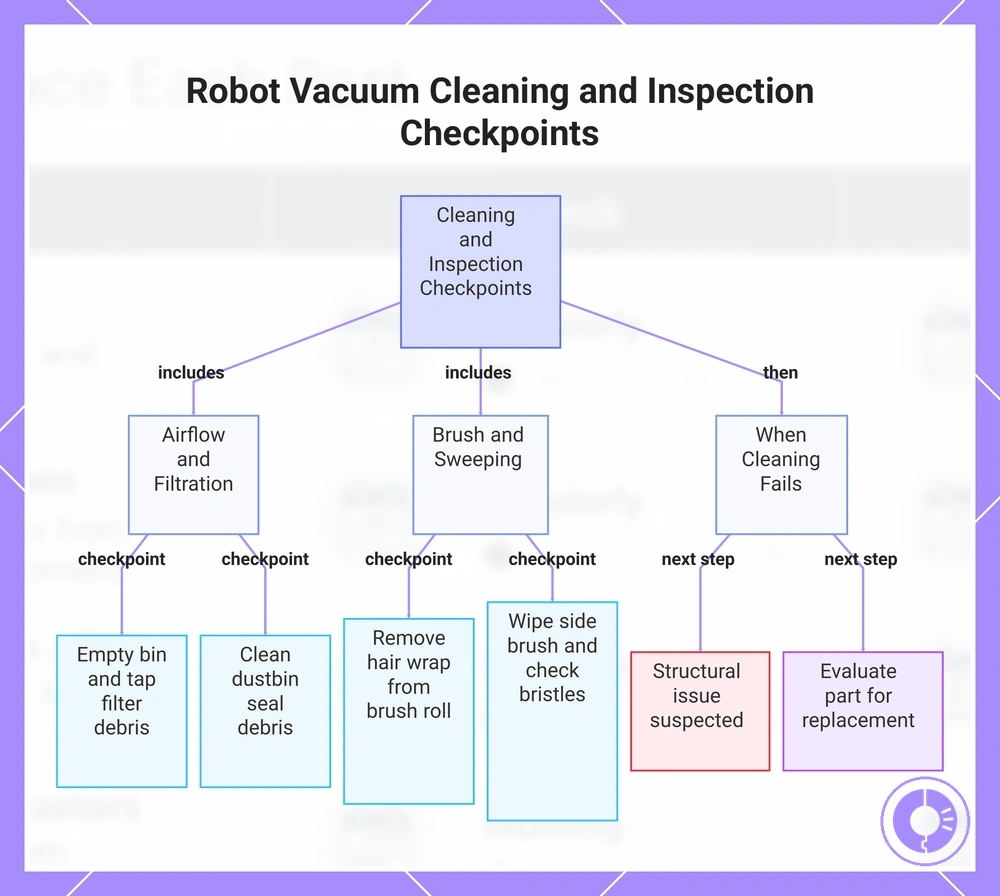
Routine cleaning and inspection can restore performance and delay replacement when wear is not structural, helping avoid unnecessary replacement. These cleaning and inspection checkpoints are organized by frequency and part group to help you quickly verify each component.
- Bin and filter → Empty bin and tap out filter debris → Airflow often returns to normal after cleaning → Indicates filter is typically reusable; replacement may not be needed yet.
- Brush roll → Remove hair and fiber wrap from end caps and bristles → Roll spins freely without resistance → Suggests cleaning often restores performance; replacement may not be required yet.
- Side brush → Wipe off caked dirt and check for bent bristles → Brush still sweeps debris into the path → Indicates the part is often functional after cleaning.
- Sensors (cliff and wall) → Gently wipe sensor windows with a dry cloth → Robot typically stops at edges and follows walls correctly → Pass/fail cue suggests sensors are clean and working.
- Wheels and casters → Remove hair and thread from wheel axles → Wheels roll smoothly without dragging → Suggests cleaning often resolves the mobility issue.
- Charging contacts → Wipe metal contacts on robot and dock with a dry cloth → Robot docks and charges reliably → Suggests electrical connection is restored.
- Dustbin seal → Check for debris blocking the seal and wipe clean → Bin typically seals tightly with no air leak → Indicates the seal remains effective.
When cleaning and inspection checkpoints do not resolve the symptom, the issue may be structural rather than surface-level. In that case, the next decision may shift from cleaning to evaluating the part for replacement. For detailed guidance on that process, refer to the general steps for replacing parts.
This chart shows the main cleaning and inspection checkpoints for robot vacuum parts that often restore performance and delay replacement, along with the next step when cleaning fails.
How to tell replacement is overdue using symptoms that match specific wear parts
Overdue replacement is identified by consistent symptoms that map to a specific worn part after basic cleaning checks. The mapping is conditional—a symptom can sometimes come from multiple sources—so a simple verification step before ordering helps confirm the likely cause. Always verify before replacing.
The table below links common wear symptoms to their likely part and an initial check. Treat each row as conditional—a symptom may suggest more than one part until verified.
| Symptom | Likely wear part(s) | First check | What it suggests |
|---|---|---|---|
| Reduced pickup | Filter or rollers | Inspect filter; if clean, examine rollers for wear | Worn filter or roller may be causing loss of suction |
| Loud operation | Rollers or wheels | Listen for grinding; remove and inspect rollers and wheels for damage | Wear on moving parts may increase noise |
| Navigation issues | Wheels or caster | Check for debris under wheels; verify caster moves freely | Reduced traction or stuck caster can cause erratic movement |
| Docking failures | Battery | Check runtime; confirm battery holds charge | Aging battery may not provide enough power to complete docking sequence |
| Shortened runtime | Battery | Run a full cleaning cycle; compare runtime to expected | Loss of capacity suggests battery replacement is likely needed |
A common mistake is assuming any persistent symptom means the part is worn out. Some symptoms come from temporary blockages or maintenance oversights, not irreversible wear. For instance, reduced pickup might result from a full dustbin rather than a clogged filter. Only after confirming basic maintenance isn't the culprit should you consider replacement. Use the table as a conditional guide, not a final diagnosis.
For expanded scenarios, see our guide on symptoms that mean replacement is overdue.
Preventative replacement planning for a consistent Roomba maintenance routine
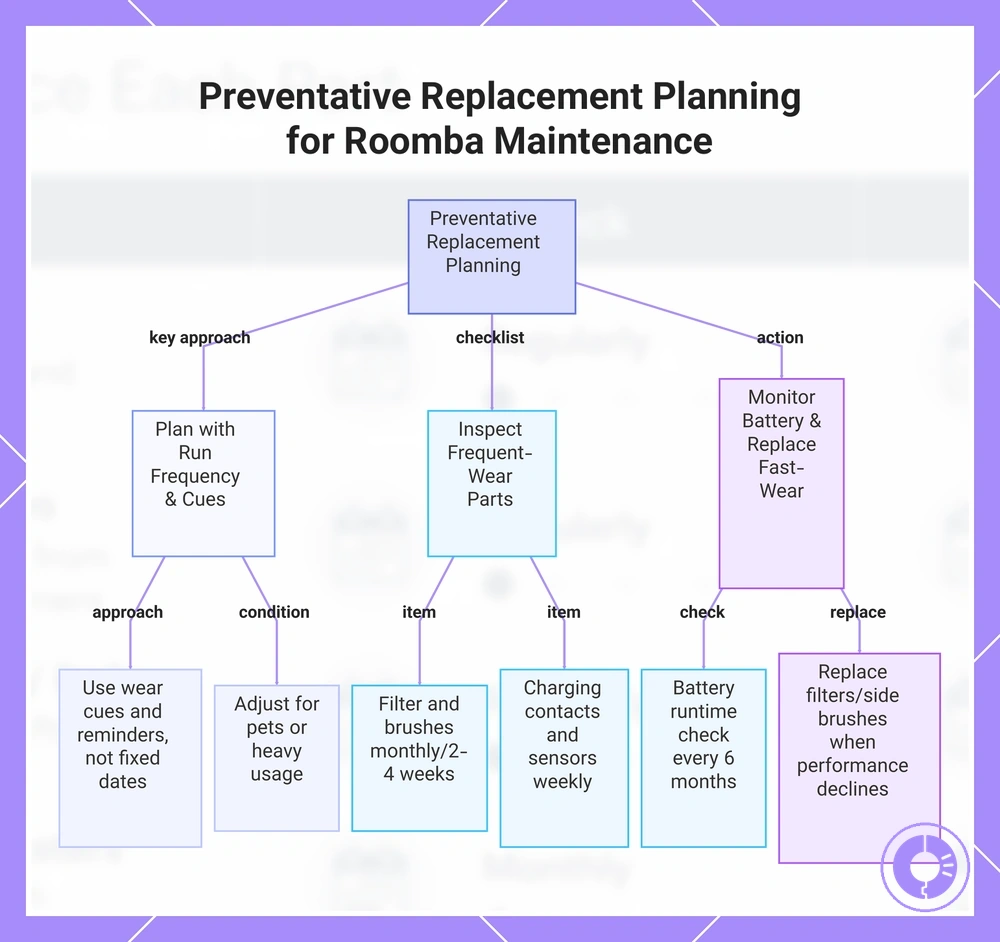
Preventative replacement planning combines interval ranges with your own inspection cadence to reduce performance drops and surprise failures. Plan around run frequency, wear cues, and reminders rather than fixed dates. Keeping a minimal spare for fast-wear parts can reduce downtime, but the choice between kits vs individual parts planning depends on your usage pattern.
This checklist organizes preventative replacement planning by part group and review frequency, helping you track what to inspect and when.
- Inspect and clean the filter – Review monthly or per run count – Reduce airflow or visible dirt signals replacement.
- Check brushes for debris and wear – Review every 2 to 4 weeks – Confirm when brush bristles are bent or missing.
- Clean charging contacts and sensors – Review weekly – Confirm when connection errors appear or robot fails to charge.
- Examine side brush for damage – Review every 1 to 2 months – Confirm when brush no longer sweeps effectively.
- Empty and clean dustbin – Review after each run – Confirm when capacity is reached or odor develops.
- Check wheels and casters for hair buildup – Review monthly – Confirm when movement becomes noisy or hesitant.
- Assess battery runtime – Review every 6 months – Confirm when runtime drops below 80% of original.
- Replace fast-wear parts such as filters and side brushes – Review at interval ranges – Confirm when performance declines or wear is visible.
Consider a household with multiple pets that runs the Roomba daily. Wear rate on filters and brushes accelerates significantly, making run frequency the primary driver for inspections. Adjust the plan based on observed cues rather than fixed timeframes. For a broader view of compatible components and their typical lifespans, see the Roomba replacement parts hub.
This chart shows how to plan preventative part replacement by using run frequency, wear cues, and a checklist for key components.
Common maintenance mistakes that shorten Roomba part lifespan and distort intervals
Common maintenance mistakes change wear rates and disrupt replacement schedules. These errors accelerate wear on parts, making fixed intervals inaccurate. When these habits persist, intervals become unreliable.
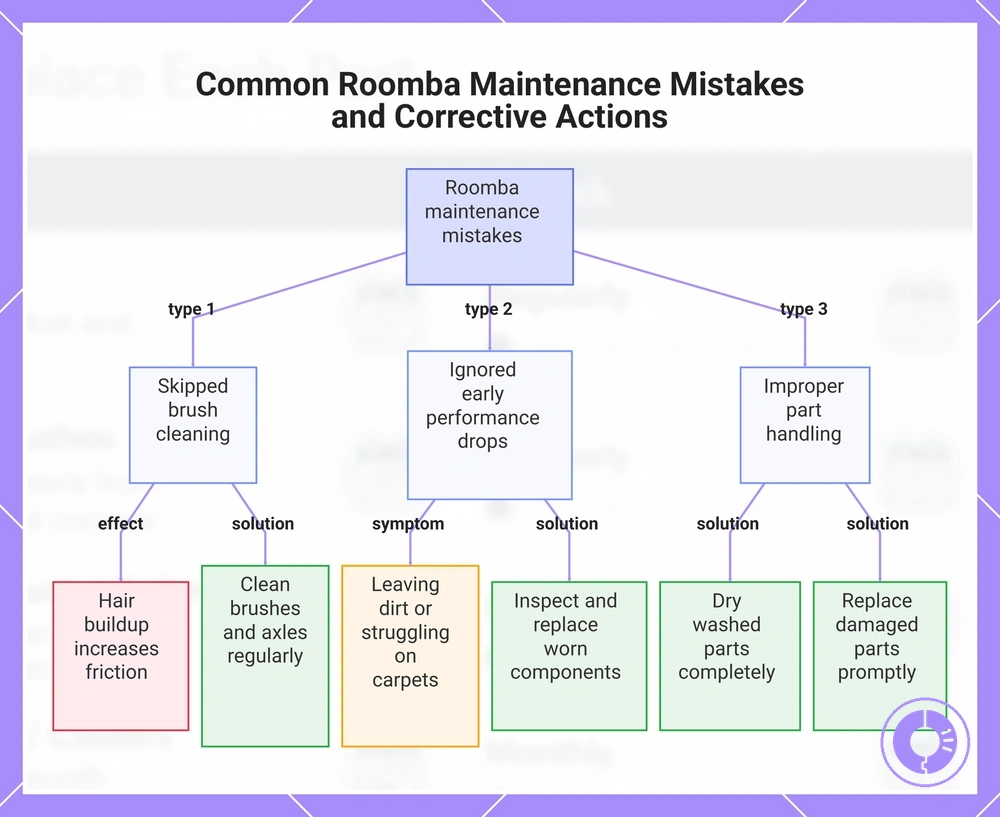
- Skipped brush cleaning affects the main brushes and axles. Hair buildup on the axles increases friction, causing faster brush wear and earlier replacement. Corrective cue: Clean brushes and axles regularly, especially when debris buildup is visible.
- Ignored early performance drops include symptoms such as the Roomba leaving dirt behind or struggling on carpets, pointing to worn brushes, clogged filters, or a blocked inlet. If left unaddressed, wear accelerates and replacement may become overdue. Corrective cue: When performance declines, inspect brushes and filters immediately and replace worn components.
- Unsuitable debris exposure happens when wet parts are reinstalled or harsh cleaning agents are used. Moisture or chemical residue can damage the dustbin, filter, and internal components, which may cause premature wear. Corrective cue: Dry washed parts completely and avoid abrasive or chemical cleaners.
- Continued use of visibly damaged parts such as frayed brushes or torn filters can put extra strain on the motor and other components, shortening overall lifespan. Corrective cue: Replace damaged parts promptly to prevent additional wear and maintain cleaning efficiency.
To keep wear rates predictable and intervals accurate, address each common error with a simple corrective action. After noticing any performance drop or unusual debris buildup, inspect the affected parts and clean or replace them as needed. Instead of following a rigid schedule, use observable cues such as brush hair accumulation, sensor dirt, or reduced suction to recalibrate your maintenance intervals.
This chart shows the most frequent maintenance errors that shorten Roomba part lifespan and disrupt replacement intervals, along with their corrective actions.