Roomba Replacement Parts FAQ
Replacement parts for Roomba robots are components you replace when they wear down or need upgrading. This includes brushes, filters, side brushes, wheels, and cleaning head modules. The parts you need and replacement intervals vary by model/series and home conditions.
This FAQ can help you avoid ordering the wrong part, replacing too early or too late, or repeating the same issue after a swap. For a complete overview of compatible components, the Roomba replacement parts hub lists compatible options. Verifying compatibility with your model/series before purchase is the first step.
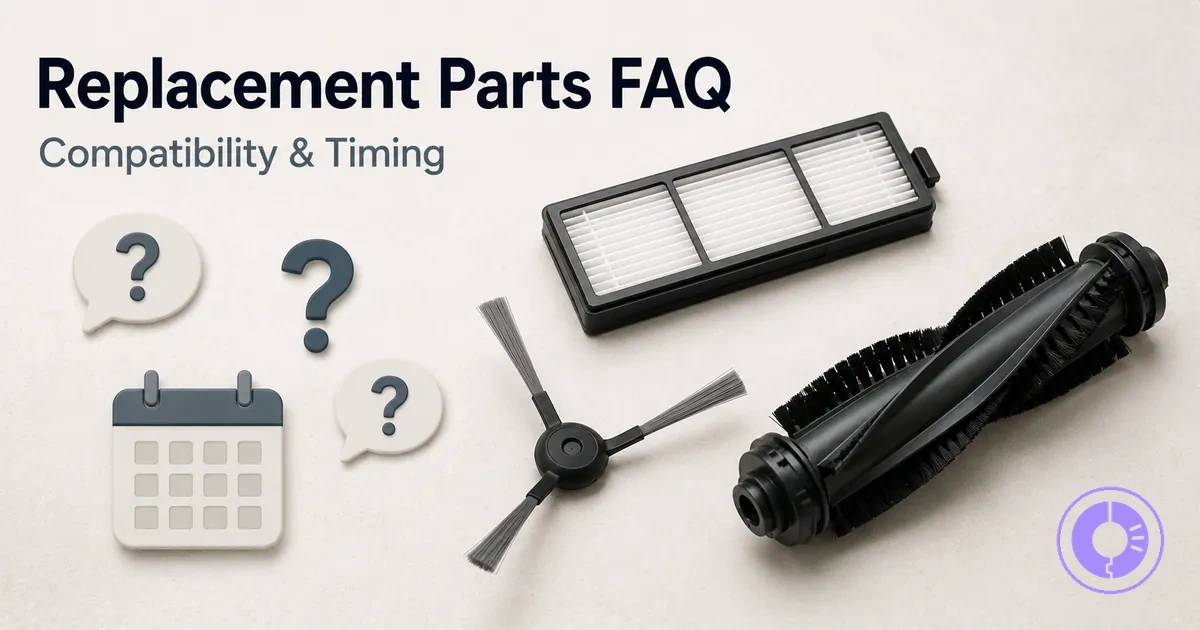
As part of this Roomba replacement parts FAQ, the following image groups common replacement parts and their locations on a Roomba for quick orientation.

A common misconception is that parts that look the same will fit any Roomba. A part labeled as compatible may still require confirmation. Checking your robot's model number and comparing part specifications can help avoid misfit and performance issues.
Which Roomba parts are designed to be replaced
Roomba parts designed to be replaced are consumable components or modules that owners swap periodically to maintain cleaning performance and help prevent mechanical issues. These parts experience predictable wear from regular use, and replacing them when needed helps avoid reduced suction, poor pickup, or unusual noises. Knowing which parts are replaceable helps owners plan maintenance instead of reacting to failures.
Classifying parts by their functional role—rather than by model—helps avoid buying the wrong item when a symptom appears. A drop in cleaning performance may point to a clogged filter or worn brushes, not a battery issue. However, 'replaceable' does not always mean 'routine replacement' across all series; some components last longer or are model-specific, so checking the part’s intended lifespan for your specific Roomba series is important.
The image labels common replacement parts by location to help reduce misidentification, making it clearer which Roomba parts are designed to be replaced.
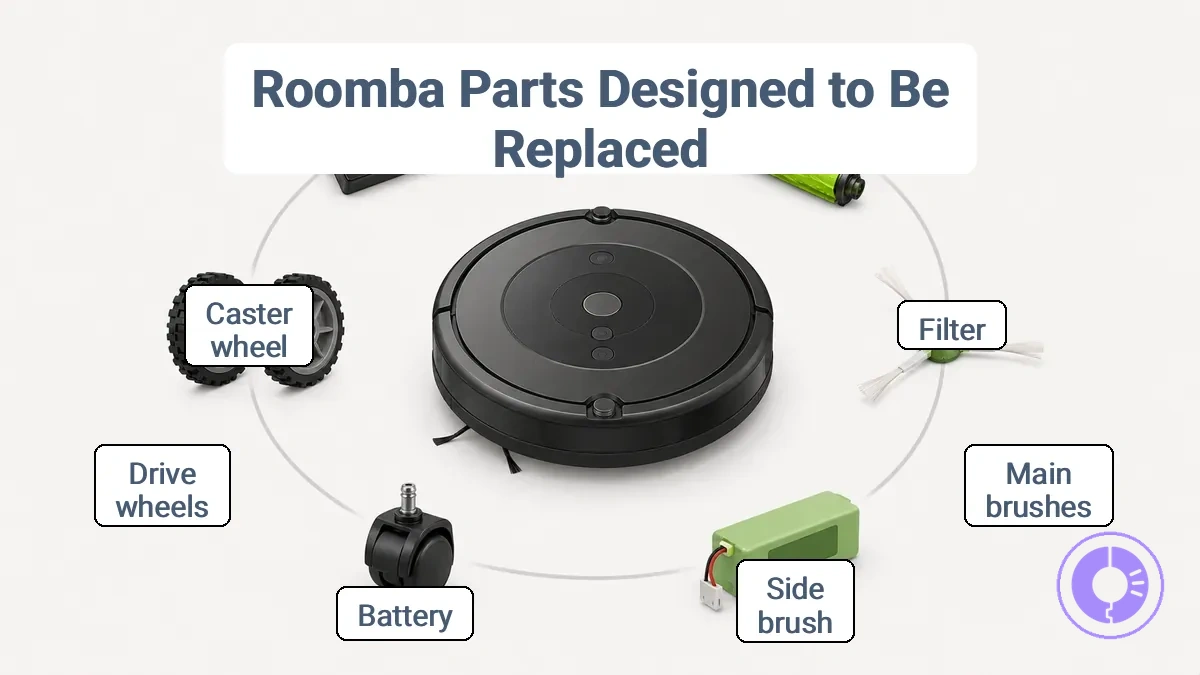
- Filter (airflow/filtration): Traps dust and fine particles; clogs over time. Symptom: reduced airflow and dust leakage. Replacing it restores filtration efficiency.
- Main brushes/rollers (pickup): Agitate and lift debris; rubber wears or bristles tangle. Symptom: loud noise or streaks on floor. Replacing them improves pickup.
- Side brush (pickup): Sweeps edges; bristles bend or break. Symptom: debris left along baseboards. Replacing it maintains edge cleaning.
- Battery (power): Stores power; capacity declines with charge cycles. Symptom: shorter runtime or robot stops mid-cycle. Replacing it restores full cleaning duration.
- Drive wheels (mobility/traction): Provide traction; tread wears or motor issues. Symptom: slipping on smooth floors or robot veers. Replacing them helps ensure stable movement.
- Caster wheel (mobility): Swivels for navigation; collects hair and debris. Symptom: robot drags or gets stuck. Replacing it restores free movement.
What counts as routine replacement vs a repair-level component
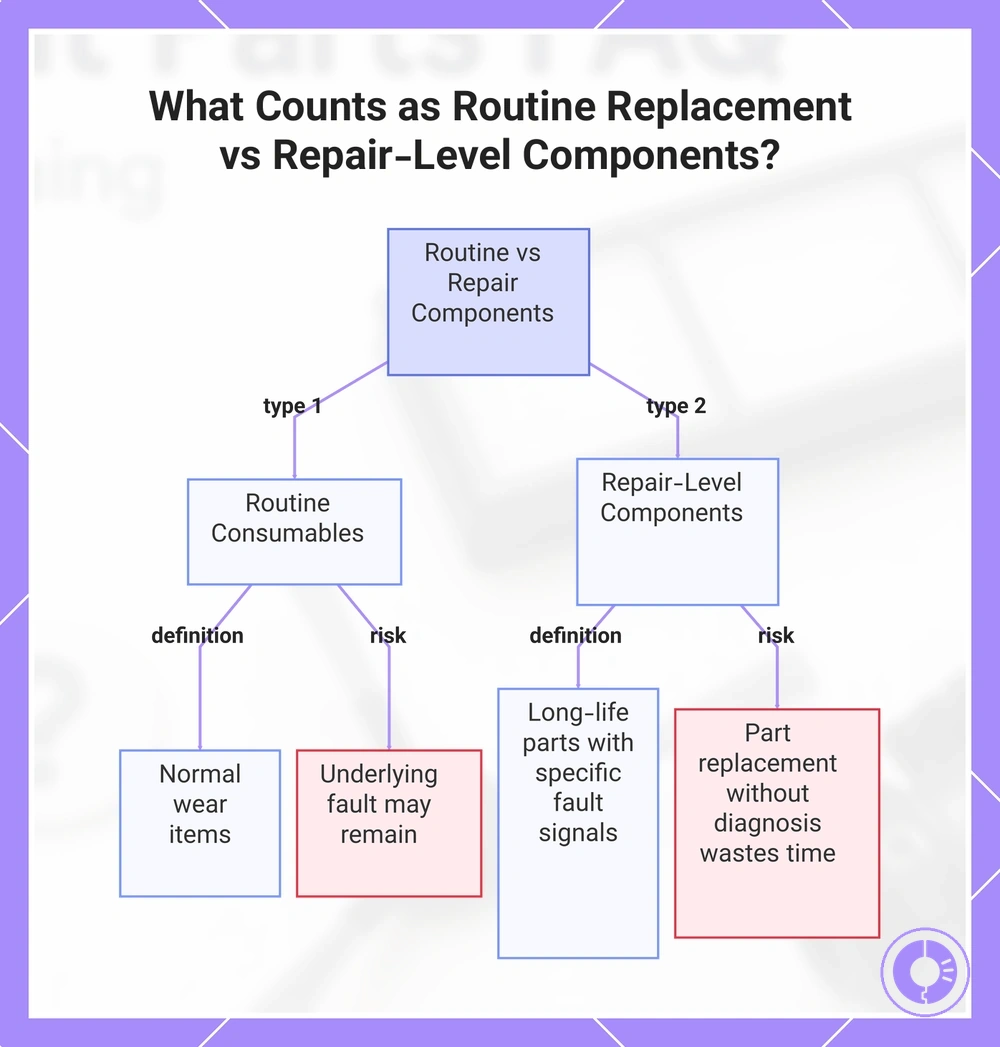
Routine replacement covers parts that wear out through normal use, while repair-level components typically need diagnosis before being swapped.
- Routine (consumable): brushes, filters, side brushes – expected to wear; replacing them when performance drops is typically safe. Risk of misdiagnosis: if the actual problem is a blocked bin or clogged suction path, new consumables alone may not help.
- Repair-level: drive module, bumper sensor, wheel motor – expected to last longer; failure often signals a specific fault. Risk: buying a new motor without checking wiring or board health can waste time and money.
- Routine (consumable): battery – gradual capacity loss is normal; a replacement can restore runtime. Risk: if charging contacts or the dock are dirty, a new battery may still charge poorly.
- Repair-level: main circuit board, speaker, IR sensor – persistent errors after cleaning suggest a board-level fault. Risk: swapping the board without verifying cleanliness or cable seating can introduce new issues.
- Routine (consumable): dust bin filter – clogs with use; periodic replacement keeps airflow steady. Risk: if the fan is weak due to a worn motor, a new filter alone may not restore suction.
If poor cleaning persists after brush replacement, the underlying cause may be a failing drive train rather than brush wear. Before buying another part, verify fit and cleanliness.
This chart shows the main differences between routine consumable parts and repair-level components, including their definitions and associated risks of misdiagnosis.
Why the same “part name” can mean different fits across Roomba series
A part name alone does not guarantee fit across Roomba series or revisions—the same label (e.g., “side brush” or “filter”) often corresponds to different physical interfaces. Confirm the exact model and series before purchasing a replacement.
Parts that look similar or are described as “universal” may still fail to seat properly. The term is a prompt for verification, not a guarantee.
- Shape: The part's outline can vary between series → the part may not seat in the housing.
- Latch: Latch location and size may differ → the part may not lock into place.
- Connector: Pin configuration on the electrical connector can change → the connection may fail or cause error.
- Mounting tolerance: Screw hole positions and spacing can shift → the part may not secure firmly.
- Revision: A newer revision modifies critical dimensions → a previously matching part may no longer fit.
Compatibility and Part Identification Questions
Compatibility for Roomba replacement parts depends on matching physical interfaces—mounting points, connector types, and internal clearances. Identifying the correct replacement starts with your Roomba model or series number, which indicates the specific shape, electrical layout, and dimensional constraints a part must meet.
A part that looks the same but differs in these interfaces may not seat properly, can cause jamming, or lead to poor pickup performance. To avoid returns and wasted effort, follow a structured verification process before ordering. For a full compatibility checklist, review the detailed steps below.
Compatibility and part identification questions often arise when ordering online; the image below highlights where to find the model/series label on your Roomba and the key fit points—such as connector shape and mounting bracket alignment—that you should compare before purchasing.
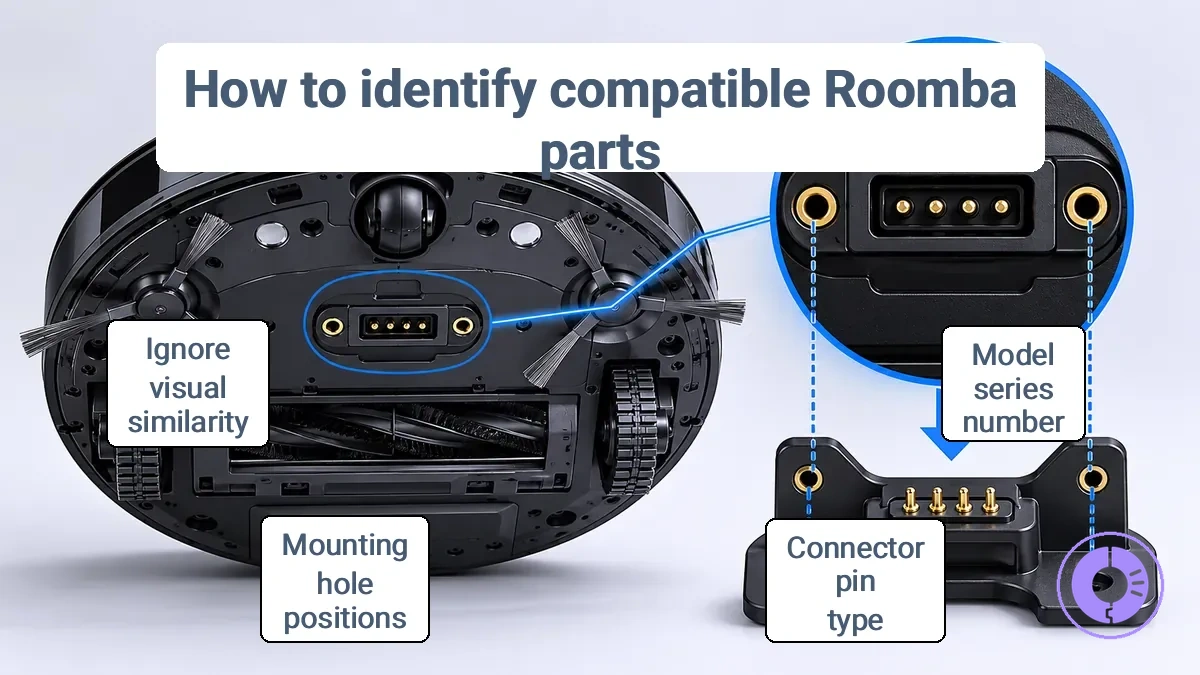
- Confirm your Roomba model or series number using the label under the robot or in the app settings.
- Verify that the part category (e.g., brush module, battery, side brush) matches the intended replacement.
- Compare the part’s overall shape and dimensions against diagrams or the original component.
- Check connector type, pin count, and orientation; a mismatched connector may not engage or could damage the board.
- Identify mounting hole positions and fastener size to confirm the part can be secured without modification.
- Review known fit constraints for your model series—some generations use slightly different gear ratios or clip designs.
- Ignore visual similarity alone; parts from different models may look nearly identical but differ in critical internal clearances.
How to confirm your Roomba model or series before buying a part
Before ordering a replacement part, confirm your Roomba model or series by checking the model number — that identifier determines which parts fit your robot.
Similar-looking parts may fit only specific models, so identifying yours correctly matters.
- Model number (underside label) — usually on a sticker near the left wheel.
- Model information (iRobot Home app) — the model name is typically displayed in the app under robot settings or about section; checking this helps confirm your series.
- Packaging or original manual — if available, the box and manual often list the exact model number and series.
When the label is missing, smudged, or inconsistent, check multiple locations (app, packaging) to cross‑verify the model before ordering any part.
Why parts that look the same can still be incompatible
Visual similarity alone does not guarantee a proper fit. Product photos can hide subtle differences in part geometry that affect how components seat together. Manufacturers may update internal dimensions without changing external appearance, so compare fit points carefully.
- A differently placed notch under the same photo: if it does not align with the housing tab, the latch won’t engage and the part won’t seat.
- A thicker latch spring despite a similar external shape: the spring can push the latch out of tolerance; rubbing against adjacent parts can cause noise.
- A slightly wider tab on a very similar replacement: the tab can prevent the latch from closing fully, which can cause a loose fit and eventual jamming.
- A tighter tolerance on the locking slot under the same visual profile: the slot must accept the mounting peg; if the peg is too large, the part won’t seat.
- A different latching angle on an outwardly identical unit: the angle must match the receiver; a mismatch can cause the latch to slip and the part to rattle loudly.
For instance, two battery covers that look the same can have a slightly different notch position: one locks into place while the other won't seat properly. Similar-looking parts are a starting point, not evidence of compatibility.
How part names and diagrams help you match the right component without guessing
Diagrams and standardized part names reduce misfit by anchoring selection to visual labels and interface points rather than marketing descriptions. Seeing the labeled location and connecting points lets you directly match the component. Confirm the series or model number after matching, as some parts have model-specific variants.
- Identify the part in the diagram using its label and shape.
- Locate its position and interface points within the diagram.
- Compare these interface points with the fit points on your actual component.
- Confirm the match by checking the part name against the diagram label and verifying series compatibility.
Replacement intervals and lifespan expectations
Replacement intervals serve as general guidance, not fixed deadlines. Watch for performance changes that signal when a part needs replacing.
Usage conditions such as pets, carpet type, and dust levels accelerate wear. Use condition triggers like reduced airflow or shorter runtime to decide when to replace parts. For the full replacement schedule, see the dedicated page.
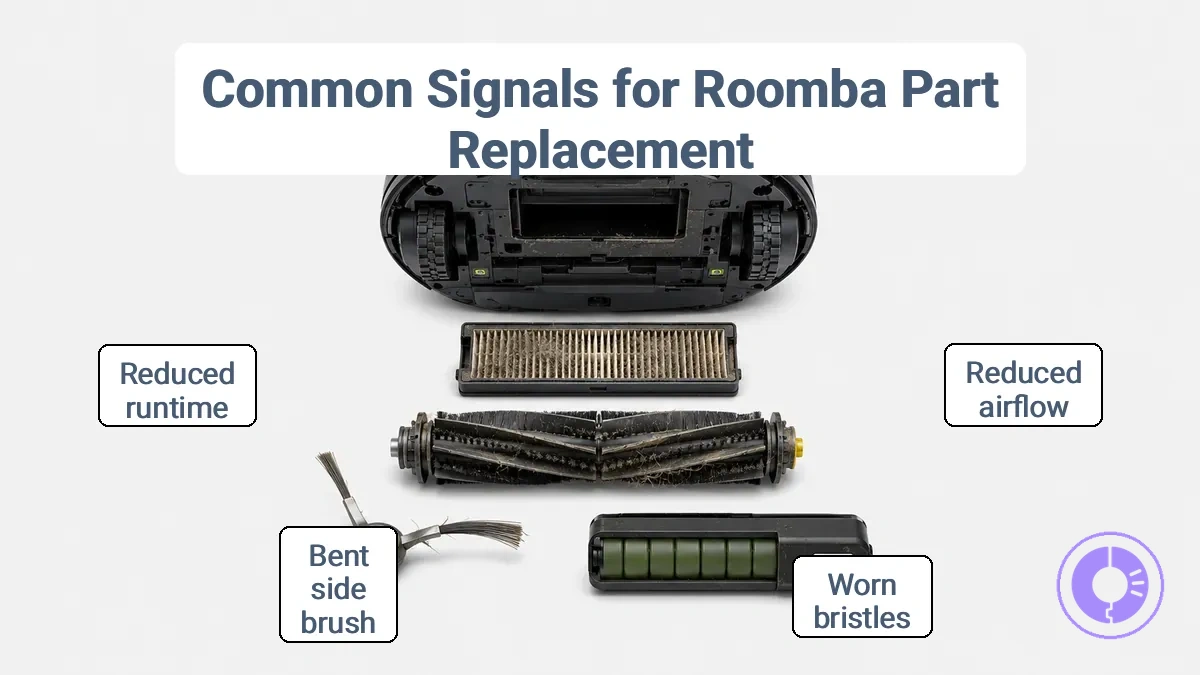
Replacement intervals and lifespan expectations are summarized in the following diagram, illustrating common wear signals that can prompt earlier replacement.
| Part type | Typical pattern | Replace when… |
|---|---|---|
| Filters | Every 1–2 months | Visibly clogged or reduced airflow |
| Main brushes | Every 4–6 months | Bristles are worn or broken |
| Side brush | Every 3–4 months | Bent or not spinning properly |
| Battery | Every 12–18 months | Runtime drops significantly |
How Often Common Roomba Parts Typically Need Replacement in Normal Use
Typical replacement intervals are a baseline, but they depend on home conditions and cleaning frequency. Reduced suction, uneven pickup, or unusual noises often mean a part is wearing out.
- Filter: Filters often need replacement every 3–4 months, more often with pets or high dust. Check for clogging if airflow drops or the bin fills quickly.
- Main brushes (rollers): Main brushes typically last 6–12 months, wearing faster with heavy pet shedding. Inspect for hair wrap or worn bristles if brushes stop turning or cleaning trails appear.
- Side brush: Side brushes need replacement every 3–6 months, sooner with pets. Check for tangled hair or bent arms if the brush stops reaching edges.
- Bag (self-emptying models): The bag typically lasts 4–6 weeks, less with heavy usage. Replace it when the robot reports a full bag or suction drops.
- Charging contacts and sensors: Charging contacts and sensors rarely need replacement; clean them first if the robot has trouble docking or navigating.
Normal use means routine cleaning with occasional debris, not extreme dust, heavy pet hair, or frequent full-bin emptying.
What makes replacement intervals shorter or longer in real homes
Home conditions influence how quickly replacement parts wear out. Floor type, debris composition, and run frequency all affect wear rates. Observing the resulting signals helps users anticipate shorter replacement intervals.
- Pets shedding hair → Brushes and rollers → Often slower rotation or clicking noises.
- Carpeted floors with dust → Filter and dustbin → Often noticeable suction loss.
- High ambient dust levels → Filter → Often reduced debris pickup.
- Daily or very frequent runs → Battery and motor → Often reduced run time over months.
- Large debris (e.g., screws, toy pieces) → Fan blades and impeller → Often vibration or grinding sounds.
- High humidity → Seals and filter → Often filter darkens or smells.
- Infrequent cleaning of components → Brushes, rollers, and filter → Often uneven wear.
For example, a home with multiple shedding dogs might require brush replacement every few months instead of annually.
When overall Roomba age changes the replacement decision
Cumulative wear, not age alone, determines whether to replace a part or the whole unit. A robot that is several years old may still perform well if its components are properly maintained. Blanket replacement based on age alone often leads to unnecessary spending.
Over time, stacked wear on multiple components can produce overlapping symptoms such as reduced cleaning coverage or shorter runtime. Worn brushes and a weakening battery often generate similar signals, making it harder to isolate the root cause. When this happens, prioritize the part that shows the clearest signs of degradation rather than replacing everything at once.
- Repeated misfitting of parts during replacement may indicate that tolerance has shifted with use.
- Persistent noise from brushes or wheels during operation can signal drag from accumulated wear.
- Consistently shorter cleaning cycles after a battery swap may point to drivetrain resistance rather than battery age alone.
- Visible deformation or looseness in brush assemblies after multiple installs suggests structural wear.
Even when age-related signals are present, each part should still be checked for fit and condition before deciding to replace.
Part-Specific Replacement Questions That Come Up Most
Common questions about replacing worn Roomba parts are answered directly with short answers.
Question: Is it compatible with my Roomba model?
Answer: Compatibility depends on your Roomba model series. Check the model number on the bottom or in the app, and verify fit by matching part specifications. If the part number does not match, the part may not function correctly.
Question: When should I replace the battery?
Answer: Replace the battery when you notice shorter run times or the Roomba stops holding a charge. Swapping to a compatible battery typically restores normal performance.
Question: When should I replace the filters?
Answer: Reduced suction or unusual noise may indicate a dirty filter. Replacement intervals vary by usage; check your model's manual for specific guidelines.
Question: What parts show symptoms of wear first?
Answer: Parts that contact surfaces directly, such as brushes and side brushes, often show wear first. Symptoms include uneven cleaning, tangles, or visible bristle damage. Replace them when cleaning performance drops noticeably.
Question: Should I replace the wheel module if the robot gets stuck?
Answer: A stuck robot may indicate a wheel module issue, but first verify the wheel is not blocked by debris. If cleaning does not resolve the symptom, check for unusual sounds or loss of traction. Then the wheel module may need replacement.
Question: What if a new part causes worse performance?
Answer: A new part that reduces performance may be installed incorrectly or be incompatible with your model. Double-check the fit and ensure all connections are secure. If the problem persists, the part may be defective or mislabeled.
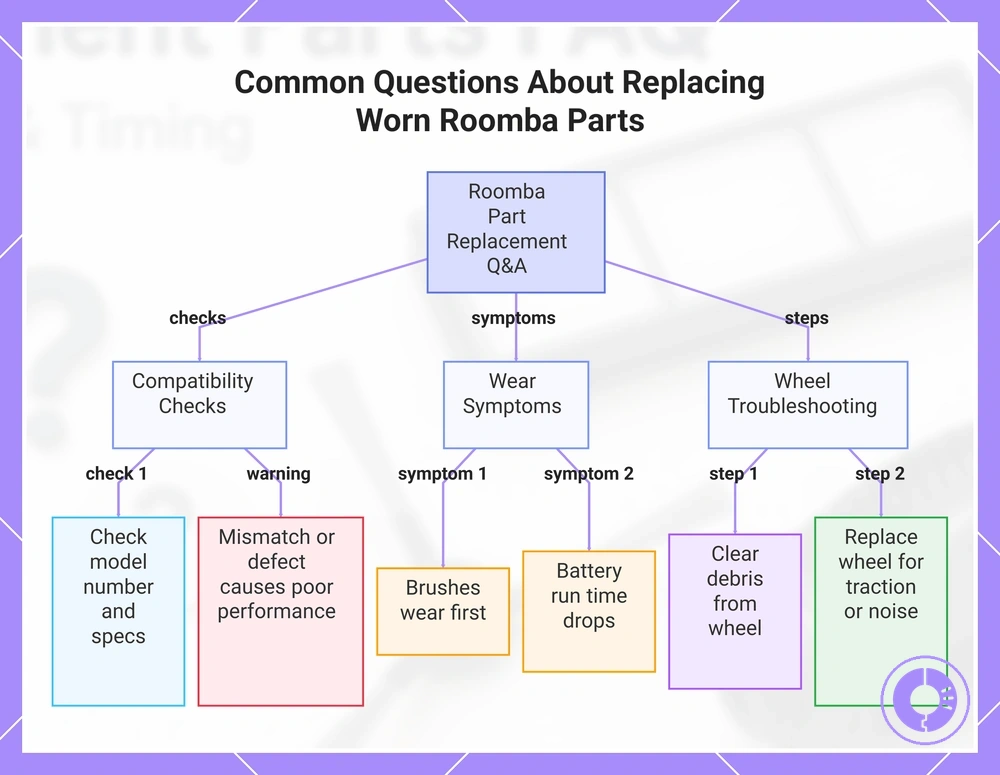
This chart answers the most common questions about replacing worn Roomba parts, covering compatibility checks, wear symptoms, and troubleshooting steps for the wheel module.
Filters and Brushes: Fit, Cleaning Effects, and Replacement Timing
When to replace filters and brushes depends on the part type, your usage, and home environment. Checking fit and condition helps you decide whether to swap them or continue using them.
Question: Can a filter that does not match the original size or shape work?
Answer: No, using a filter with the wrong fit can reduce airflow and may allow dust to bypass the system, potentially lowering suction and indoor air quality. Confirm the replacement matches the exact dimensions and mounting points of the original. Verify fit before installing.
Question: When should I replace the filter instead of cleaning it?
Answer: Replace a filter when it is visibly clogged, discolored, or no longer picks up debris after vacuuming or brushing. Disposable pleated filters may lose effectiveness after a few months of regular use. Replace now if the filter shows heavy dust buildup or damage.
Question: What effect does a clogged brush roller have on cleaning?
Answer: A roller clogged with hair, string, or debris creates noise, reduces pickup on carpets and hard floors, and often tangles more quickly. Removing tangles and cleaning the roller can restore performance, but worn bristles or deformed edges require replacement. Clean and re-check; replace if bristles are flattened or missing.
Question: Should I replace both the filter and the brush roller at the same time?
Answer: Not necessarily; filters and rollers have independent wear rates. A roller may last several months depending on surface type and pet hair levels, while a filter may need swapping sooner. Replacing both simultaneously can simplify maintenance and help maintain consistent performance. Verify fit and condition of each component before deciding.
Question: When do pet hair or high‑dust homes change replacement timing?
Answer: Homes with shedding pets or heavy dust may require more frequent filter changes and brush‑roller inspections. Tangles and dust accumulation happen faster, so visual checks every two weeks catch buildup early. Clean and re-check more often; replace if heavy buildup or noise appears.
Question: What happens if I ignore a worn brush roller and continue using it?
Answer: A worn roller loses contact with the floor, reducing cleaning performance and may scatter debris away from the suction path. It can also strain the motor and increase noise. Replace now if the roller shows uneven wear or no longer spins freely.
Battery: when replacement is likely and what to verify first
Some symptoms may point to a failing battery, but checking other possible causes first can prevent unnecessary replacements. If swelling or heat is observed, stop use and seek official support.
Signals that may indicate a battery needs replacement:
- Significantly reduced runtime between charges.
- Charging completes quickly but runtime remains short.
- Battery fails to charge despite correct dock placement.
- A sulfuric smell near the battery compartment.
Checks to run before replacing the battery:
- Clean the charging contacts on both the robot and the home base.
- Ensure the dock is placed on a level surface and not blocked.
- Verify the battery is seated correctly and connectors are not loose.
- Check for software updates that may improve charging behavior.
- Test with a compatible battery if available.
Wheels and traction modules: what usually needs replacing and why
Traction issues usually stem from worn wheel components rather than software faults, so identifying the specific symptom determines whether wheel module replacement is needed.
- Symptom: Device moves erratically or veers to one side. Likely cause: Uneven wheel tread wear or a stuck wheel module. What to check: Compare the condition of both drive wheels and rotate them to see if traction improves.
- Symptom: Wheels slip on smooth floors or fail to climb onto carpets. Likely cause: Reduced tread grip or worn drive tire material. What to check: Inspect the tread depth and rubber hardness; replace the wheel module if the tread is smooth.
- Symptom: Traction system activates randomly or makes clicking sounds. Likely cause: A failing encoder sensor inside the wheel module, often due to debris or wear. What to check: Clean the sensor window and test for consistent signal.
- Symptom: Device stops suddenly or gets stuck on small obstacles. Likely cause: A worn gear train inside the wheel module that reduces applied torque. What to check: Listen for grinding noises; if present, the wheel module likely needs replacement.
- Symptom: Warning indicator for traction appears. Likely cause: Faulty wheel module sensor or loose connection. What to check: Verify wiring harness integrity and connector seating.
Note: Debris buildup around the wheels or near the sensor can cause symptoms that mimic mechanical failure. Clean the affected area first before deciding whether to replace any components.
Rollers, latches, and small hardware: common misfit and wear points
Most reassembly misfits involving rollers and small latches result from alignment mistakes or from using parts that look identical but differ in interface geometry.
- Roller end caps: orientation mismatch with the housing slot prevents seating and may cause rattling; verify that the cap's shape aligns with the slot.
- Latch/clip: angled or incomplete engagement prevents smooth door closure; confirm the clip tab is fully seated and aligned with the strike plate.
- Roller assembly alignment: shifting during reassembly leads to grinding or creaking; center the end caps and ensure the assembly moves without force.
- Interface mismatch: shape differences between the latch tab and the end cap groove cause intermittent latching failure; check that the tab points toward the matching groove.
Because small interface differences can indicate series-specific compatibility, compare the part shape with your original before reuse.
Common Replacement Mistakes That Cause Poor Fit or Poor Performance
When a newly replaced part performs worse, the cause is often improper seat alignment, dirty housings, or mismatched interfaces rather than a defective component. Verify the part is fully seated and the housing is clean before concluding the replacement is faulty.
- Installing the side brush with too much force — can warp the brush mount or push it past the locking notch, causing scraping noise or detachment during a cycle. Correction: align the brush flat to the module and press gently until it locks.
- Seating the main roller brush in the wrong orientation — often leads to grinding noise or incomplete debris pickup because the roller can’t turn freely. Correction: match the roller cap shape to the housing channel and confirm it clicks into place.
- Inserting a filter without cleaning the filter housing — may leave the filter loose, allowing unfiltered air to pass through and triggering a false ”filter full” alert under light dust loads. Correction: wipe the housing edges and seat the filter until it sits flush.
- Replacing the dustbin without checking the bin seal alignment — can create a gap that lets debris escape, mimicking a pickup issue. Correction: ensure the rubber gasket sits evenly along the bin rim and the bin clicks into the robot.
- Mounting a new wheel module without inspecting the wheel well for debris — often causes wheel slip or stuttering movement because trapped dirt prevents proper seating. Correction: clear any buildup from the well and press the module evenly until both tabs lock.
- Snapping a cliff sensor cover without aligning the screw holes — can leave the sensor slightly raised, causing false cliff detection in normal floor transitions. Correction: align the cover flat and hand‑tighten screws in a cross pattern to distribute pressure evenly.
- Replacing the battery without verifying the contact orientation — may result in intermittent power loss or failure to charge, even with a new battery. Correction: match the battery terminal arrows to the robot’s contact tabs and push down until the release clips catch.
- Installing a new part — even a correctly fitting one — into a housing filled with debris or corrosion — often underperforms because the interface is not clean. Correction: inspect and clean the housing area before final assembly to restore original performance.
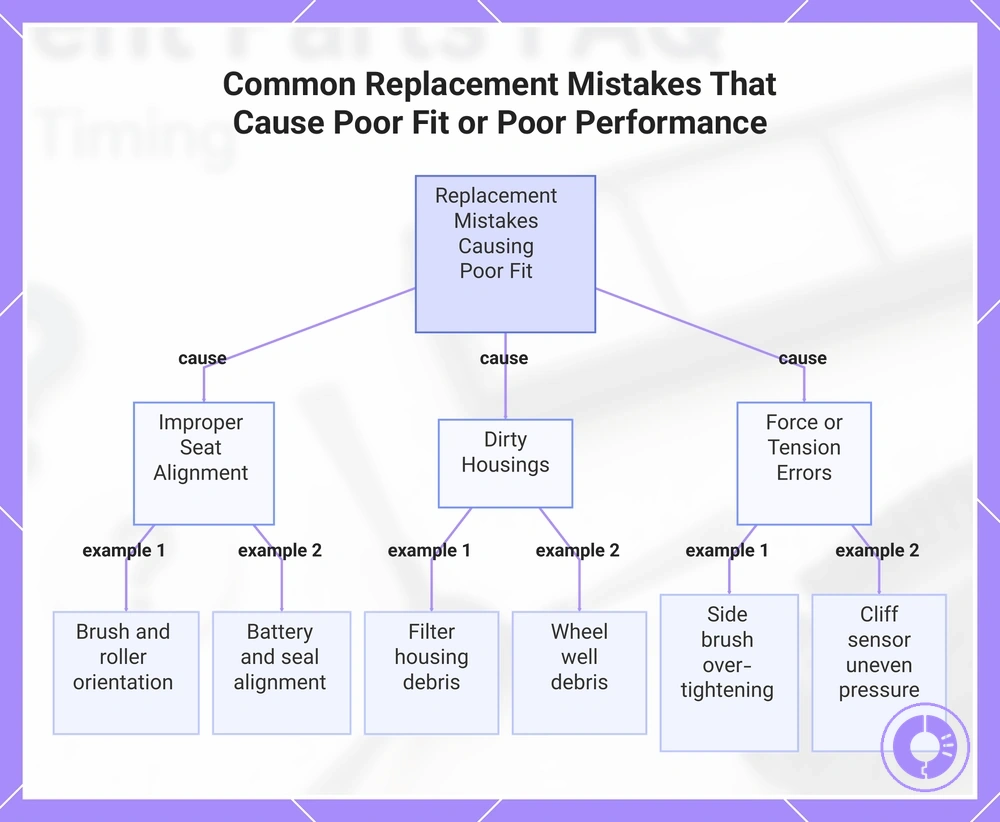
This chart categorizes replacement mistakes into three main causes: improper seat alignment, dirty housings, and force or tension errors, each with specific examples from common part replacements.
Replacing parts without cleaning housings and contact areas first
Before installing a new part, cleaning the housing and contact surfaces is often necessary because accumulated debris or residue can prevent proper seating, block airflow, or interfere with electrical connections. Cleaning these areas before installation helps promote a reliable fit and proper function.
- Contact pads: residue or oxidation on electrical contacts can cause poor conductivity or intermittent charging. Wiping them clean before installation helps maintain a consistent electrical connection.
- Filter housing: dust or debris inside the housing can obstruct airflow and reduce cooling efficiency. Removing loose material from the seating area helps preserve proper airflow.
- Mounting rails: hair or lint buildup on guide rails can prevent the part from sliding fully into place. Cleaning the rails helps ensure the replacement seats correctly.
- Vent openings: blockage in vent channels from accumulated dust can restrict airflow and cause overheating. Clearing the vents before insertion supports adequate ventilation.
- Sensor recesses: residue or film inside sensor pockets may interfere with signal accuracy. Wiping the recess clean helps the sensor read correctly.
Incorrect seating and alignment for filters, brushes, rollers, and modules
Incorrect seating and alignment of filters, brushes, rollers, or modules during installation can cause noise, drag, reduced pickup, or repeated error messages.
- Filters
- Orientation: If oriented incorrectly, the filter restricts airflow and causes dragging. Re-seat it in the correct direction until it clicks.
- Latch/click: An unlatched filter rattles and reduces suction. Re-align the frame and press until fully seated.
- Rollers
- Alignment: Misaligned rollers can cause grinding and drag. Re-align the assembly and verify free spin.
- Seating: If the roller is not fully seated, cleaning becomes uneven and pickup drops. Re-seat until it locks into place.
- Brushes
- Orientation: Wrong orientation leads to rattling and poor pickup. Re-align the end caps and make sure they are seated.
- Latch/click: A brush that is not clicked in place drags and makes noise. Re-check the fit point and press until it clicks.
- Modules
- Alignment: Misaligned modules can cause intermittent operation and error messages. Re-align and seat fully.
- Latch/click: If the module is unlatched, it rattles and loses power. Re-seat it until the latch clicks.
Forcing a part into place often suggests debris obstruction or an incompatible component.
Mixing incompatible versions of the same part type across series
Using an older spare part or a mixed kit can introduce a version mismatch that causes fit and performance problems.
- Compare the part version and revision against the original part and the series requirement.
- Match all components in a kit to the same series.
- Check for visible differences in shape or mounting points.
- Test fit without force before final assembly.
Assuming a new part fixes performance when the cause is elsewhere
Replacing a part does not always resolve performance issues. The symptom often persists when a clog, sensor, or contact problem remains unaddressed. Verify the basics before buying another part.
- For poor pickup, check for a clog in the airflow path. Clean.
- For charging issues, check the robot and dock contacts for dirt. Re-seat.
- For navigation or error symptoms, clean the sensor windows and check robot settings. Clean.
- For repeated failure after replacement, re-check compatibility between the part and your unit. Re-check fit.
- If the problem continues after these checks, consider broader diagnosis rather than another part swap. Escalate troubleshooting.
Buying Questions: Maintenance Kits, Genuine vs Third-Party, and Listing Reliability
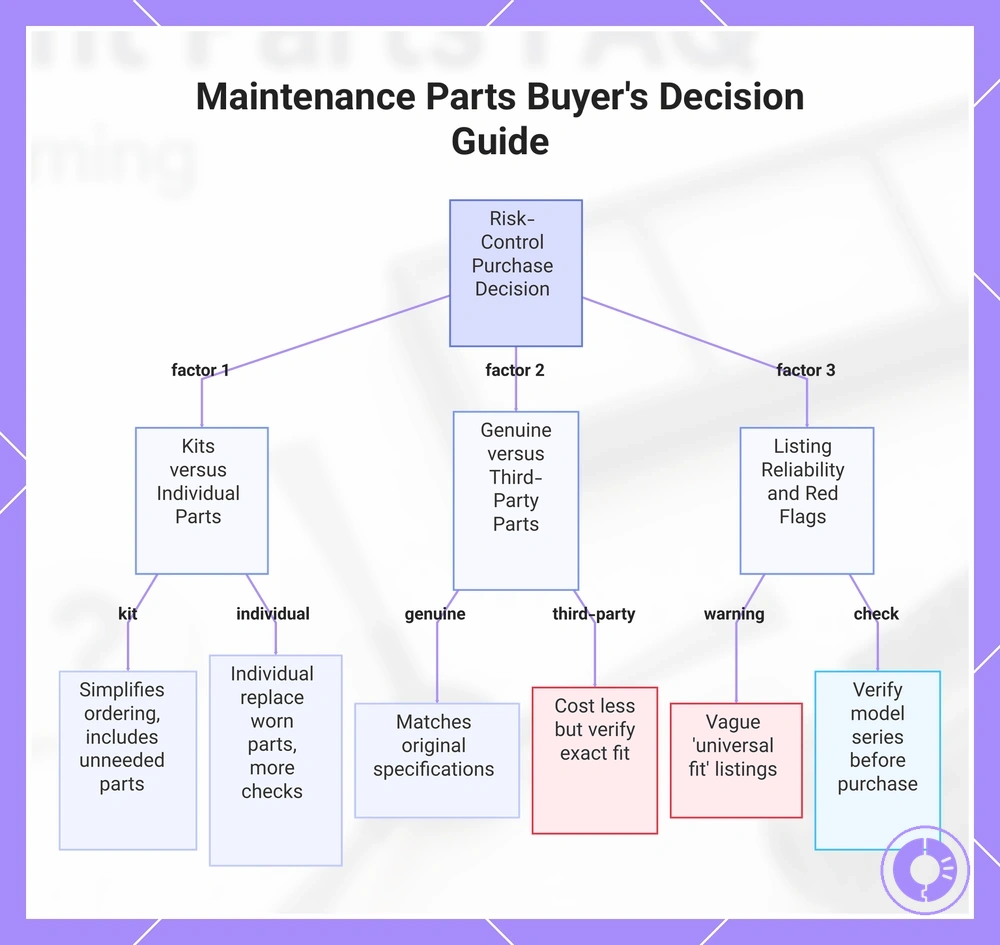
Buying replacement parts or a maintenance kit is essentially a risk-control decision: fit consistency and predictable performance matter most. Without proper verification, even a well-priced part can result in return costs or downtime, so verifying compatibility comes first.
Three factors typically define this decision: whether to buy a full kit or individual parts, whether to choose genuine or third-party components, and how to assess listing reliability.
Maintenance Kits vs. Individual Parts
- A kit bundles several wear items, simplifying ordering but possibly including parts you do not yet need.
- Buying individual parts lets you replace only the worn components, but each part requires its own fit check.
- Return risk tends to be higher with individual parts if the model or series is misidentified.
- Verify that any kit or part number explicitly matches your specific model series and revision.
Genuine vs. Third-Party Parts
- Genuine parts match the original specifications, helping maintain fit consistency across identical models.
- Third-party parts often cost less but may vary in material or dimensions, so fit verification becomes more important.
- Neither source is always longer lasting; durability depends on the specific component and how it is used.
- Verify that a third-party part lists your exact model series as a confirmed fit, not just a universal fit.
Listing Reliability and Red Flags
- A listing that uses vague terms like 'universal fit' without listing compatible model numbers is a warning sign.
- Listings with conflicting or missing part numbers increase the risk of a wrong shipment and a return.
- Prioritize sellers who provide clear fitment tables and accept returns for compatibility errors.
- Verify the model and series against the listing details before completing the purchase.
The right choice depends on fit certainty, usage intensity, and tolerance for re-ordering.
This chart shows the three key factors for deciding between maintenance kits versus individual parts, genuine versus third-party components, and assessing listing reliability to minimize return costs and downtime.
When a maintenance kit makes sense compared with buying parts individually
A maintenance kit works well when wear patterns are uniform across components, while individual parts are better for staggered wear to reduce waste and misfit risk.
Kit makes sense when:
- Uniform wear levels – replacing together prevents future issues.
- Full service – one package includes all needed parts.
- Critical fit – bundled set reduces mismatched wear and compatibility risk.
- Time constraint – kit eliminates separate shipping and planning steps.
for a deeper kit vs individual parts decision.
Individual parts make sense when:
- Single worn component – avoids unnecessary waste from full kit.
- Staggered wear – replacing each at its own interval extends component life.
- Low misfit risk – parts are standardized or compatibility known.
- Tight budgeting – spread replacement costs over time.
For example, when a single roller wears faster than other components in the same assembly, buying that part individually often avoids replacing still-functional parts unnecessarily.
What typically changes with genuine vs third-party parts in fit and lifespan
The trade-off between genuine and third-party parts typically centers on fit consistency versus lifespan variance. Genuine parts offer more predictable fit due to tighter tolerances, while third-party alternatives vary more in alignment and longevity. The genuine vs third-party guidance covers these differences in greater detail. Your choice depends on your risk tolerance and the specific component's role in the device.
| Source | Fit consistency | Lifespan variance | Consider when... |
|---|---|---|---|
| Genuine | Consistent fit; tighter tolerances | Low variance; typically low returns friction | When reliable performance and warranty preservation are priorities |
| Third-party | Varies by brand; may require verification | Moderate to high inconsistency range; verify compatibility | When cost savings are acceptable with careful selection |
For power-related components (e.g., batteries or motors), verifying fit and electrical tolerances is especially important to reduce the risk of unexpected failures.
How to Reduce Mislabeling Risk and Avoid ‘Universal Fit’ Traps
Reduce mislabeling risk by evaluating each listing’s claims against verifiable details.
- Check the compatibility claim: confirm a complete model/series list is present, as vague claims increase mismatch risk.
- Compare photos to your device’s connector/shape and verify an exact match to avoid generic listings.
- Confirm the return policy includes a clear return window; listings without one increase risk.
- Check the dimensions: ensure exact measurements are provided, as universal listings often omit them.
- Check the material and finish by verifying they match your device’s specifications; mismatched materials signal a universal-fit claim.
- Check the number and dimensions of slots or compartments by verifying depth and width are specified to avoid mismatch.
- Check that the listing specifies support for your device’s connector type; listings with only one type increase damage risk.
- Check bundled listings by verifying each item’s specifications individually; bundles often claim universal fit but may include mismatched components.
When it’s not a replacement-part problem
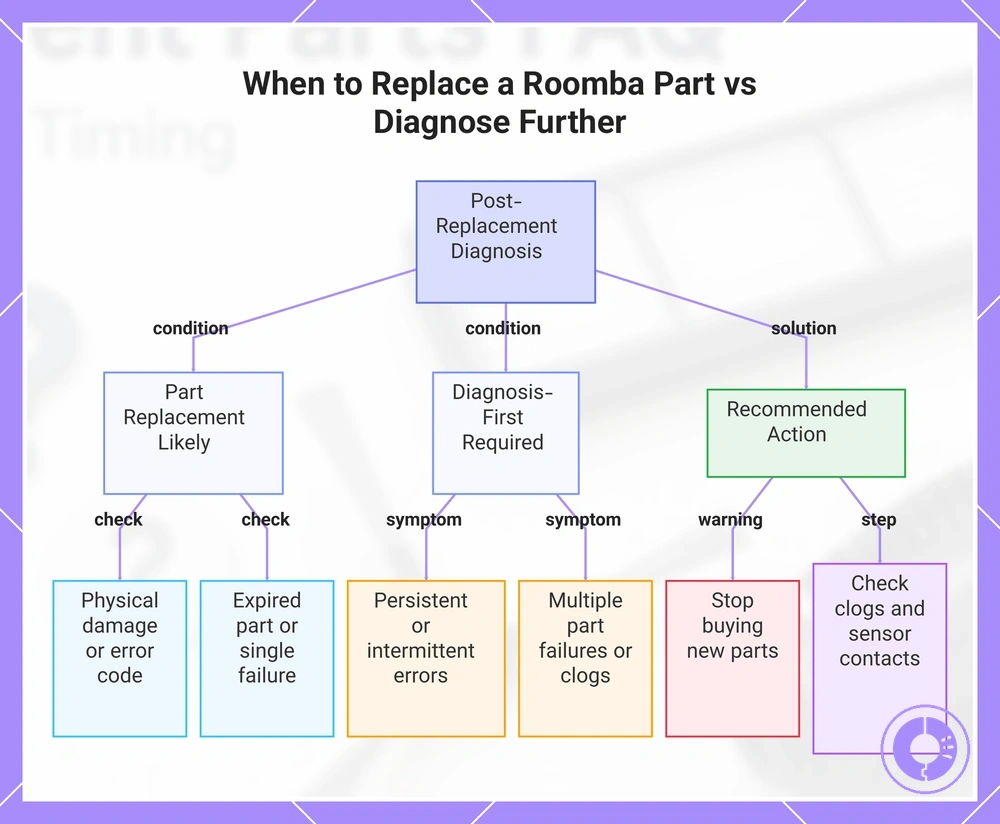
When a Roomba still shows the same error after a new part, the cause is often an underlying issue elsewhere in the system. Diagnosis-first checks can save time and money.
The pattern of symptoms determines whether to replace a part or perform a deeper check. Use the checklist to separate situations where a part swap is likely to work from those where targeted troubleshooting is needed first.
Part-likely signals
- Visible cracks, leaks, or worn belts on the old part
- Error code that points to a known defective component
- Part has exceeded its expected lifespan
- Single, consistent failure without prior similar errors
Diagnosis-first signals
- Persistent errors that return immediately after replacement, or repeat failures of the same part within a short period
- Intermittent problems that appear and disappear
- Multiple different parts failing in sequence
- Settings or programming irregularities that affect behavior
- Clogged filters, blocked sensors, or dirty contacts found during inspection
When symptoms point to a non-part cause, stop buying new components. Verify basics like clogs, sensor contacts, and system settings. Persistent errors usually require targeted checks, not random swaps.
This chart shows how to decide whether to replace a part or perform deeper checks based on symptom patterns after a Roomba error.
If cleaning performance drops, what to verify before ordering replacements
When cleaning performance drops, rule out simple causes before buying parts.
Check these items in priority order, then decide whether to clean or replace.
- Check the bin and filter for clogs. A full bin or a clogged filter restricts airflow and can cause poor pickup. Decision: Clean bin and tap or rinse filter; replace filter if it remains blocked after cleaning.
- Inspect the rollers for tangles and debris. Hair and string wrapped around the rollers can stall rotation and create noise. Decision: Remove tangles; replace rollers if the rubber surface is worn or torn.
- Verify the filter is seated correctly. A loose or improperly installed filter lets debris bypass the suction path. Decision: Reseat the filter until it clicks or fits flush.
- Look for blockages in the dustbin airway or the robot’s suction inlet. Small objects or compacted dust can obstruct the path. Decision: Clean the blockage; if stuck, consider replacement.
- Clean the cliff and wall sensors. Dust on sensors can cause the robot to avoid areas or misjudge surfaces. Decision: Wipe sensors with a dry cloth; replace only if the sensor is physically damaged.
- Check the side brush for tangles or bending. A tangled or bent side brush can reduce edge cleaning. Decision: Remove debris; replace the brush if bristles are permanently bent or broken.
In homes with high pet hair or long hair, check the rollers and filter first, as they often clog faster and can mimic a motor or battery problem. For deeper symptom-led troubleshooting, see troubleshooting for poor cleaning.
If it won’t charge, which checks come before replacing a battery or dock-related part
When your Roomba is not charging, check basic causes before replacing the battery or dock. Always use a compatible battery and avoid forcing connectors.
- Inspect the charging contacts on both the robot and the dock for dirt, debris, or corrosion; clean them gently if needed.
- Check that the dock is placed on a hard, level surface with sufficient clearance on all sides.
- Ensure the robot’s charging pads align correctly with the dock contacts when docking.
- Verify that the battery is firmly seated and its connector is fully inserted without forcing.
- Confirm the battery model is compatible with your Roomba version.
- Observe whether the robot’s charging indicator responds when placed on the dock.
For targeted charging troubleshooting, see troubleshooting for charging.
How Error Codes Change the Replacement Decision Without Trial-and-Error
An error code points to a general system area rather than a specific failed part, so prioritize verification over guesswork. Verify first.
- Cleaning path error → brush assembly or debris path → check for obstructions and confirm brush spin.
- Mobility error → wheel module or cliff sensors → test wheel rotation and clean sensor lenses.
- Charging error → battery or charging contacts → verify contact alignment and battery voltage.
- Navigation error → bumper or optical sensor → press bumper and clean sensor windows.
- Power error → main board or battery connection → reseat cables and test with a known good battery.
The same error appearing again after replacement may indicate a misfit, installation error, or a root issue unrelated to the part itself.