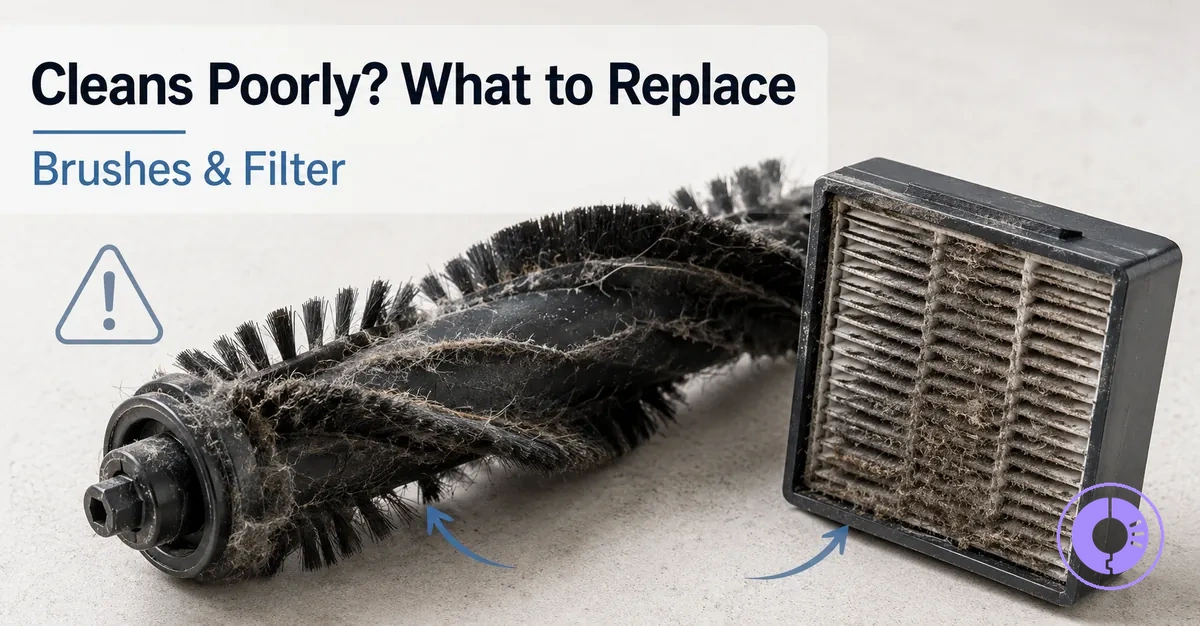
Roomba Cleans Poorly: Which Replacement Parts to Check and Replace First
Roomba cleans poorly when specific replacement parts are worn and affect debris pickup. Diagnose the problem by identifying the symptom and matching it to the right part family.
- How to classify poor cleaning symptoms
- Which low-risk checks to run before replacing parts
- How to match symptoms to part families such as filters, brushes, and the cleaning head module
- When to consider replacement based on model, floor type, and wear levels
- Links to detailed replacement instructions
Many users assume a full disassembly or multiple part replacements are needed, but in many cases effective troubleshooting starts with a single check and replace. A common method is to diagnose the symptom first, run simple checks like emptying the bin and cleaning the filter, and then replace only the part family that matches the symptom. This approach can save time and help avoid unnecessary purchases. The Roomba replacement parts hub provides a complete overview of all compatible components.
When the Roomba leaves visible debris on hard floors but collects well on carpet, the issue often lies in the brush roll or end caps. Similarly, reduced suction points to a clogged filter or full bin.
Replacement parts that commonly affect cleaning performance are covered here. General cleaning tips and detailed step-by-step replacement procedures are available on linked pages.
What “cleans poorly” usually means in Roomba cleaning performance
When a Roomba cleans poorly, you may see visible debris left behind on the floor, weak pickup on hard surfaces or carpets, or areas the vacuum does not reach. These outcomes are not random—they cluster into a few repeatable patterns. Rather than guessing what is wrong, it helps to label your symptom first.
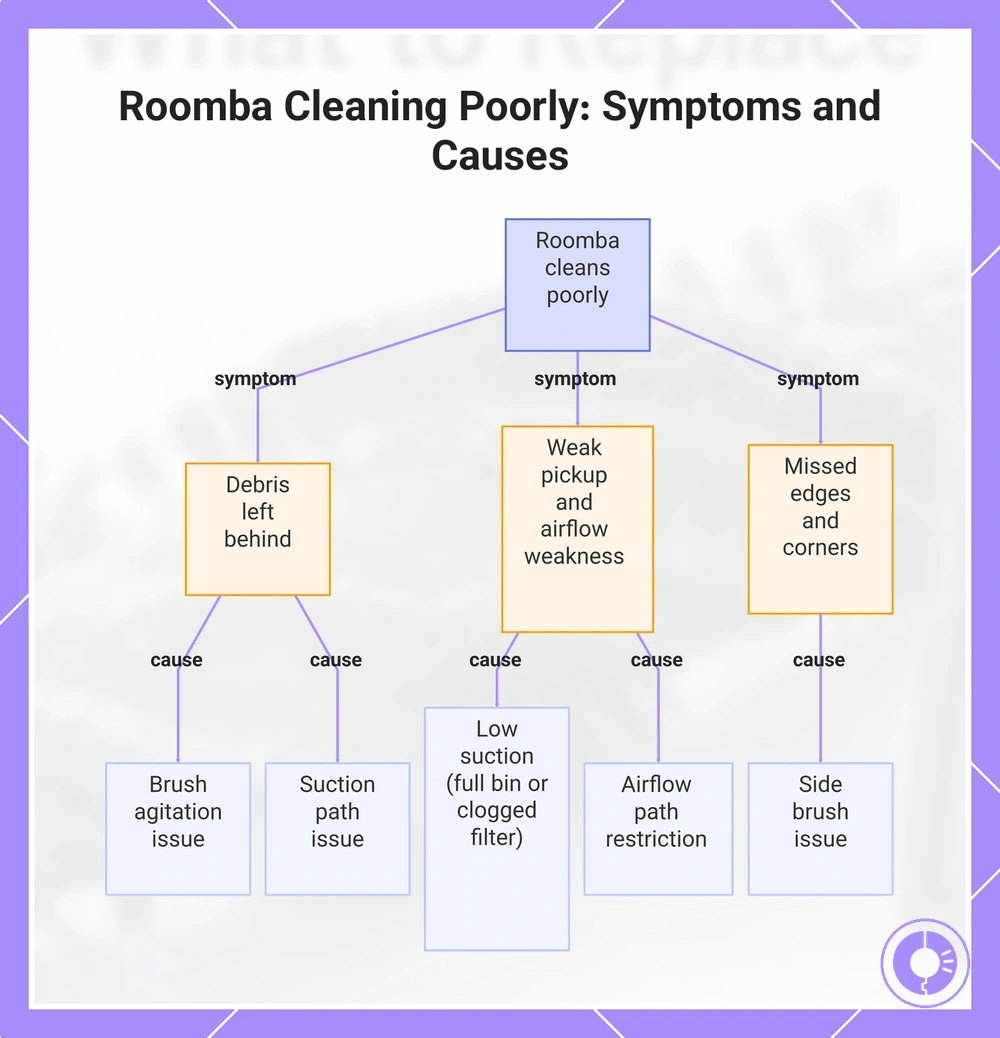
The main symptom groups are debris left behind, weak pickup, airflow-like weakness, and missed edges or corners. Debris left behind often points to issues with brush agitation or suction path. Weak pickup may indicate low suction from a full bin or clogged filter. Airflow-like weakness—where the vacuum sounds normal but picks up little—suggests a restriction in the airflow path. Missed edges and corners typically involve the side brush.
A common assumption is that poor cleaning means a failing battery or motor. In reality, the same outcome can come from airflow or agitation problems. Understanding this split—pickup versus suction versus coverage—helps narrow down the actual cause.
- Debris left behind after a cleaning cycle
- Weak pickup on hard floors or carpet, especially visible on carpet
- Airflow-like weakness: the vacuum runs but picks up little debris
- Edges and corners that are consistently missed
This chart shows the main symptom groups when a Roomba cleans poorly and the likely causes behind each symptom.
Pickup vs Suction vs Coverage Symptoms That Change Which Part Is Likely at Fault
You can use pickup, suction, and coverage as symptom labels to narrow down which part group might be at fault.
Pickup vs suction vs coverage symptoms differ by the part family each points to. The image below clarifies which part family to check first.
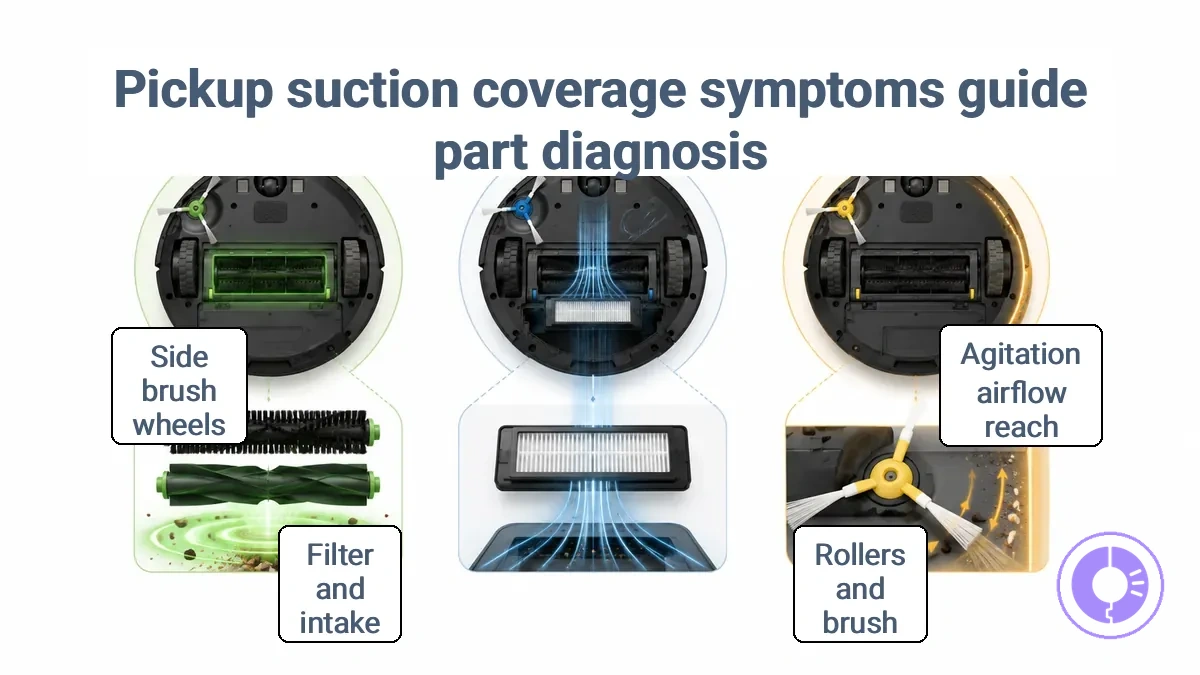
The table below pairs each symptom label with its limiting attribute and the first part family to check.
| Symptom label | Limiting attribute | First part family to check | What you may see |
|---|---|---|---|
| Pickup | Agitation | Rollers and brush | Debris left behind on carpets or hard floors |
| Suction | Airflow | Filter and intake path | Reduced dust collection, quieter operation |
| Coverage | Reach | Side brush and drive wheels | Missed corners or uneven cleaning patterns |
Do these checks before moving to replacement parts.
Checks that prevent unnecessary replacement when cleaning performance drops
When cleaning performance drops, a few fast checks can prevent unnecessary replacement by ruling out common blockages or misalignment instead of worn parts. Start with the fastest checks.
These checks that prevent unnecessary replacement focus on confirmation signals you can see without tools. The image labels the most common check points: bin seating, visible clogs, and brush tangles.
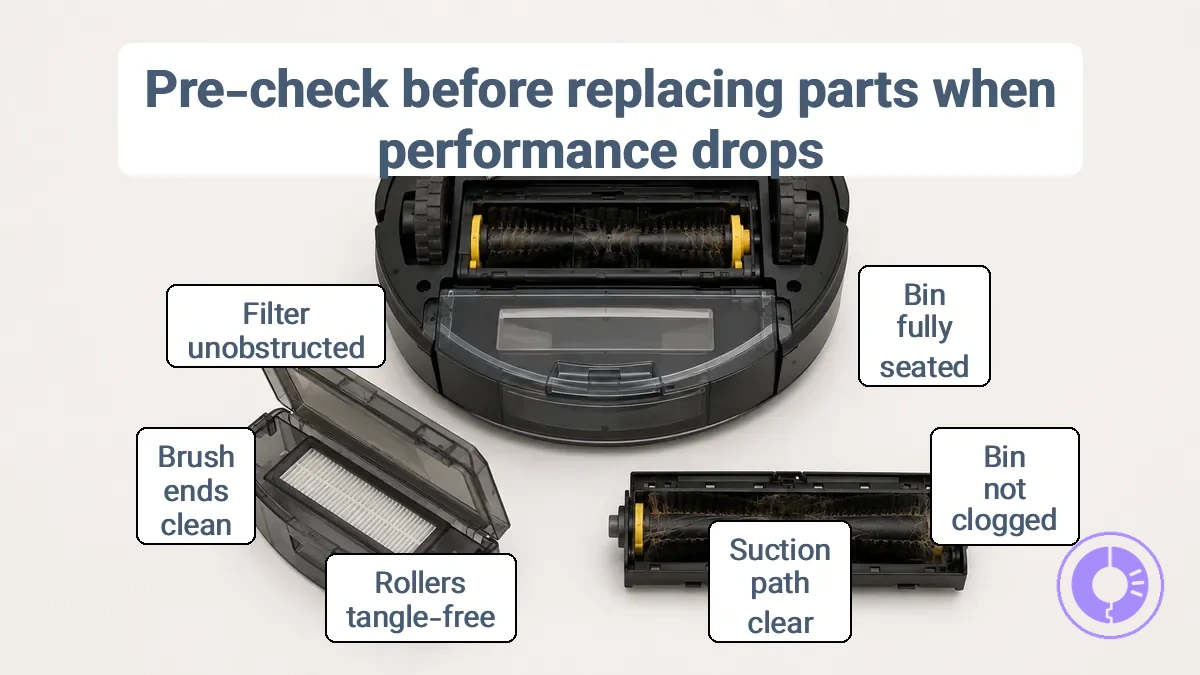
- Check the bin seating. If the bin is not fully clicked into place, airflow drops and pickup suffers. You should hear a firm click and see no gap between the bin and the robot body. A properly seated bin means the suction path is sealed.
- Check the bin for clogs. A full or blocked bin reduces suction. You should see an empty bin and clear airflow through the inlet. A clean bin confirms the suction path is open.
- Check the suction path for blockages. A clog in the short channel between the bin and the rollers stops debris from reaching the bin. You should see no obstruction when you look into the opening. A clear path means airflow is not restricted.
- Check the rollers for tangles. Hair or string wrapped around the rollers can stop them from turning freely. You should see clean rollers that spin without resistance. Free-spinning rollers mean pickup is not blocked by tangles.
- Check the brush ends for tangles. Tangles at the end caps can prevent the brush from spinning. You should see no wrapped material around the end caps. Clean ends confirm the brush can rotate fully.
- Check the filter for clogs. A clogged filter restricts airflow through the bin. You should see a filter that is not packed with dust. A clean filter means the system can maintain proper suction.
If every check is negative — bin seated, no clogs, no tangles — do not replace parts yet. The symptom may come from a different cause that needs further diagnosis.
Bin Fill Level, Clogs, and Seating Issues That Mimic Low Suction
Airflow-path issues—like a full bin, a blockage in the hose or inlet, or a poor seal at the bin or dust bag—can produce weak pickup that feels like low suction. These issues are typically not a sign of a failed motor or internal component, so checking the airflow path and clearing any clogs often restores performance. Check the airflow path first.
Look for these signs to tell whether the issue is a clog or a poor seal:
- Weak suction with no abnormal noise often points to a clog in the hose, wand, or bin inlet.
- A full bin or bag restricts airflow; emptying it often restores suction.
- A hissing or leaking sound around the bin or bag compartment suggests a loose seal or seating issue.
- When suction improves after detaching the hose and testing it directly, the blockage is likely in the attachments.
- Persistent weak suction after clearing all clogs and reseating the bin may indicate a damaged seal.
When weak pickup persists after these checks, the cause may lie outside the airflow path, and further troubleshooting is needed.
Brush and roller cleaning checks that mimic poor pickup and agitation loss
Hair and debris wrapped around brushes and rollers can mimic poor pickup and agitation loss even when the motor and suction path are clear. Checking for visible restrictions and limited movement helps distinguish between a cleaning need and a worn component.
- Look for hair tightly wrapped around the roller. That reduces agitation and prevents proper floor contact.
- Check the end caps for accumulated debris or hair. Blockage at the ends restricts roller rotation and can mimic motor or belt issues.
- Look for debris packed between bristles on the brush roll. That limits bristle flexibility and reduces carpet pickup.
- Spin the roller by hand to feel for resistance. Restricted movement often means buildup needs removal.
- Examine the roller for worn or flattened bristles. That signals wear, not a cleaning issue, so cleaning will not restore performance.
- Check for debris buildup under the roller housing near the suction inlet. That restricts roller rotation and reduces pickup.
- Observe whether the roller moves freely when the vacuum is on. Limited or no movement often points to a tangle or obstruction, not motor failure.
If pickup remains poor after cleaning, worn bristles or rollers are the likely cause—not residual debris.
Low suction and poor pickup: diagnosing which replacement part restores cleaning
Low suction or poor pickup comes from either an airflow restriction or an agitation failure. Diagnosing the right part starts with identifying which cause is present. The decision map helps match your symptom to the most likely part family.
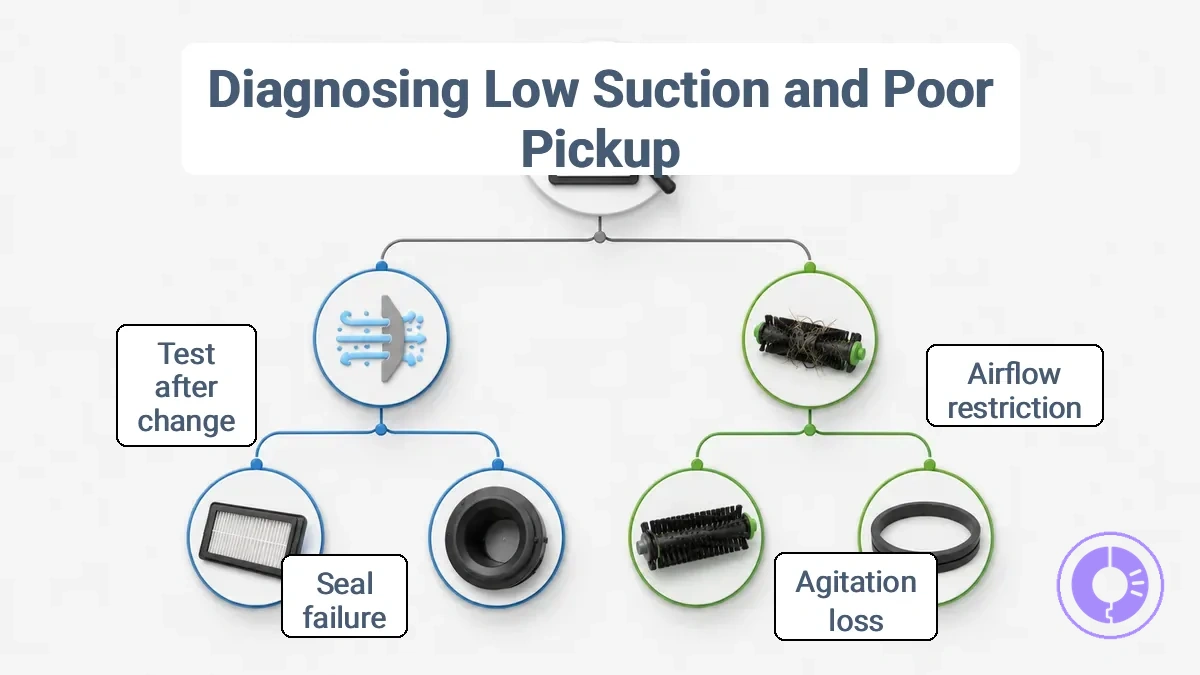
The diagnostic table matches your persistent symptom to a limiting attribute, first check, and most likely replacement part family. Choose one part family based on your vacuum's behavior, not on guesswork.
| Persistent symptom | Likely limiting attribute | First check | Most likely replacement part family |
|---|---|---|---|
| Low suction, weak airflow at the nozzle | Airflow restriction | Inspect the dustbin, bag, and filter for clogs or saturation | Filter (foam, HEPA, or pre-motor) |
| Poor pickup on carpets, debris left behind | Agitation loss | Examine the brush roll for hair tangles or a worn belt | Rollers (brush roll, beater bar) |
| Intermittent suction, whistling sound | Air leak or seal failure | Check hose connections, bin lid, and gaskets for cracks or gaps | Seals (gaskets, hose cuffs, bin lid seal) |
A common mistake is assuming that replacing the filter fixes all suction problems. If the brush roll is jammed or the belt is stretched, a new filter alone may not restore pickup. Similarly, replacing rollers may not solve a clogged filter or a cracked seal. Stick to one part family at a time and test after each change to avoid unnecessary replacements.
Filter wear, clogging, and fit problems that point to replacement
Filter replacement is typically needed when cleaning no longer restores normal airflow. Look for these signals:
- Persistent clogging: Weak airflow from the filter area. What it usually affects: Lowers suction power and can leave more dust behind.
- Worn filter media: Visible holes or thinning areas. What it usually affects: Allows dust to bypass and reduces filtration effectiveness.
- Improper fit: Gaps between filter and housing. What it usually affects: Creates bypass channels that let unfiltered air circulate.
- Odor after cleaning: Musty or dusty smell when the robot runs. What it usually affects: Indicates trapped debris or buildup; reduces airflow and performance.
- Buildup that resists cleaning: Filter remains dirty after tapping or rinsing. What it usually affects: Media is saturated and no longer captures dust effectively.
Clogging, wear, and improper fit each reduce airflow, lowering suction and leaving dust behind. The guide on filters that affect pickup performance explains how to choose the right one.
Filters that look similar may not fit correctly; shape and dimensions must match your model. Check fit before ordering to ensure it seats properly.
Roller and Brush Wear Patterns That Reduce Pickup and Carpet Agitation
Common wear patterns that reduce pickup and agitation include bristle deformation, flattened brush strips, and uneven roller surfaces—these are the patterns that matter.
- Bent or missing bristles – can reduce contact area and agitation force.
- Flattened brush strips – may not lift embedded debris effectively.
- Worn roller ends – can cause uneven contact across the cleaning path.
- Visible deformation on brush surface – can lead to inconsistent pickup on rugs.
This is especially relevant on low-pile or synthetic rugs where firm contact is needed. Replacing worn parts with brushes and rollers that restore cleaning is a practical step to improve agitation on rugs.
A brush or roller that looks intact can still have worn bristles or surface deformation that can limit pickup. Replacing such parts is the practical next step, though the correct type depends on your Roomba series and cleaning frequency.
Air leaks and sealing wear: bin seals, doors, and gaskets that reduce suction at the floor
Air leaks at the bin seal, door gasket, or bin interface can weaken floor suction even when filters and rollers are clean, as airflow escapes before reaching the floor. Look for fit cues to identify where air is leaking.
When the filter and rollers are in good condition but suction remains weak, inspect the sealing interfaces. Common cues include:
- Loose bin seating: allows air to bypass the seal, reducing suction at the brush roll.
- Warped bin door gasket: creates a gap that leaks air, lowering overall airflow.
- Cracked or missing bin seal: allows air to escape, weakening floor pickup.
- Misaligned dustbin: prevents proper contact with the gasket, causing airflow loss.
- Debris caught between bin and gasket: breaks the seal, allowing air leaks that reduce suction.
Myth: A new filter and clean rollers are sufficient to restore full suction. Truth: Suction can remain weak until bin or door seals are properly seated or replaced. First, reseat and clean the sealing surfaces; if suction does not improve, the gasket or bin assembly may need replacement after confirming a fit issue.
Edges and corners still dirty: when side brush replacement is the likely fix
When edges and corners stay dirty while the rest of the floor is clean, the side brush is often the likely cause.
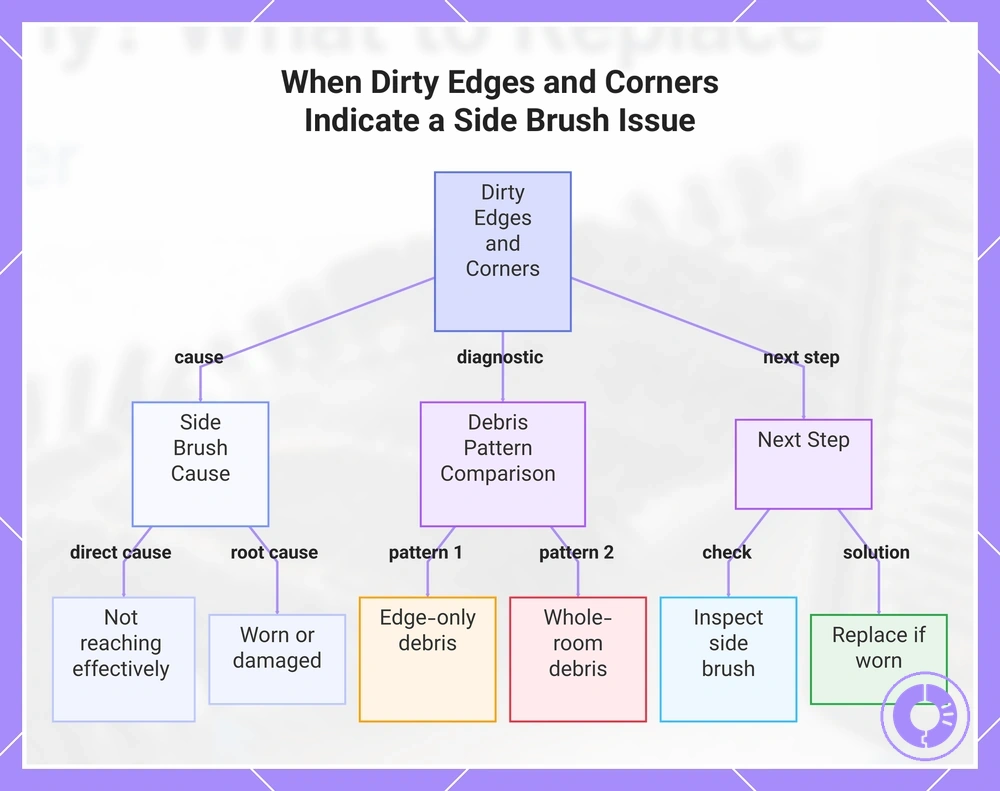
Edges and corners still dirty? Compare the debris pattern:
- Edge-only debris: A clean main area with a debris line along walls and in corners suggests the side brush is not reaching effectively.
- Whole-room debris: Dirt scattered across the floor points to a different issue, such as weak suction or a full bin.
Dirty corners are often mistaken for a coverage problem, but edge-only debris indicates a diminished side brush is the more direct cause. This observation leads to the next step: inspect the side brush for wear or damage.
This chart shows how to diagnose dirty edges and corners by comparing debris patterns and identifying the side brush as the likely cause.
Side brush deformation, missing bristles, and looseness as replacement triggers
Side brush deformation, missing bristles, and looseness reduce edge reach, leaving debris along walls and corners.
Look for these signs and what they change at edges.
- Bent or curled bristles – reduce effective reach along baseboards and in corners.
- Missing bristles – create gaps in the sweep path, leaving debris near walls.
- Loose side brush (wobble) – prevents consistent contact at the floor-wall junction.
- Bristles that no longer straighten after cleaning – permanent deformation that limits edge contact.
- Brush spins but bristles do not touch the corner – reach lost due to advanced wear or looseness.
If edges are the only problem, check fit first, then replace the side brush if needed.
When performance keeps declining: replacement timing signals vs one-off issues
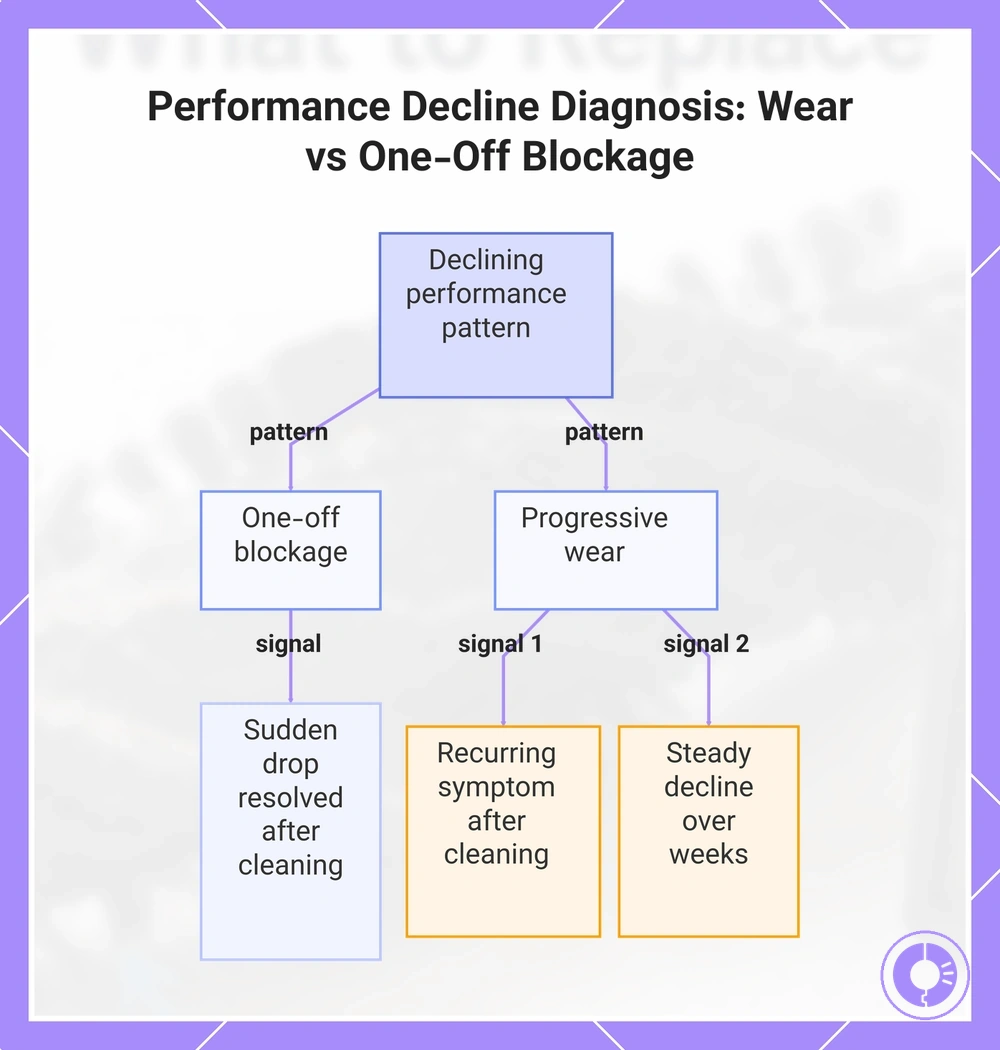
A sudden drop in cleaning performance is not the same as a gradual decline. To tell them apart, look at the pattern.
If the robot cleans well for a while after clearing a visible blockage but then returns to poor performance shortly after, the symptom may be recurring. A gradual decline that worsens over weeks or months, even after cleaning, points to wear rather than a one-off blockage. When you find yourself intervening more often to keep results acceptable, the underlying cause is likely progressive component wear.
When a symptom recurs after cleaning and poor performance persists, the part is probably worn and needs replacement rather than another manual fix. The key signals to watch for include:
- Performance drops again shortly after a thorough cleaning.
- Cleaning results worsen steadily over time, not suddenly.
- You need to clear blockages or reset parts more frequently than before.
- Poor performance persists despite repeated cleaning attempts.
- Manual intervention becomes a regular routine instead of a rare event.
This chart helps identify whether a robot vacuum's declining cleaning performance is caused by progressive wear or a one-off blockage based on symptom patterns.
Symptoms that usually mean the part is overdue rather than temporarily blocked
When a repeated symptom persists after cleaning, the part may be overdue rather than temporarily blocked. The checklist below helps distinguish a temporary blockage from a part that needs replacement.
To decide between a blockage and a part that needs replacement, check the criteria below; reviewing replacement intervals that prevent performance drop can help you plan ahead.
- Symptom: Repeated navigation errors after cleaning wheels. What you already tried: Removed hair and debris from wheel modules. What it suggests: The wheel motor or encoder may be overdue for replacement.
- Symptom: Recurring brush motor noise after brush removal. What you already tried: Cleaned the brush and end cap. What it suggests: The brush module bearings may be overdue for replacement.
- Symptom: Sustained battery drain after cleaning contacts. What you already tried: Wiped battery terminals and charging contacts. What it suggests: The battery or charging circuit may be overdue for replacement.
- Symptom: Persistent error codes after filter cleaning. What you already tried: Cleaned the filter and checked airflow. What it suggests: The filter or fan unit may be overdue for replacement.
- Symptom: Unchanged pick-up performance after emptying bin and cleaning sensors. What you already tried: Emptied the bin, cleaned cliff and dust sensors. What it suggests: The suction motor or seal may be overdue for replacement.
- Symptom: Recurring suction loss after clearing debris path. What you already tried: Removed blockages from the dustbin and tube. What it suggests: The impeller or filter gasket may be overdue for replacement.
Intervals vary by usage; use a schedule as a planning guide, not a rigid rule.
Choosing the correct replacement part without misfit risk
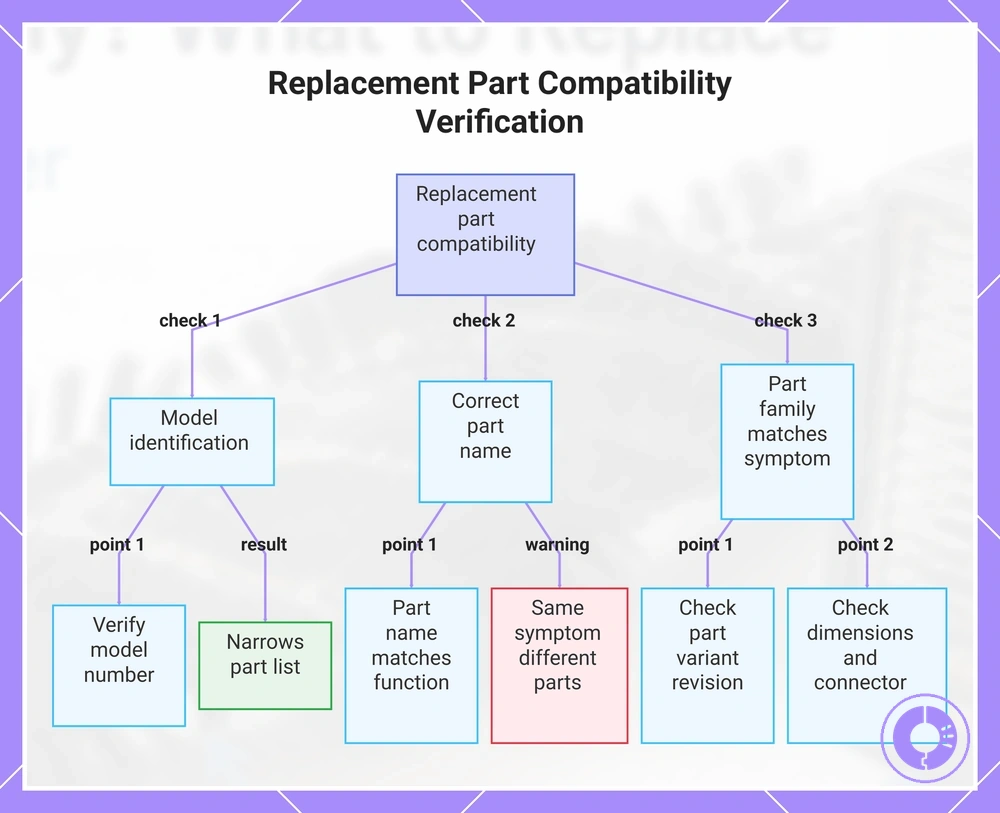
Before ordering a replacement part, confirm three things: the device's model identification, the correct part name, and whether the part family matches the observed symptom. Verify before ordering.
Use this verification checklist to confirm compatibility before purchase:
- Verify the model number on your appliance: This narrows the part list to those designed for that specific unit, preventing a size or interface mismatch.
- Verify the part number on the old component: Cross-referencing the official part number avoids getting a visually similar but wrong part.
- Verify the part name matches the needed function: A component named differently often has a different role; confirm the name corresponds to the symptom you are addressing.
- Verify dimensions and connector type against the worn part: Measuring length, width, hole spacing, and connector shape confirms mechanical fit and prevents misfit.
- Verify the part variant (revision or generation): Many appliances have multiple revisions; selecting the correct variant prevents assembly issues.
- Use a diagram when unsure: An exploded parts diagram confirms where the part fits and how it installs, reducing misfit risk before buying.
The same symptom can come from different parts; confirm the part name. A cleaning issue may be caused by a worn brush, a faulty motor, or a blocked sensor. Confirming the part name prevents replacing the wrong part.
This chart outlines the three essential verification steps to select a correct replacement part and avoid misfit risk.
Confirming Model and Part Identification Before Ordering
Model and part identification begins with the Roomba model or series label. The model number is typically printed on the underside of the robot or in the iRobot app. Use these identifiers to narrow down compatible replacement parts before searching.
Different Roomba series use different part shapes and attachment points, so compatibility depends on the interface between the replacement component and the robot's housing or chassis. To avoid ordering a misfit, use a parts diagram to pinpoint the component.
To confirm compatibility, verify the following details:
- Roomba model or series label (e.g., i7, j7, 800 series)
- Part number or OEM reference on the original component
- Shape and dimensions of the mounting points
- Attachment interface (clips, screws, or electrical connectors)
- Visual similarity does not guarantee compatibility — confirm by matching these identifiers.
Quality and fit cues when the same issue returns quickly after replacement
Poor cleaning that returns quickly after a part swap is often caused by a fit or seating problem, so re-check fit and compatibility before swapping more components.
A misfit or wrong variant can mimic a failed part. For example, a filter or brush not fully seated allows debris bypass, causing the same issue to return. Verify fit by ensuring the part clicks or locks into place and that it matches the original shape and mounting points.
Many assume all replacement parts perform identically, but premature wear or poor material quality can cause rapid return of the issue. If the same problem recurs, consult a quality checklist if issues return quickly to distinguish between a wrong part and a low-quality part.
Red flags include loose fit, forced installation, or rapid wear.
- Cleaning may drop off soon after replacement → check seating and lock-in
- Part wobbles or shifts during use → verify fit against original component
- Same error or behavior returns after swap → confirm you have the correct variant for your model
- New part shows visible wear or deformation quickly → may indicate premature wear from poor material
- Part does not align with mounting guides or clips → likely a wrong variant or misfit
- Noise or vibration appears after replacement → check for loose fit or incorrect installation
- Symptom persists despite multiple part swaps → prioritize fit and compatibility checks before replacing again
After You Replace a Part: Quick Verification and Prevention of Repeat Poor Cleaning
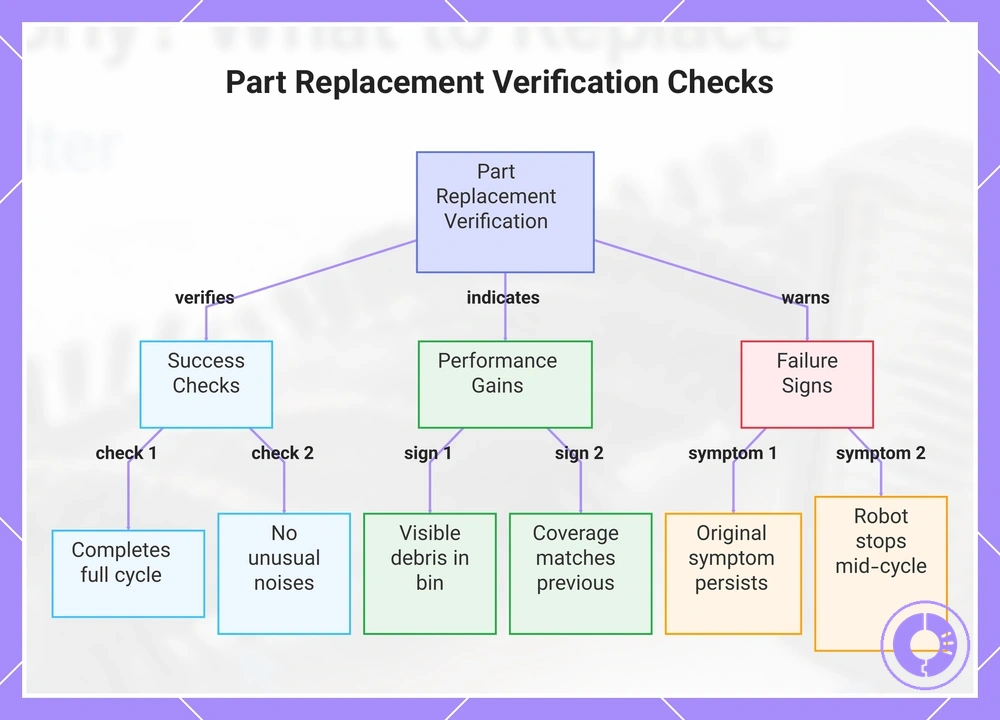
After replacing a part, run one test cycle to verify whether the expected change in cleaning performance occurs. Observe whether the replacement addressed the original symptom or if the issue remains unchanged.
If cleaning performance remains poor after the test, use this checklist to confirm the replacement and decide the next action. Don’t swap another part until you test the current replacement.
- What to look for: The robot completes a full cycle without stopping. What it indicates: The replacement part may be installed correctly and functioning as expected.
- What to look for: The bin contains visible debris after the cycle. What it indicates: The new brush, filter, or suction component may be improving pickup performance.
- What to look for: No unusual noises or vibrations during operation. What it indicates: The part may be properly seated and not obstructing moving parts.
- What to look for: Cleaning coverage matches its previous performance. What it indicates: The replacement may have restored the original cleaning effectiveness.
- What to look for: The original symptom (e.g., poor suction, missed spots) remains unchanged after two test cycles. What it indicates: The part may not be the correct fix, or the installation needs review.
- What to look for: The robot stops mid-cycle or shows error lights. What it indicates: There may be an installation issue or an incompatible part.
This chart shows the key checks to verify if a replaced part has resolved cleaning issues and indicators of success or failure.
What to test in the next cleaning cycle to confirm the replacement solved the symptom
Confirming that the replacement part addressed the symptom means running a cleaning cycle and checking for observable signals. These signals must match your original symptom type.
To test improvement, run a full cycle on a typical floor surface and check these observable signals:
- Check for a noticeable reduction in debris left behind in high-traffic areas compared to previous cycles.
- Look for improved edge pickup along walls and corners, especially if the original symptom was missed edges.
- Observe whether the robot completes the entire cycle without mid-cycle errors or getting stuck.
- Check for reduced repeated intervention (the robot requires fewer or no manual rescues or restarts mid-run).
- Confirm that the dustbin fills to an appropriate level for the debris load, suggesting effective vacuum or brush engagement.
- Look for stable navigation and consistent path coverage without wandering or skipping zones.
- Assess improvement conditionally: results may vary by floor type (carpet vs. hard surface) and debris load (light dust vs. pet hair).
- Escalate to professional diagnosis if these signals remain unchanged after multiple cycles.
When to escalate to error-code troubleshooting instead of swapping more parts
When your robotic vacuum shows an explicit error message or repeated stoppage in the same spot, escalate to error-code troubleshooting instead of swapping more parts. A coded fault often narrows down the problem more effectively than guessing which component to replace.
Escalate to error-code troubleshooting when you observe any of these reliable signals:
- Clear error message on the device display or app
- Repeated stoppage after the same cleaning interval
- Consistent failure pattern that follows a specific route or area
- Coded fault indicator that reappears after a restart
- Failure that occurs only in a specific mode or setting
These error codes that point to parts often narrow the fault class better than symptom guessing.
Swapping a suspected part might seem faster than checking an error code, but error codes usually lead to the correct fix in fewer steps, reducing the need for multiple part swaps.