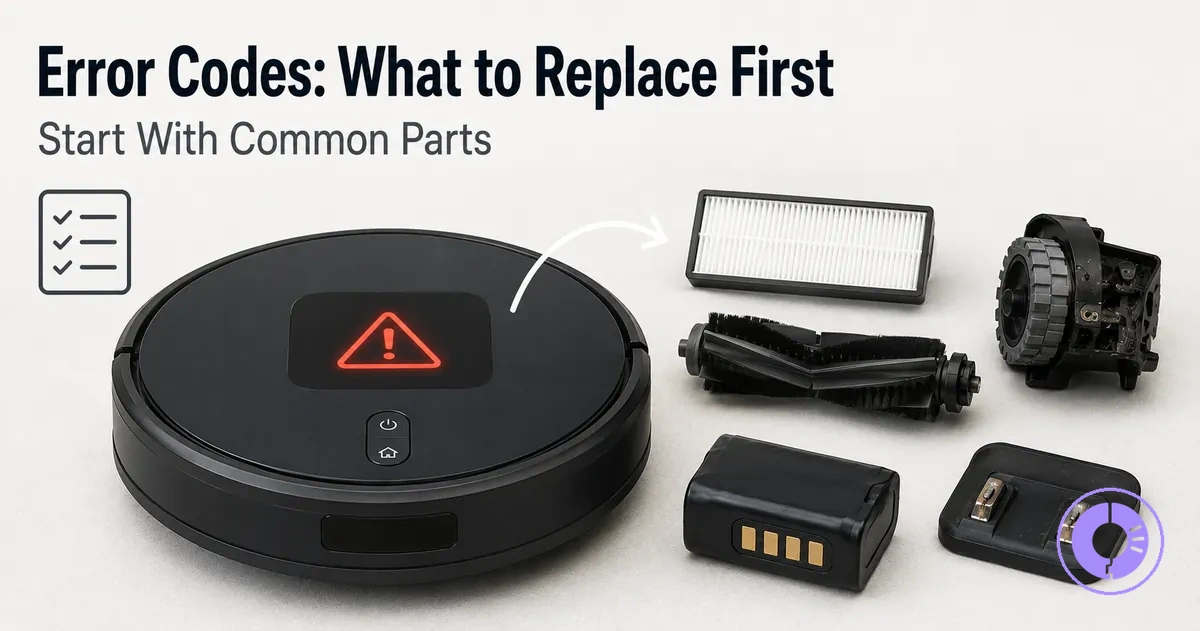
Roomba error codes: which replacement part to try first
A Roomba error code points to a specific module group, reducing unnecessary part swaps and repeat failures when used as the first action. A narrated voice message or solid red light often signals a failure class such as obstruction, wear, sensor contamination, or power delivery.
A common mistake is to replace a part without confirmatory checks. Clean or inspect the suspected component first, and only replace if the error persists after that. Outcomes vary by model family and failure class; for a broader view of compatible modules, consult the Roomba replacement parts hub.
The next step is matching specific error messages to the correct replaceable module and performing confirmatory checks before buying a component.
How Roomba error codes map to replaceable modules
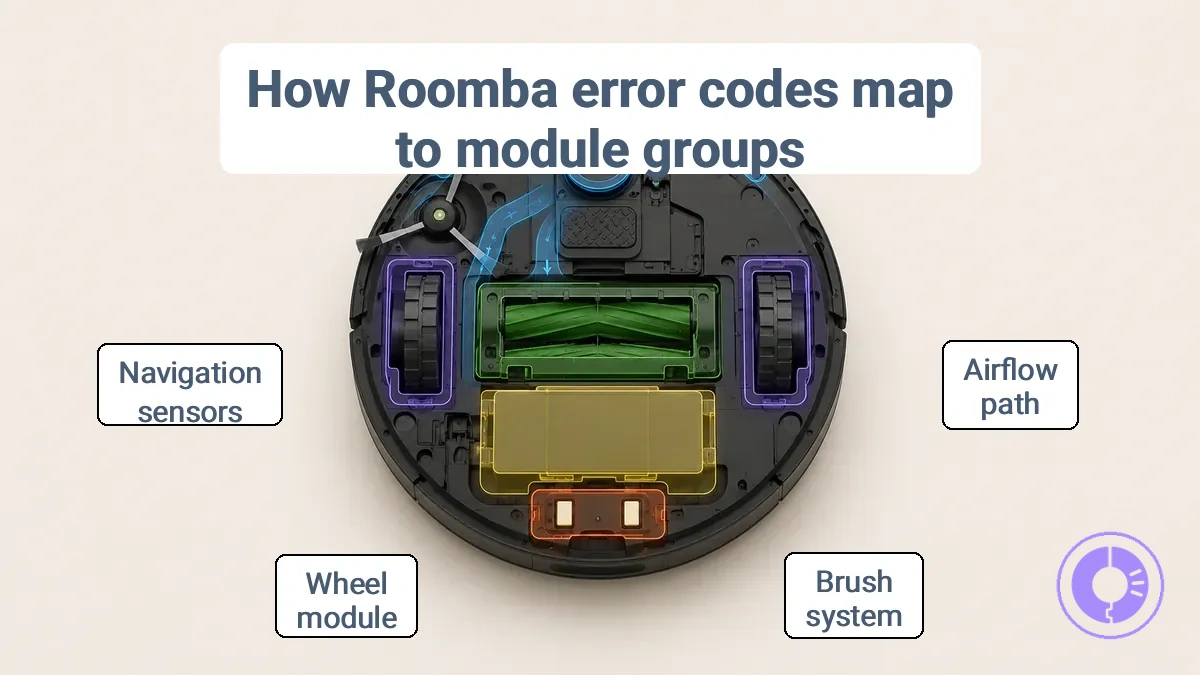
An error code from a Roomba vacuum typically signals a problem within a specific module group rather than pointing to a single failed part. This table organizes common error signals by module family to guide troubleshooting efforts.
The annotated image labels the main module groups referenced in the table, illustrating how error codes map to replaceable modules.
| Module group | Common attribute issue | Typical condition | First action class |
|---|---|---|---|
| Airflow path | Restricted airflow or vacuum motor stall | Error signals related to suction loss or motor not starting | Clean filter, bin, and air path as first check |
| Brush system | Brush jam or motor overload | Error signals during cleaning cycles | Check brushes for tangled debris |
| Wheel module | Wheel motor or gear failure | Robot stops or drifts during navigation | Clean wheel contacts and inspect wheels |
| Navigation sensors | Sensor contamination or blockage | False obstacle detections or bumping | Clean sensor windows with soft cloth |
| Battery/charging | Charging circuit or battery condition | Error signals at docking or short run times | Check charging contacts, test battery |
A common myth is that each error code points directly to one replaceable part. In reality, an error signal is a symptom cue from a component family. Treat the first action class as a starting point, not a guaranteed fix, and verify the condition before proceeding. The focus remains on hardware module groups; troubleshooting should not assume a direct link to software, app, or mapping issues.
Quick Checks That Confirm a Part-Level Fix Before You Order Anything
These quick checks separate removable obstructions and dirty contacts from true part failure, so you can confirm a part-level fix before ordering anything. A simple inspection can rule out false alarms, preventing unnecessary replacements.
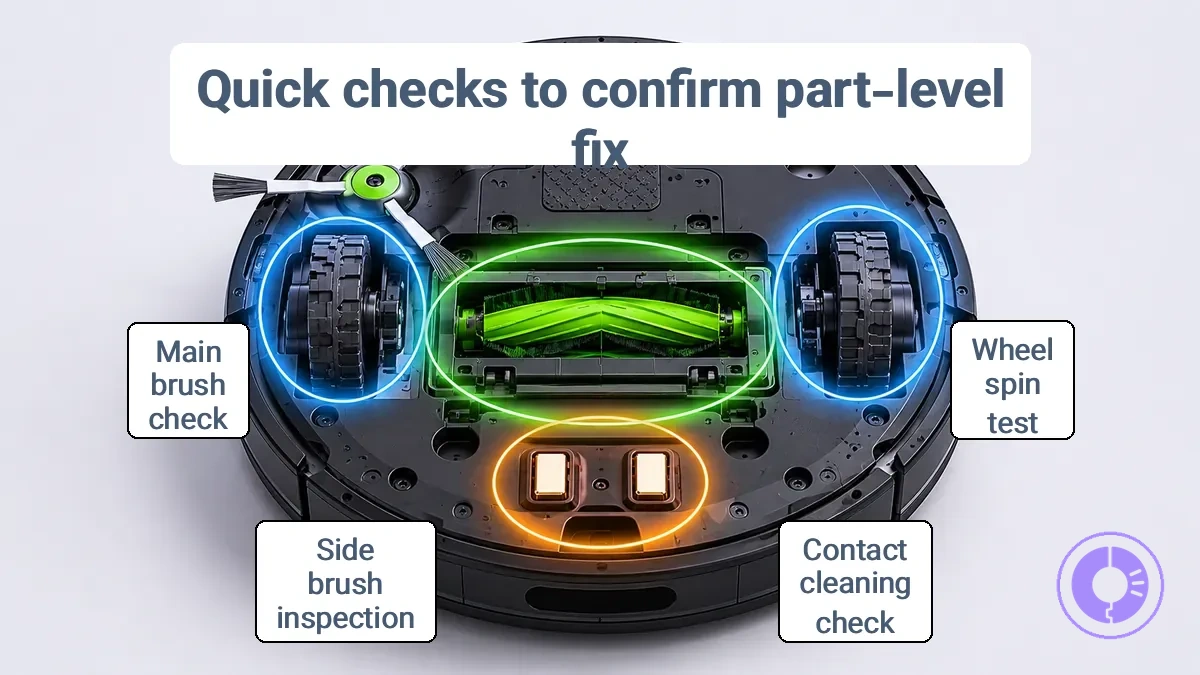
- Wheels: spin test for free movement → passes if wheel rotates freely without resistance → clean debris and retest; fails if jammed → check for obstruction and move to next module group.
- Charging contacts: inspect for dirt or corrosion → passes after cleaning and reseating → clean and retest; fails if still no charge → replace only if confirmed.
- Side brush: check for obstruction and free movement → passes when brush spins without dragging → clean and retest; fails if bound up → remove debris and verify again before ordering.
- Main brush: inspect for hair or debris blocking rotation → passes if brush moves freely after cleaning → clean and retest; fails if jam persists → replace only if confirmed.
- Bumper: test free movement by pressing → passes if it moves inward and returns smoothly → no part needed; fails if stuck or no return → clean and verify; if still stuck, move to next module group.
- Cliff sensors: check for dirt on sensor windows → passes after wiping → clean and retest; fails if error returns → replace only if confirmed.
- Battery contacts: check for clean connection and secure reseating → passes if charging light appears → clean and retest; fails if no power → replace only if confirmed.
- Side brush motor: listen for unusual noise or lack of spin → passes if motor rotates quietly → move to next module group; fails if silent or grinding → replace only if confirmed.
Interpret results: if the part passes after cleaning, it may not need replacement; if it fails repeatedly after retest, replace only if confirmed. For a more detailed decision flow and to locate components, refer to the parts diagram for locating components.
Error-code-to-part mapping by module group
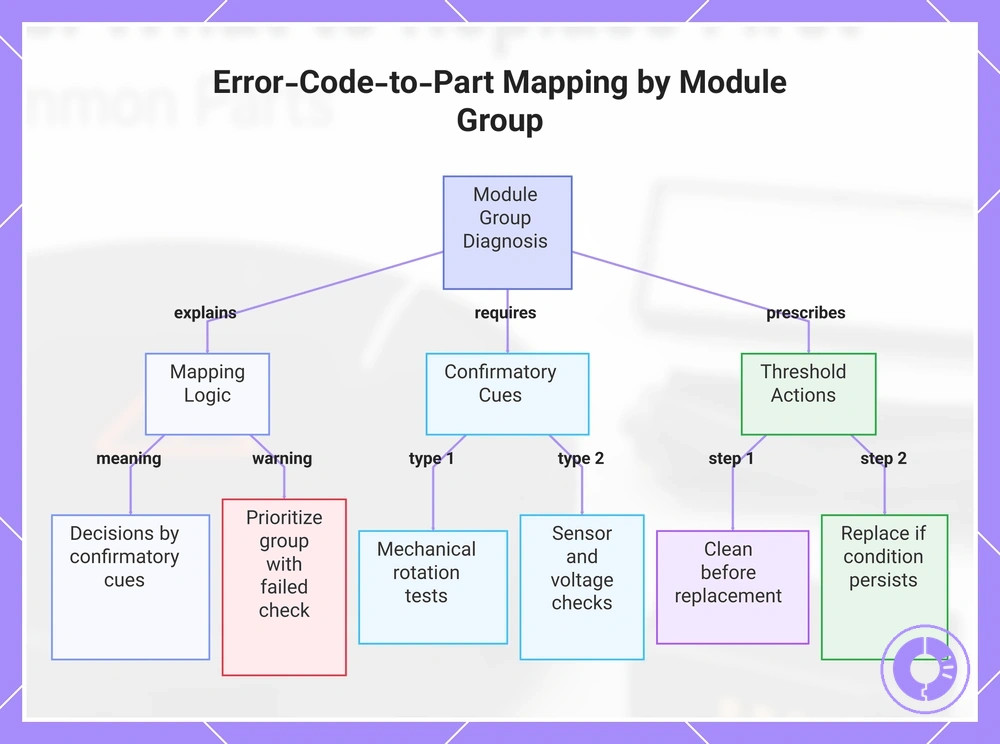
The correct diagnostic sequence is error signal → module group → confirmatory cue → replacement threshold. This error-code-to-part mapping organizes decisions by confirmatory cues rather than by assuming a one-to-one link between an error and a specific part, so it is a conservative mapping.
- Error signal class: drive motor stall — module group: wheel assembly — confirmatory cue: wheel does not spin freely by hand — threshold: replace wheel module if resistance persists after cleaning debris from axle.
- Error signal class: brush deck jam — module group: brush deck assembly — confirmatory cue: brush bar does not rotate when manually turned — threshold: clean brush bar and end caps first; replace brush deck motor if jam returns after cleaning.
- Error signal class: cliff sensor fault — module group: cliff sensor array — confirmatory cue: sensor lens is dirty or blocked — threshold: clean sensor lenses with a dry cloth; replace sensor module if error repeats after cleaning and retest.
- Error signal class: battery not charging — module group: battery and charging system — confirmatory cue: battery voltage reads below nominal under load — threshold: replace battery if voltage does not recover after a full charge cycle; clean charging contacts before replacement.
If two module groups fit, prioritize the one with a failed confirmatory check. Retest after cleaning or replacement, and confirm compatibility with your specific model before ordering parts.
This chart shows how to diagnose robot vacuum errors by mapping error codes to module groups using confirmatory cues before part replacement.
Airflow and bin path issues that point to filter or bin-related replacements
For airflow errors, clean the filter and bin path first and retest after cleaning once. If normal suction does not return, replacement is needed. Airflow and bin path issues give clear clues that separate the clean-or-replace decision into obstruction, worn filter, and bin seal cues. Error codes related to filters linked to error symptoms can guide whether to clean or replace.
- A dirty bin path with loose debris that clears after a quick clean means cleaning is enough; no replacement needed.
- Debris lodged in the bin path that persists after cleaning may require replacing a damaged bin component.
- Persistent airflow restriction or filter clogging after cleaning means the filter has reached its replace threshold and needs replacement.
- Suction loss caused by a leaking bin seal often requires replacing the seal rather than the filter.
- A bin that does not fit snugly can create a false airflow restriction; reseating or replacing the bin resolves it without filter replacement.
- Persistent error codes after cleaning may point to a bin seal leak or alignment problem instead of a filter issue.
Brush and roller drive issues that point to brush module replacements
Brush and roller drive issues fall into two categories: temporary obstructions that clear after debris removal, and persistent drive failure from wear or component damage. If rotation returns to normal after debris removal, it is not a module failure yet. Recurring stalls, uneven rotation despite a clean brush assembly, or abnormal noise suggesting drive resistance (see brushes and rollers linked to error symptoms for common symptom patterns) indicate the brush module may need replacement. Refer to symptom-led troubleshooting for poor cleaning to confirm replacement thresholds. Brush and roller drive issues that point to brush module replacements can be identified by the following patterns that separate obstruction from module failure:
- Repeated stall error after cleaning → likely obstruction is not root cause → consider module replacement if debris is absent
- Uneven rotation or intermittent spinning → likely drive gear wear or motor resistance → replace threshold when rotation fails under load
- Abnormal noise (grinding or clicking) from brush area → likely debris in gear assembly or worn bearings → module replacement indicated when noise persists after disassembly
- Brush roller stops when encountering carpet resistance → likely drive belt slip or motor torque loss → replace module if roller stops with minimal load
- Side brush does not spin despite clean mounting → likely gear assembly blockage or motor failure → replace side brush module
- Soft brush roller not turning after replacement → likely missing drive components or improper shaft engagement → verify module seating before full replacement
Wheel traction and drive issues that point to wheel module replacements
When a wheel module continues to lose traction or fails to drive after a thorough cleaning and a free-spin check, replacing the module is the logical next step. However, slips that occur only on debris-covered floors differ from slips on clean surfaces. The former may respond to cleaning, while the latter often indicate module wear. Wheel traction and drive issues divide into obstruction-related symptoms and module failure signs; the following list provides replacement justification for each.
- Free-spin resistance without visible obstruction points to internal bearing or gear wear within the wheel module; justifies replacement.
- Intermittent drive stalls only on thick carpet or rugs suggest worn tread; justifies replacement if traction loss persists after cleaning and free-spin checks.
- Wheel spins freely but robot stops after a few seconds indicates a failing motor or encoder; warrants replacement after confirming connector and contacts are not the cause.
- Repeated hair or debris buildup inside the wheel well shows seals are ineffective; straightforward module replacement.
- Grinding or clicking sounds during rotation point to gearbox damage; module replacement is typical after noise confirmation.
- Intermittent stalls that resume without pattern often result from loose wiring or failing connector; replacement justified after verifying wiring harness is intact.
- Persistent left- or right-wheel error (e.g., Error 5) after cleaning and free-spin checks suggests the wheel module is at fault; replacement justified if other checks fail.
Bumper, cliff, and navigation-related faults where cleaning beats replacing parts
Bumper, cliff sensor, or navigation-related errors often resolve with cleaning and alignment checks before part replacement, as contamination on sensor windows or a stuck bumper mechanism can trigger false alerts.
If cleaning does not change the behavior, move back to module-group mapping and compatibility rather than troubleshooting the app. Only consider replacement if visible damage is present or the error is a persistent failure after thorough cleaning and movement verification.
Because cleaning beats replacing parts for these faults, the following quick checks verify sensor condition and bumper movement before any disassembly:
- Clean the bumper sensor windows with a soft cloth to remove dirt or debris that may cause false error signals, then retest.
- Press and release the bumper manually to confirm it moves freely and returns to its original position; a stuck bumper can trigger a persistent fault.
- Wipe the cliff sensor lenses underneath the robot to remove any dust or smudges that could interfere with detection, then run a retest.
- Check for any obstructions around the bumper or cliff sensor area that could block movement or sensor view, and clear them before retesting.
- If the same error still triggers after cleaning, inspect for visible damage such as cracked sensor housings or broken bumper tabs.
Battery and charging-related errors and when battery replacement is justified
Battery replacement is justified only when power or capacity symptoms persist after checking charging contacts and the charging troubleshooting path. For example, a device showing a charging error may require battery-related error fixes rather than a new battery if the issue is dirty contacts or a faulty dock. Battery replacement can restore runtime if the cell has degraded, but it does not fix contact or power delivery problems. Separating contact and power-path issues from true battery degradation signs helps decide when battery replacement is justified.
- Dirty charging contacts → clean contacts and retry → if error clears, battery replacement not needed.
- Intermittent charging error → check dock alignment and power cord → troubleshoot charging path before assuming battery failure.
- Dock not delivering power → test dock with another device or replace power adapter → dock issues often mimic a dead battery.
- Slow or no response on dock → inspect dock contacts for debris → typically a power path problem, not battery degradation.
- Shorter runtime than before → capacity drop from age or usage cycles → replacement justified if runtime no longer meets your needs.
- Rapid capacity loss over weeks → accelerated degradation from heat or deep discharges → battery replacement likely needed.
- Charger light stays red after extended charging → possible battery internal resistance increase → check with a battery tester before replacing.
- Battery warning light combined with other symptoms → use multimeter at charging base output → if dock voltage is correct, suspect battery degradation.
What to replace first: replacement priority rules for common error scenarios
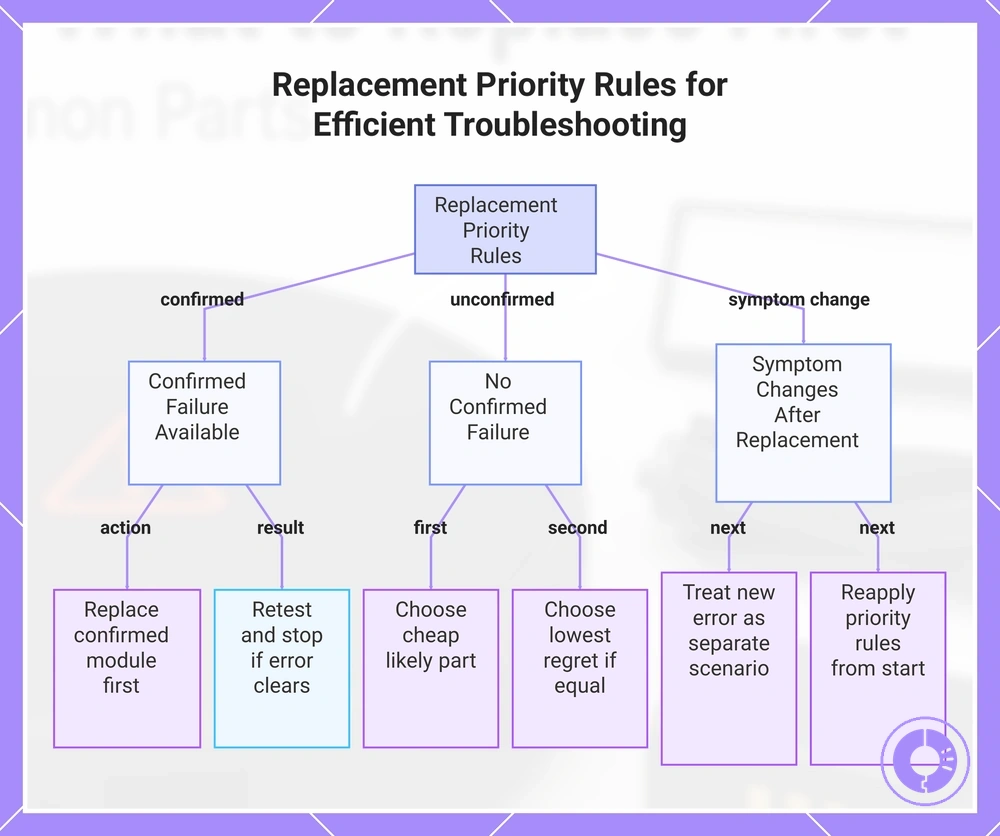
Replace the most probable confirmed failure point before higher-cost or lower-probability modules. That reduces misreplacement risk and keeps repairs efficient. The rules below rank actions by likelihood and risk, guiding what to replace first after each confirmatory check.
- Cheap and high-likelihood first: If a confirmatory check result points to a low-cost, frequently failing component (e.g., a filter or brush), replace that part first. Retest; if the error clears, stop.
- Expensive only after confirmation: Defer higher-cost modules (e.g., a main board or sensor array) until a confirmatory check result clearly implicates them. Replace first only when the check passes and cheaper candidates have been ruled out.
- Confirmed failure over suspicion: When a check result confirms a specific module failure (e.g., a wheel motor does not respond), prioritize that module over a suspected but unconfirmed part. Retest to confirm resolution.
- Lowest regret when probability is unclear: If likelihood is roughly equal between two candidates, choose the one with the lowest regret—lower cost, easier access, or less risk of secondary damage. Replace first and retest.
- Stop condition after each replacement: After any replacement, retest. If the original error code no longer appears, stop to avoid over-replacement.
- Revisit priority when symptom changes: If the error code changes after a replacement, treat the new symptom as a separate scenario. Reapply the priority rule from the start rather than continuing down the original list.
Scenario example: A unit shows a wheel-stall error. A confirmatory check shows the wheel module is clean but the motor does not respond. Replace the motor (confirmed failure) before the main board (higher-cost, lower-probability). After replacement, retest. If the error clears, stop. If it persists, priority shifts to the board.
This chart shows the decision logic for choosing which component to replace first based on confirmation, cost, likelihood, and symptom changes.
Compatibility checks that prevent ordering the wrong module for your Roomba model
Model family and hardware revision are common reasons a correct-looking replacement does not resolve the error. The same-looking module may use a different connector or belong to a later revision, making it incompatible with your Roomba's wiring or mounting points. Running a few compatibility checks before ordering prevents mismatches.
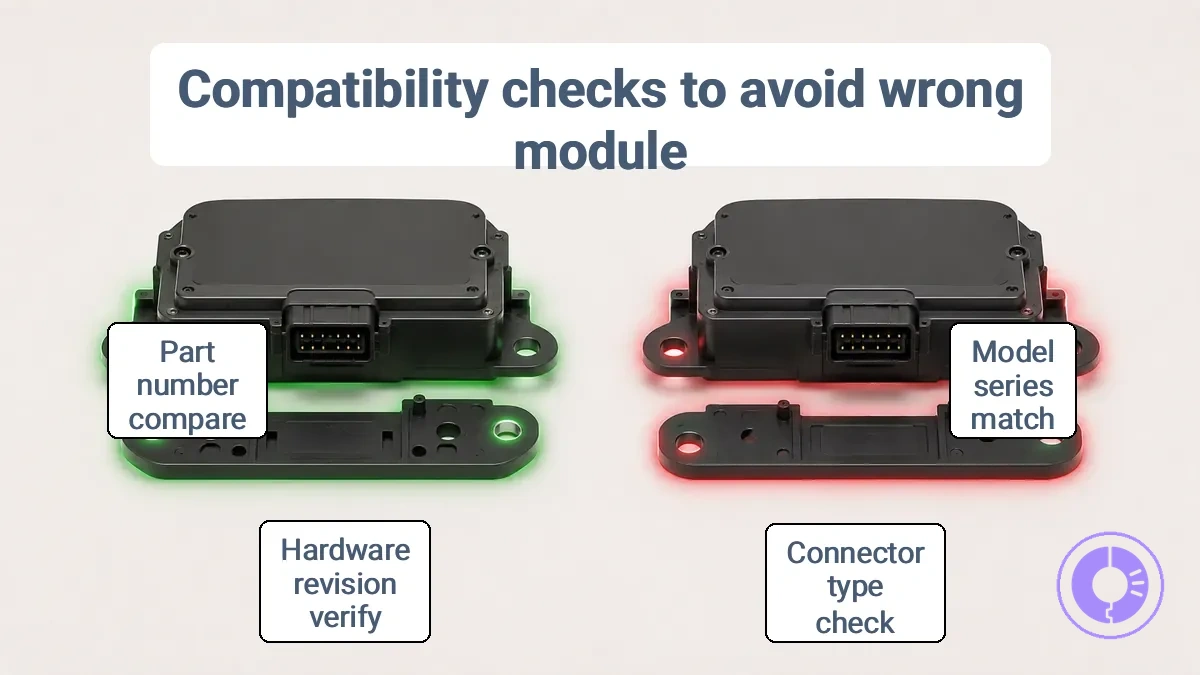
Compatibility checks verify identifiers and fit cues before you place an order; refer to the parts diagram for locating components to identify the exact module and its connector. Use the following checklist to confirm model, module naming, and connector alignment.
- Identify your Roomba's model series (e.g., i3, i7, j7) and check the module's listed compatible series. A module that does not list your series is likely not a match.
- Compare the module's connector type (e.g., 2-pin vs 4-pin) with the connector on your robot. A different connector means the module will not physically connect.
- Verify the hardware revision number printed on the module. A newer revision may have different fit or electrical characteristics.
- Check the module's part number against the original. A different part number often indicates a different fit.
- Confirm the module's mounting hole alignment. Some modules have offset holes that only fit specific chassis revisions.
- Ensure the module's dimensions match the original. A slightly larger or smaller module may not seat properly.
- Examine the module's label for model series naming. A name mismatch with your Roomba often signals a different connector or revision.
- Verify that the module's compatible revision range includes your Roomba's revision. A revision mismatch can prevent proper fit.
Compatibility does not guarantee the replacement will fix the error; it only ensures the module can be installed correctly.
After Replacing a Module: Reset Steps and a Verification Run to Confirm the Error Is Cleared
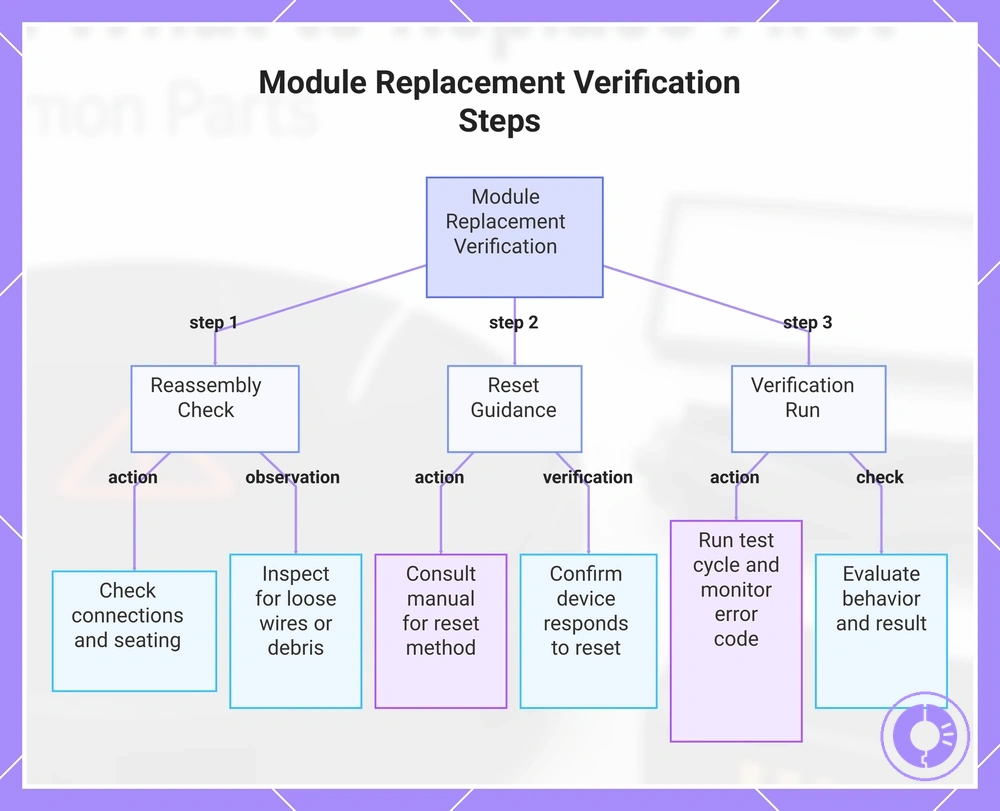
A successful replacement is confirmed when the error stays cleared during a controlled verification run. The following steps outline the reassembly check, reset guidance, and verification run to confirm the error is cleared.
- Perform a reassembly check: verify all connections are secure and the module is correctly seated. Observation point: Look for loose wires, unseated connectors, or leftover packing material. Stop and correct if any issue is found.
- Identify the reset guidance for your model. Procedures vary by device. Consult the user manual or support site for the required button combination or power cycle. Observation: Confirm the device responds to the reset command (e.g., lights flash, tone sounds). If not, recheck the method.
- Observe the startup sequence after reset. Expected behavior: The device powers on without the previously reported error code. If the error reappears immediately, stop and inspect the module installation.
- Run a test cycle by starting a short cleaning run or built-in system test. Observation point: Monitor for recurrence of the original error code during operation. Use this as an early pass/fail indicator.
- Observe device behavior during the test cycle: movement, sensor response, and communication with the app or base station. Pass means all functions match expected behavior; fail means any deviation suggests incorrect installation or seating.
- Evaluate the test cycle results. If no error code appears during the full cycle, the verification run is successful. If an error code appears, return to the reassembly and reset verification steps.
This chart shows the three main steps to confirm a successful module replacement: reassembly check, reset guidance, and verification run.
When replacement parts are unlikely to solve the error
If the error persists after a verified compatible module replacement, stop replacing parts and reassess the failure class. When symptoms remain inconsistent, installing another part is unlikely to solve the error.
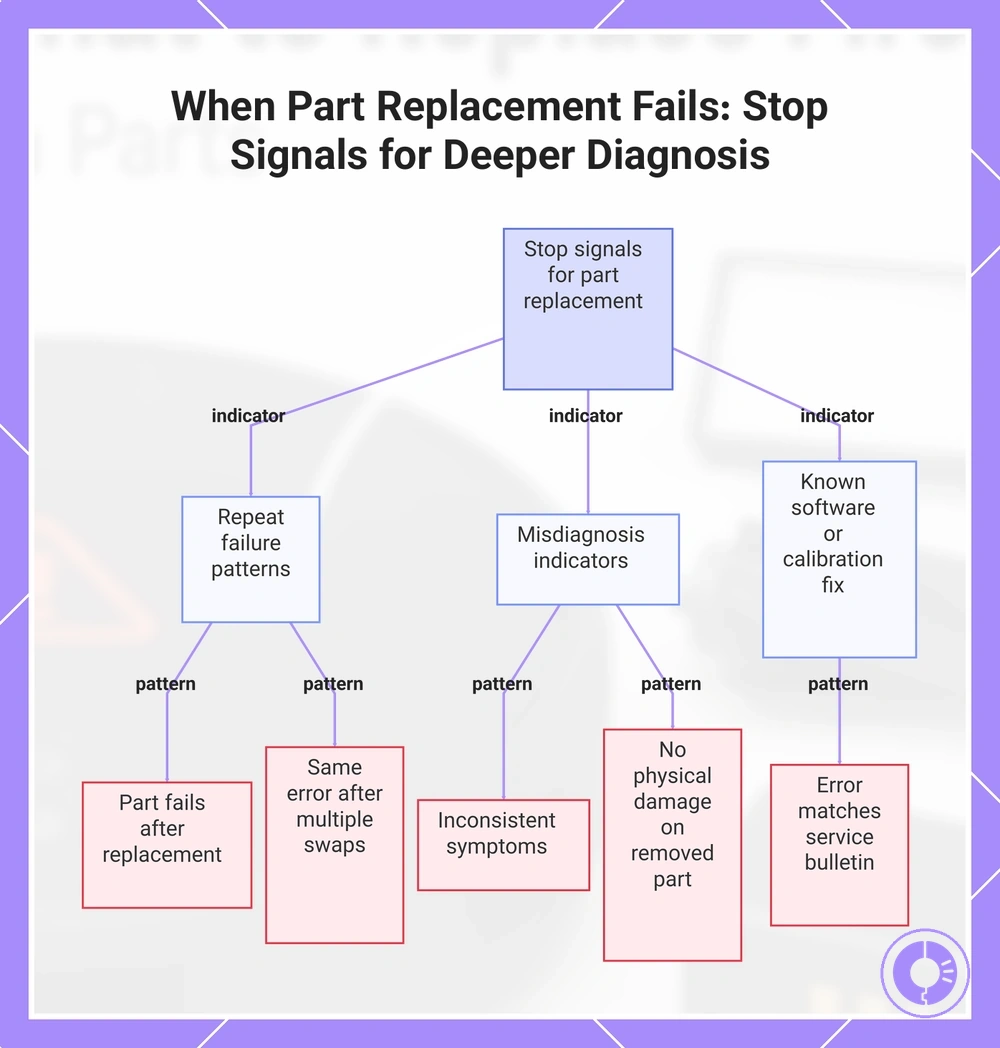
The following patterns act as stop-signals: replacement is unlikely to solve the error, suggesting that deeper diagnosis is needed.
- Repeat failure after replacement — A part that fails again shortly after replacement suggests an underlying issue—voltage irregularity, mechanical binding, or environmental stress—that the new part may not overcome.
- Inconsistent symptoms — When the error appears only under specific conditions (temperature, load, position) and not others, the root cause is likely misdiagnosed; the part itself may be functional.
- Same error code after multiple part swaps — Swapping the same component type repeatedly without clearing the error suggests a system-level issue rather than a defective unit.
- No physical damage on the removed part — If the old component shows no signs of wear, corrosion, or breakage, the failure may originate in wiring, connectors, or control logic rather than the part itself.
- Error returns after a brief normal operation — A part that works for a few cycles and then fails suggests a conditional trigger—such as heat buildup or intermittent power drop—that a replacement alone is unlikely to fix.
- Multiple unrelated error codes appear together — A cluster of different errors often points to a shared root cause such as a failing power supply, ground fault, or communication bus issue, making individual part replacement low-probability.
- Error code matches a known service bulletin for software or calibration — In such cases, the fix may require a firmware update or sensor alignment rather than hardware replacement.
For a structured approach to identifying the actual failure class, see symptom-led troubleshooting for poor cleaning.
This chart shows the stop signals that indicate replacing parts is unlikely to solve an error, pointing to the need for deeper diagnosis.
FAQ: ordering, repeating errors, and replacement thresholds
This FAQ addresses ordering and repeat-error questions that the main sections do not fully cover. Answers use thresholds and conditional checks instead of absolute rules.
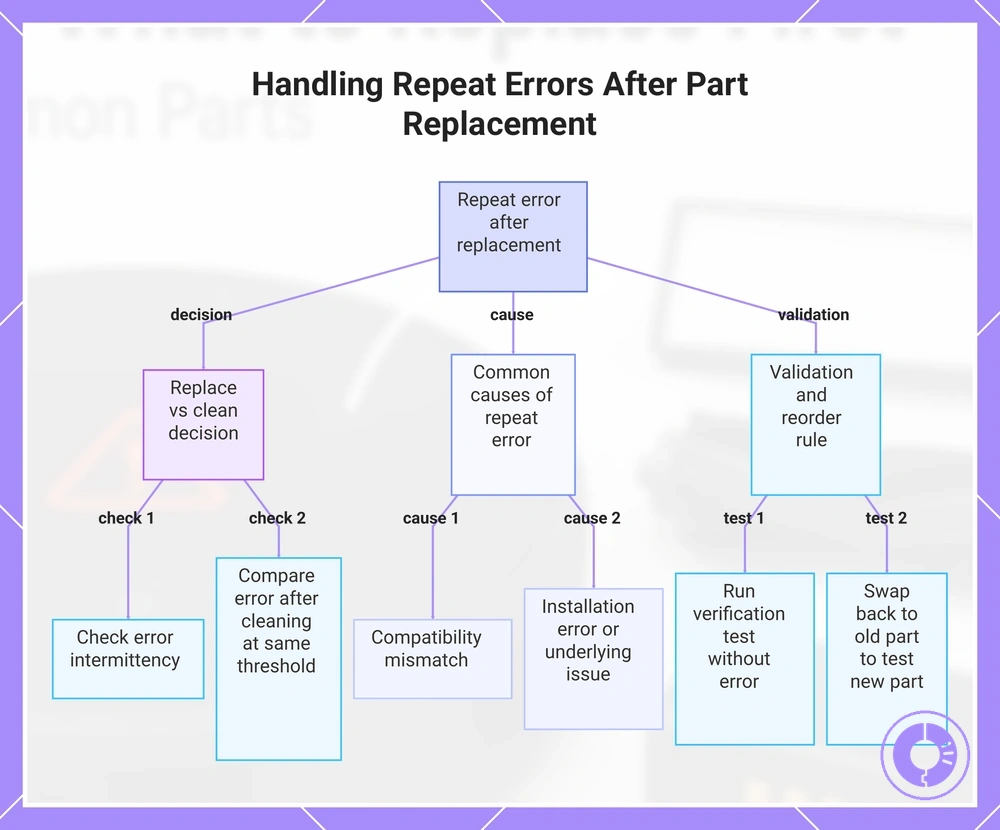
Question: Should I reorder a replacement part if the same error appears again?
Answer: Not immediately. Check compatibility and inspect the part first. If the error persists, the issue may not be the part itself.
Question: Can a replacement part cause a repeat error if it is not fully compatible?
Answer: Yes. Compatibility uncertainty is a common cause of repeat errors. The error may return because the part model family does not match the original specifications. Confirm a fix by comparing fit cues and mounting points before reordering.
Question: How do I know whether to replace a component or clean it first?
Answer: Whether to replace or clean depends on threshold and component condition. If the error is intermittent, cleaning may resolve it. If the error repeats after cleaning at the same threshold, replacement is more likely needed. Retest after each action.
Question: What does a repeat error after replacement indicate?
Answer: A repeat error after replacement usually indicates a compatibility mismatch, installation error, or an underlying issue not addressed by the part. If the error reappears within the same number of cycles as before, the original part may not be the root cause. Check surrounding components next.
Question: When should I retest after replacing a part?
Answer: Retest immediately after every replacement to confirm the error clears. Run a full verification cycle. If the cleared error returns, additional diagnosis is needed before ordering another part.
Question: How can I validate that a replacement fixed the error?
Answer: Run a verification test without the error occurring. If the error does not reappear, the fix is likely correct.
Question: When is it safe to assume a repeat error is caused by the new part itself?
Answer: If the error appears immediately after replacement and no other changes were made, the new part is a likely cause. If you then swap back to the old part and the error disappears, that suggests the new part is faulty or incompatible. In that case, reorder only after verifying compatibility.
This chart shows the decision steps, common causes, and validation methods for repeat errors after replacing a part.