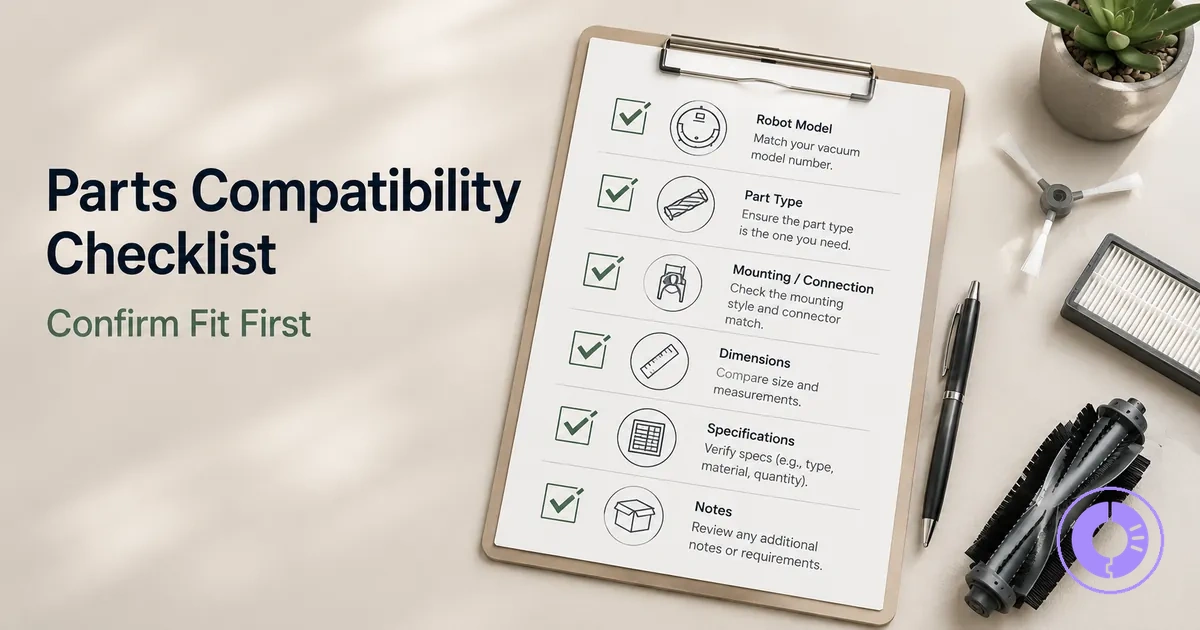
Roomba Replacement Parts Compatibility Checklist
Roomba replacement parts compatibility depends on your specific model and series, not just the brand name. Each iRobot series uses distinct interfaces, mounting points, latch designs, and connector shapes that differ between generations. Use this checklist to verify compatibility before purchase by checking evidence from the part and your Roomba.
The core rule for compatibility: first confirm your Roomba model and series using the label under the robot or in the iRobot app; then verify that the replacement part's mounting, latch, seal, and connector match your original component. Use the following points as a fit check before ordering:
- Model and series match. The replacement part should specify the exact series (e.g., 500, 600, e, i, j, s) that matches your Roomba.
- Interface design consistency. The mounting points, latch style, and seal shape must be identical to the original part. Misfit often occurs when a part looks compatible but the latch or seal differs.
- Connector and wiring fit. For parts that connect electrically (batteries, sensors, modules), verify that the connector shape and pin layout are the same. A mismatched connector typically cannot be safely adapted.
- Dustbin and brush module compatibility. These components often vary between series; confirm that the dustbin seal and brushmodule mounting tabs align with your model's chassis.
- Documented cross-compatibility. Cross-compatibility is rare; check iRobot's published compatibility chart for the specific part before assuming universal fit.
What "compatible" means for Roomba replacement parts
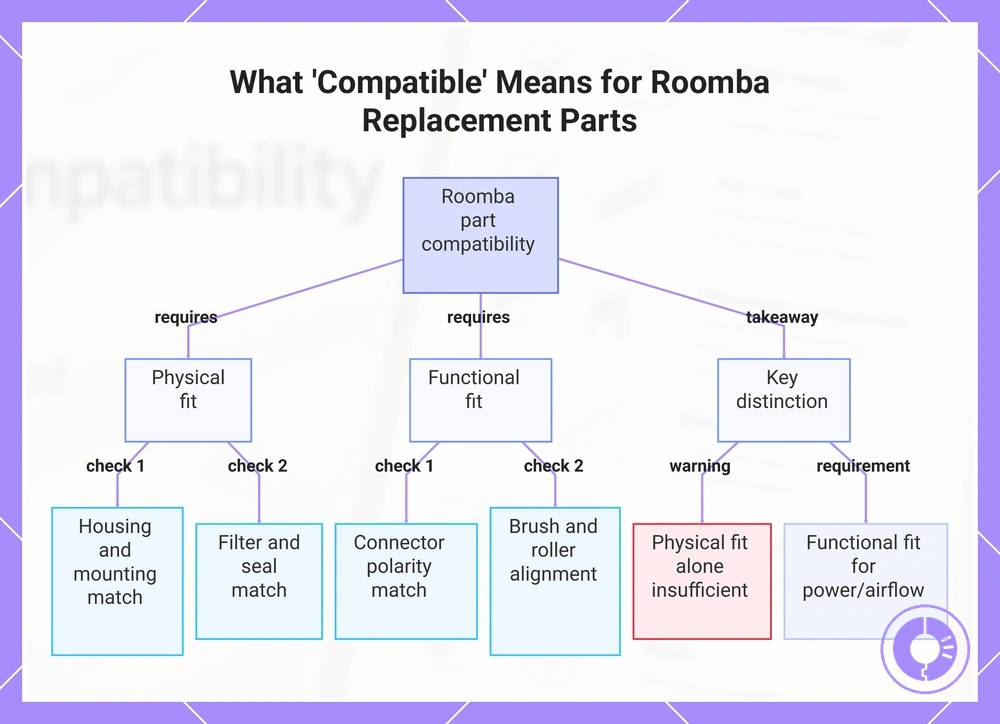
Compatibility for iRobot Roomba replacement parts means the part must match both the physical dimensions and the functional requirements of a specific Roomba model or series. A compatible part fits into the intended housing and also operates correctly with the robot's power and airflow systems. Compatibility is satisfied when the part physically aligns and performs its role without requiring modification or causing error conditions.
For example, a brush set that slots into the debris collector housing is physically compatible, but it also needs to work with the roller material and motor load of your specific model to maintain performance. See the Roomba replacement parts hub for a complete list of compatible options.
Checklist: physical fit vs functional fit signals for common replacement parts:
- Housing shape and mounting points match the slot in your Roomba (physical fit).
- Filter frame size and sealing ridge match the filter door (physical fit).
- Connector type and polarity match the robot's power interface (functional fit).
- Brush material and roller pattern align with the model's debris collection design (functional fit).
- Part revision number matches the model generation (both physical and functional; a mismatched revision may cause poor airflow or electrical issues).
Compatible does not mean only that the part fits the housing; for parts with power or airflow functions, functional fit is required. Similar-looking parts from different model series may still fail because of small changes in mounting depth or power requirements between revisions.
This chart shows the two main dimensions of compatibility for iRobot Roomba replacement parts: physical fit and functional fit, and the key takeaway that functional fit is required for parts with power or airflow functions.
Confirm your Roomba model and series before checking part fit
Before checking part fit, confirm your Roomba model and series, because the model number and series label determine which replacement parts work with your unit. The image below shows the underside label location and typical markings. If you skip this identification, a part that looks compatible might not align with the mounting points, connectors, or seals. The how to identify your Roomba model or series guide covers the identification process in detail.
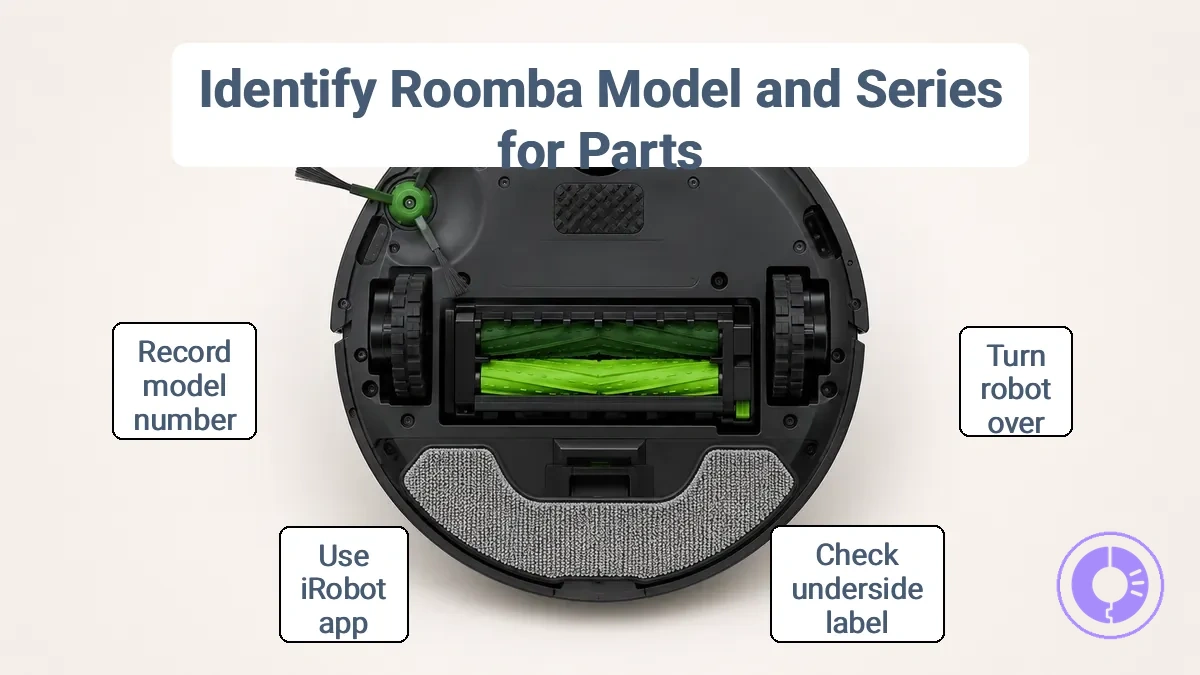
Find the model and series identifier from these sources before picking replacement parts.
- Turn the robot over and locate the printed label near the left wheel on the underside; the model number is printed there.
- Remove the dustbin and check the serial number sticker inside the bin compartment; the serial number can help identify the model and series.
- Open the iRobot Home app, select your robot, and look for the model name or series listed in the device settings.
- Check the original product manual or the box label if you still have the packaging; the model and series are printed on the box.
- Record the model number and series label (for example, 560, 675, 800 series) before moving on to part selection.
Once you have the model and series, the identifier maps to specific part families. For example, a Roomba 560 may share a filter assembly with other 500-series units but differ from 800-series models in mounting and seal design. The connector type, latch position, and overall interface vary by series, so matching the identifier to the correct part family reduces the risk of a misfit.
Some retailers or refurbishers may list a model under a branding name that differs from the internal series label. For instance, a unit sold as a Roomba 561 may carry the same internal chassis as a 560 but ship with different accessories. Rely on the physical label or app identifier rather than the product listing name when confirming fit.
Use a series-level compatibility chart as a fast exclusion check
A series-level compatibility chart lets you quickly exclude replacement parts that are unlikely to fit your Roomba or iRobot model. The chart is an exclusion tool, not proof that a part will work.
The series-level compatibility chart shows series groups, common part families, and typical exclusions. The table groups series by common part families and typical exclusions, with exclusions often resulting from generation shifts and form-factor changes.
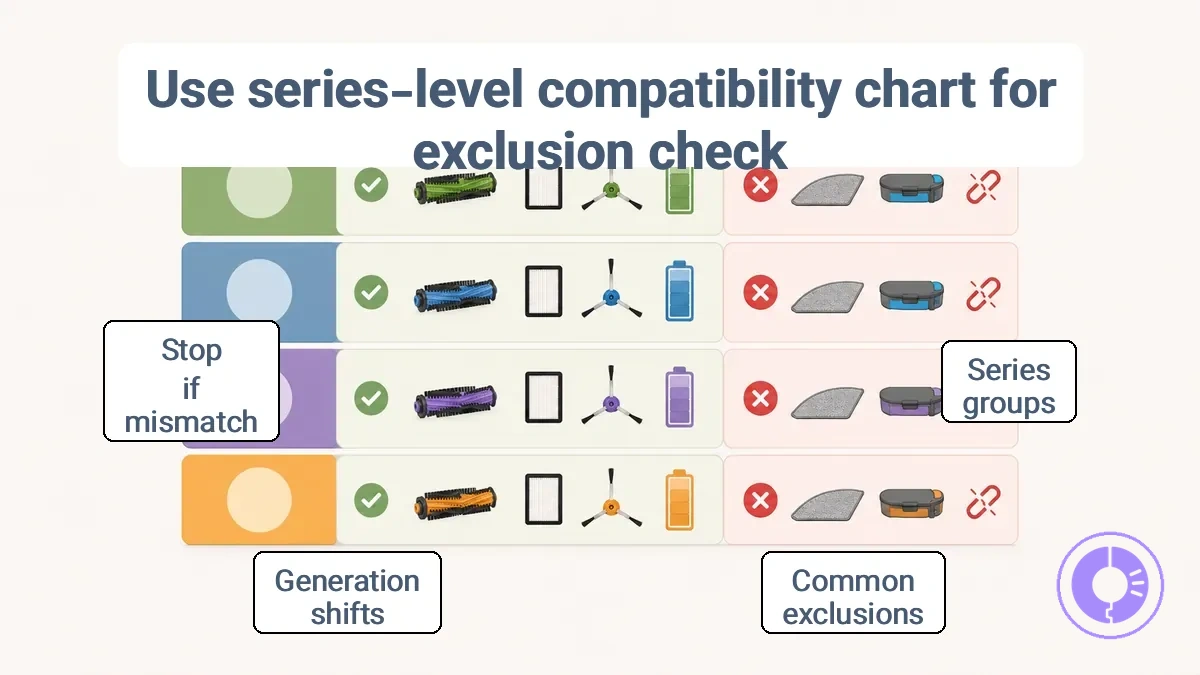
| Series group | Common part families | Common exclusions |
|---|---|---|
| 500 / 600 series | Side brushes, filters, dustbin assemblies | Typically do not fit 700 or 900 series; battery connectors changed after 600 |
| 700 / 800 series | Main brushes, battery packs, charging contacts | Main brush housing differs from 500/600; battery form factor shift in late 800 |
| 900 series | Vacuum motors, cliff sensors, wheel modules | Sensor layout and motor mounting changed from 700/800; parts commonly not interchangeable |
| i / e / j series | Filter trays, side brushes, dustbin doors | Part interface shape differs from 900 series; generation revisions affect brush orientation |
When your model falls outside the series group for a part, stop and do not proceed to part-level checks—a different interface is likely. When the series group matches, verify the physical interface and mounting points before ordering.
The chart identifies probable misfits, but the final fit depends on the exact part design and your model's revision; confirm the interface next.
When model names are not enough: revisions, part families, and “almost fits” mismatches
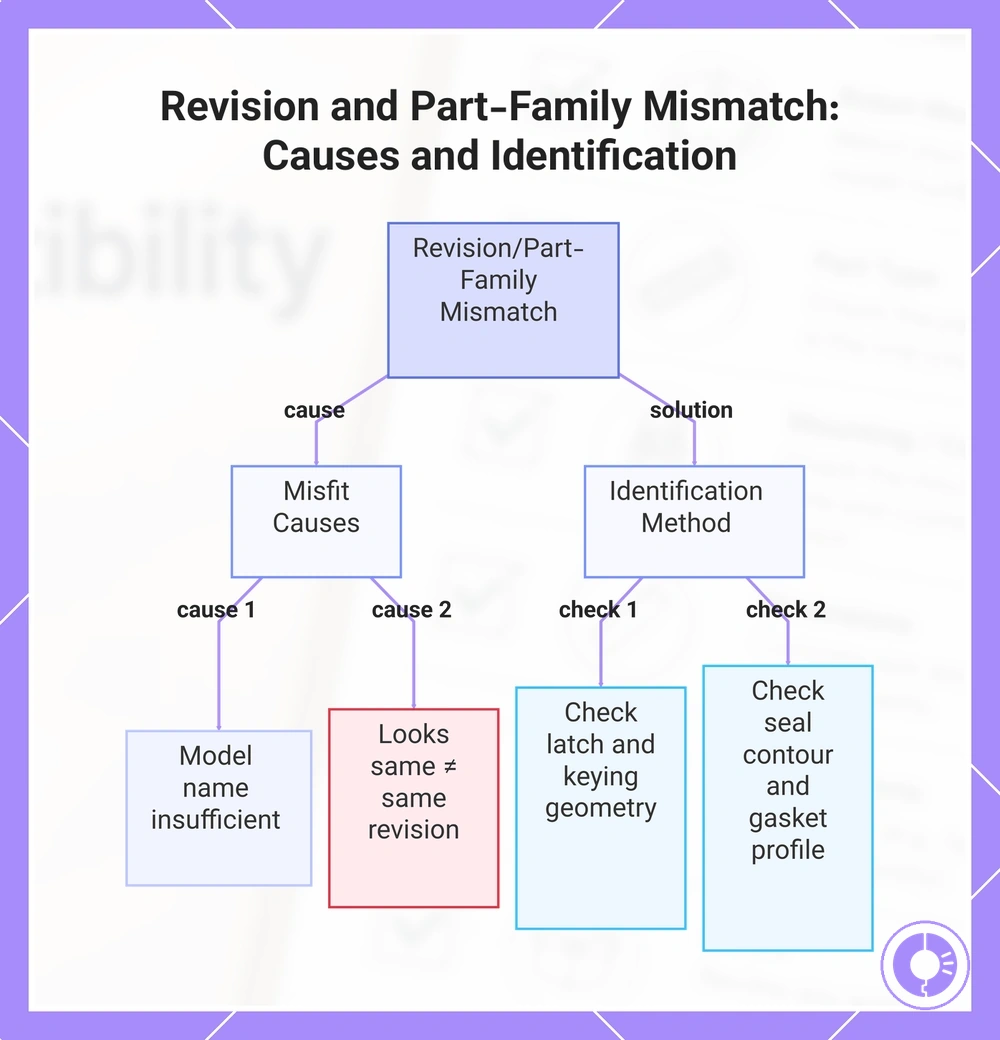
Even when the model name appears correct, revisions and part-family variants can cause misfit—failing to seat or lock. That is a revision/part-family mismatch.
The safe way to identify the correct variant is to check the physical interface rather than relying only on the model number printed on the packaging. Photographs of the mounting points, latch positions, connector keying, and the revision marker often reveal differences that a model label alone hides. When those interface details match the original part’s geometry, the risk of a misfit decreases.
“Looks the same” does not mean “same revision”, and model names crossing revisions or part families produce common mismatch patterns:
- When the part looks right but will not click into place, compare the latch point position and the angle of the retaining tab against your original part.
- When the connector appears identical but does not seat fully, check the keying groove shape and the depth of the socket recess on both parts.
- When the seal edge rubs or leaves a gap when installed, align the outer contour and the gasket profile with a photo of the original component.
A shared part name across sellers is not proof of fit unless the interface evidence matches.
This chart shows why model names alone can lead to misfit and how to reliably identify the correct variant by checking physical interface details.
Part Numbers and Exact Product Naming as Compatibility Evidence
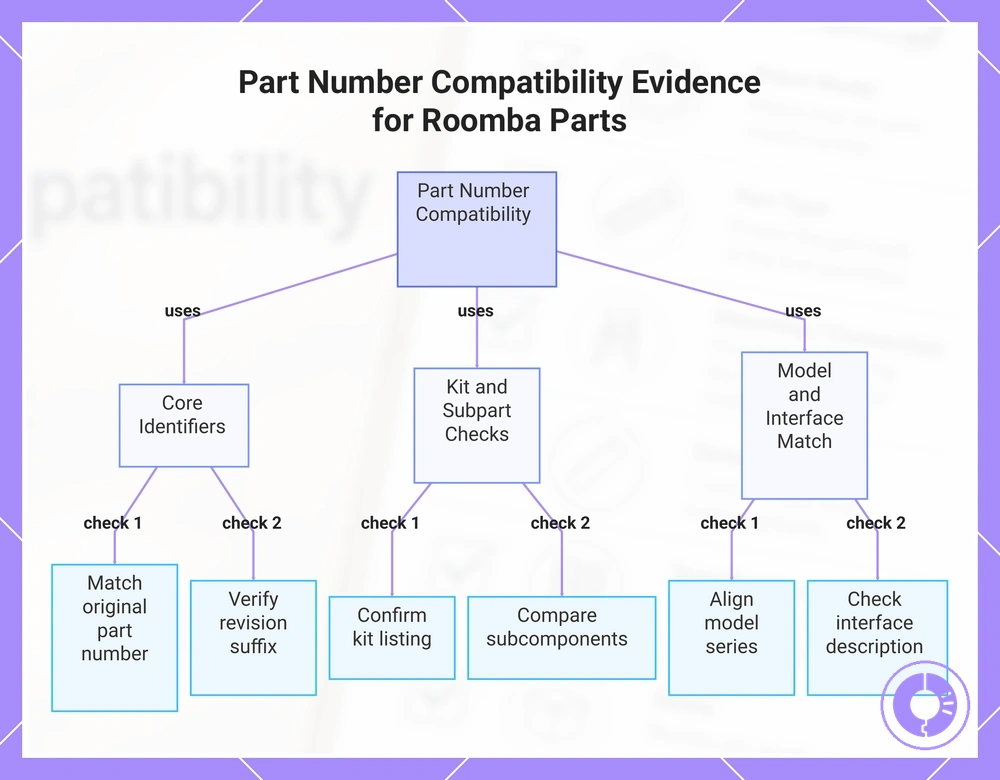
Part numbers and exact naming conventions provide stronger evidence for iRobot Roomba replacement parts compatibility than generic fit claims. A specific identifier ties the component to a known design and assembly context, while generic claims lack that precision.
To confirm fit, verify these identifiers against your original part.
- Part number printed on the original part — matching it with the replacement part label provides a useful fit indicator.
- Revision suffix — a letter or digit after the part number may indicate a design change; matching the suffix can help confirm the interface dimensions.
- Kit identification — when the part belongs to a kit, verify that the kit listing is intended for your Roomba model and includes the required subcomponents.
- Included subparts — compare each subcomponent listed in the replacement against the original assembly to check for exact match in type and count.
- Model series designation — the part number should align with the intended model series (e.g., 600, 800, 900); a mismatch in series may indicate different connectors or mounting.
- Interface description — the replacement should describe the same connection type, such as a specific connector shape or mounting tab position, as the original.
For example, an iRobot Roomba side brush labelled with part number '12345A' may differ from a brush labelled '12345B' due to a revision that changed the mounting arm length. Using the wrong suffix can cause misfit even though the core part number is the same.
A generic claim such as 'fits Roomba 500 series' without a part number provides no identifier to verify against the actual part.
This chart shows the specific identifiers (part number, revision suffix, kit details, model series, and interface description) that provide reliable evidence for replacement part compatibility.
Compatibility signals that matter most at the part interface
The part interface is the primary rule-set for confirming compatibility after model and series filtering. Even when the model and series match, the physical and electrical connection of an iRobot Roomba replacement part helps determine whether it can seat, power, and function correctly. The interface is proof.
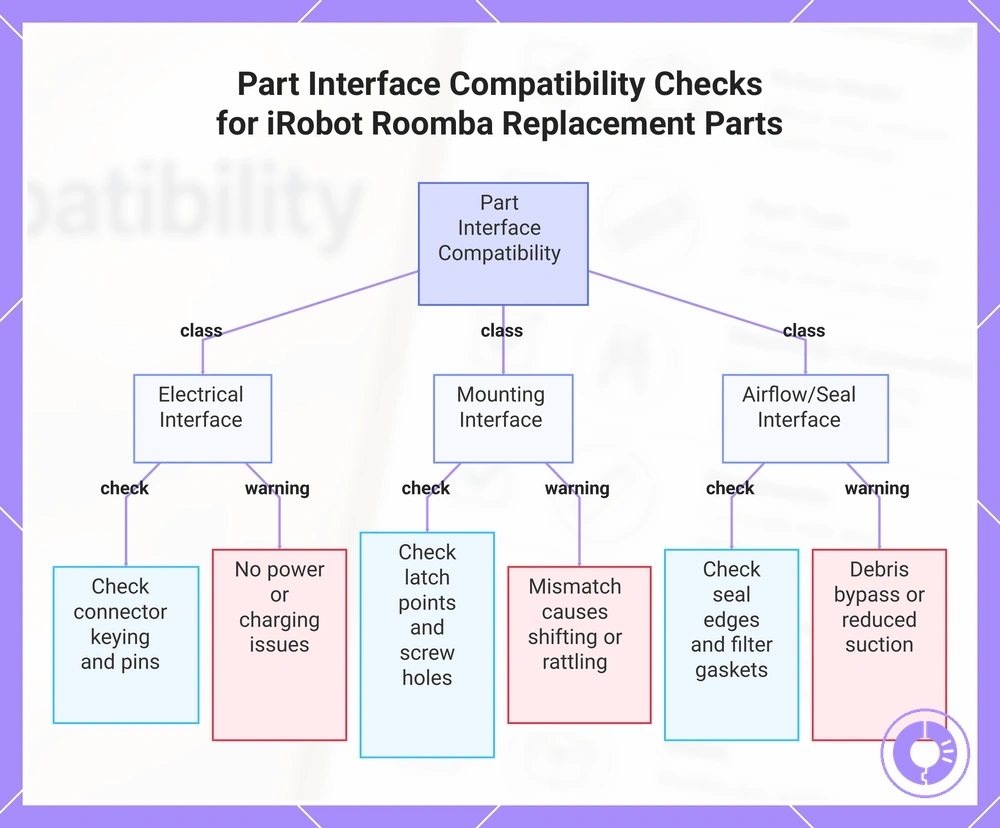
Compare interface details grouped by class: electrical, mounting, and airflow or seal. Review common part types to verify each interface class.
Visible cues such as connector keying, latch points, and seal edges allow quick verification without measurements. A mismatch in any class may cause improper seating or performance loss; stop if mismatch.
When replacing a battery, for example, the electrical interface should match the connector shape and pin arrangement as shown on the part label. Compare that evidence to the original part.
- Electrical interface: Check connector keying and pin arrangement; a mismatch may cause no power or charging issues.
- Mounting interface: Check latch points and screw holes; a mismatch may cause the part to shift or rattle.
- Airflow/seal interface: Check seal edges and filter gaskets; a mismatch may allow debris bypass or reduce suction.
This chart shows the three interface classes—electrical, mounting, and airflow/seal—used to verify iRobot Roomba replacement part compatibility, along with the specific checks and consequences of a mismatch.
Connector type and electrical spec alignment for batteries and charging-related parts
Connector type and electrical spec alignment are key for Roomba battery compatibility; a mismatch in shape, keying, or voltage/current ratings can prevent charging or damage the iRobot system. Verify connector match first.
When checking a replacement battery, verify its model number and look for the same pin arrangement, housing shape, and polarity markers. If the connector profile or nominal voltage differs from the original, stop and re-verify.
Use this checklist to confirm connector and spec equivalence before installing a replacement part:
- Compare the physical connector shape, pin count, and keying orientation with the original. Pass if they match; fail if any discrepancy exists.
- Check that the replacement battery's nominal voltage matches the original. Use color coding or printed specs to help identify the correct voltage. Pass if voltage matches; fail if it does not.
- Verify that the current or amp rating is equal to or higher than the original battery. Lower ratings may overheat or fail. Pass if rating is sufficient; fail if lower.
- Confirm polarity alignment by checking the position of positive and negative terminals. Incorrect polarity can damage the circuit. Pass if polarity matches; fail if reversed.
- Watch for connectors that look similar but belong to different series families (e.g., Anderson SB50 vs. SB120). They may appear to fit but differ in current capacity or keying, leading to a misfit. Check the series number on the housing.
Mounting Pattern and Attachment Method Checks for Modules and Assemblies
For replacement modules like the wheel module or brush module, compatibility depends on verifying that the mounting pattern matches the original attachment points in your Roomba model or series. Mounting alignment is pass/fail based on a quick visual comparison.
Before fitting a new module, confirm that the replacement part's physical interface matches the chassis. For example, a wheel module with shifted screw spacing relative to the mounting holes may not seat fully and often rubs against the housing during operation, indicating a misfit.
- Check screw positions align with chassis holes.
- Confirm that latch points engage without forcing.
- Check alignment tabs fit into the designated slots.
- Ensure adequate clearance around the module so that no part contacts the housing.
Shape, latch, and sealing-surface checks for filters, bins, and airflow-path parts
For Roomba filters and bins, airflow-path fit depends on filter shape, latch style, and sealing surface condition. Even if the replacement part matches the model and series by label, differences in frame depth or latch engagement can cause a failed seal. The seal is the proof.
Before installing a replacement, here is what to verify.
- Seal edges: check for tears, compression marks, or gaps along the full perimeter.
- Gasket presence: confirm the gasket is attached and not missing or deformed.
- Latch engagement: the latch should click fully into place without forcing.
- Mating surfaces: both the part and the housing surface must be clean and free of debris.
Similar-looking filters can differ in filter shape, frame depth, or latch style, so compare the replacement directly with the original part before finalizing fit. A misfit at any of these points can create an airflow loss path.
Critical Fit Checkpoints by Common Replacement Part Type
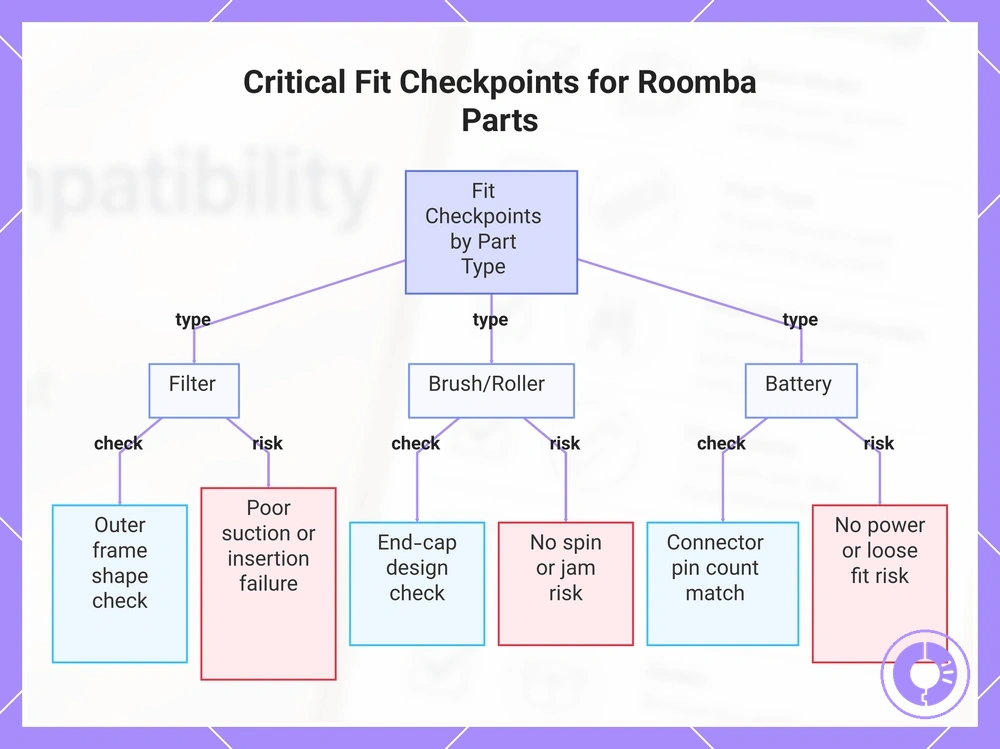
Each common Roomba replacement part type has its own set of high-impact checkpoints. These checkpoints focus on interface attributes that must match—such as connector shape, mounting holes, seal type, or latch position—so that a simple pass/fail check can confirm compatibility and prevent wrong orders.
The checkpoints are grouped by part type—filter, brush/roller, side brush, battery, and wheel module—because each component engages the robot through distinct interface points. A filter seals against a housing, a brush locks into a drive socket, a battery connects via a multi-pin plug, and a wheel module bolts into a chassis cavity with specific alignment features.
- Filter – Check outer frame shape, seal type, and latch position. A misfit may cause poor suction or incorrect insertion.
- Brush/Roller – Verify end-cap design, drive gear pattern, and overall length. A mismatch may cause the brush to not spin or to jam.
- Side Brush – Confirm screw hole location, bristle configuration, and mounting arm shape. A misfit may cause the brush to drag or detach during operation.
- Battery – Match connector pin count, housing dimensions, and latch tab orientation. An incorrect part may not power on or may fit loosely.
- Wheel Module – Check mounting hole spacing, electrical connector type, and wheel diameter. A misfit may cause the module to wobble or fail to respond.
This chart highlights key fit checkpoints and their consequences for three common Roomba replacement parts: filter, brush/roller, and battery.
Filters and filter frames: shape profile, seal edges, and frame locking points
A Roomba replacement filter fits its frame based on three physical attributes: the filter's shape profile, the seal edges that contact the frame, and the locking points that hold the assembly in place. A filter that matches the outline but differs in latch placement or seal geometry may not seat correctly, and the frame must lock and seal.
To compare a replacement filter to your iRobot model or series, use these fit-check points.
- Filter outline fits the frame cavity without forcing or rocking.
- Seal edge runs continuously along the filter perimeter and aligns with the frame gasket surface.
- Latch or locking tab on the filter engages the frame recess with an audible or tactile click.
- Frame locking arms or clips close fully without excessive play.
- Filter sits flush against the frame sealing flange when latched.
- No visible gap between the filter edge and the frame after locking.
- Filter removal requires deliberate unlatching, not gravity or vibration.
A common confusion: a filter may have the same rectangular outline as the original, but the latch placement is shifted by a few millimeters. The filter appears to fit until the frame locking points fail to align, leaving the seal edge partially seated. Then leakage may occur around the unlatched side even though the filter shape looks correct. Confirm latch position and seal edge contact, not just the outer dimensions, before purchasing a replacement part.
Rollers and brush modules: end-cap geometry, bearing seats, and module latch fit
For an iRobot Roomba replacement brush module or roller, fit depends on end-cap geometry, bearing seat shape, and module latch fit. After installation, free rotation is the test.
The Roomba series label indicates interface dimensions, but physical verification confirms compatibility:
- Roller checks: Verify that the end-cap diameter and profile match the housing receiver and that the bearing seat is clean and free of burrs. A roller that does not spin freely indicates a geometry mismatch.
- Module checks: Confirm that the latch tabs align with the chassis slots and that the module clicks into place without excessive force. A loose or misaligned latch fit can cause the module to shift during operation.
If the roller or module binds when seated or rubs against adjacent parts, the fit may be incorrect. This can cause noise, rotation resistance, and wear. Wrong-fit parts often produce immediate binding or rubbing signals that are often mistaken for debris or cleaning errors.
Color or branding alone does not confirm compatibility; physical fit and free rotation typically verify proper match.
Side brushes: hub profile, screw type, and rotation clearance
Side brush compatibility for Roomba and iRobot models depends on matching hub profile, screw type, and spindle interface to the specific series. Fit requires a seated hub that sits flush against the mounting point with adequate rotation clearance.
Use the checklist to verify these fit cues and confirm compatibility for your model.
- Check hub recess depth against the motor shaft height / A mismatch (hub too shallow) can prevent the brush from snapping into place.
- Check screw thread size and length / A wrong screw may strip the threads or fail to hold the brush.
- Check screw head shape (flat vs. countersunk) / A domed head can contact the brush surface and cause drag.
- Check spindle interface shape (round vs. D-shaped) / A non-matching interface may not transfer rotation.
- Check rotation clearance between brush bristles and the robot chassis / Insufficient clearance can cause binding or motor strain.
A common misfit occurs when a replacement side brush uses a screw with a head that is too thick. This prevents the hub from seating fully against the motor shaft, resulting in a loose brush that may not rotate smoothly.
Batteries: connector match, physical profile, and safe spec equivalence
Battery compatibility for the Roomba series by iRobot depends on matching the connector, physical profile, and safe spec equivalence. A replacement battery pack with the same voltage but a different connector or improper fit may cause charging or fit problems. Verify connector and physical fit first.
Verify in this order using these grouped checks.
- Connector and terminal layout: Check that the battery pack interface matches the charging and power terminals of your Roomba model. A mismatch can create a poor electrical contact or prevent the battery from locking into place.
- Physical dimensions and mounting: Measure the compartment area and compare with the replacement battery length, width, height, and any alignment tabs. An incorrect fit may leave the battery loose or force the cover closed improperly.
- Labeling and spec cues: Look for the original battery label to identify the voltage, chemistry (NiMH or Li‑ion), and capacity. Use these markings as a guide when selecting a compatible replacement. Voltage alone isn’t enough to confirm compatibility; the connector and physical fit must match as well.
If any of these three checks fails, the risk of charging failure or physical damage increases.
Wheel modules and tires: mounting alignment, axle interface, and traction profile
Wheel module compatibility comes down to housing shape, connector placement, and a traction profile that matches the original. The axle/mount must match the model's mounting bracket.
- Module-fit checks: Check that the module’s housing shape and connector orientation align with the mounting bracket and harness of your model. A visible misfit at the axle interface can block installation or cause poor contact.
- Tire/traction-fit checks: Check that the replacement tire’s tread pattern and surface grip match the original traction profile. An incompatible traction surface may affect movement consistency across different floor types.
A mismatch in housing shape or connector placement often prevents proper seating against the axle mount, signaling an incompatible part.
Photo-and-diagram cross-checking that prevents ordering the wrong variant
Photo-and-diagram cross-checking prevents ordering the wrong variant by verifying interface details that listings often omit. The image shows a side-by-side comparison highlighting latch points, connectors, and sealing edges — photos reveal interface details.
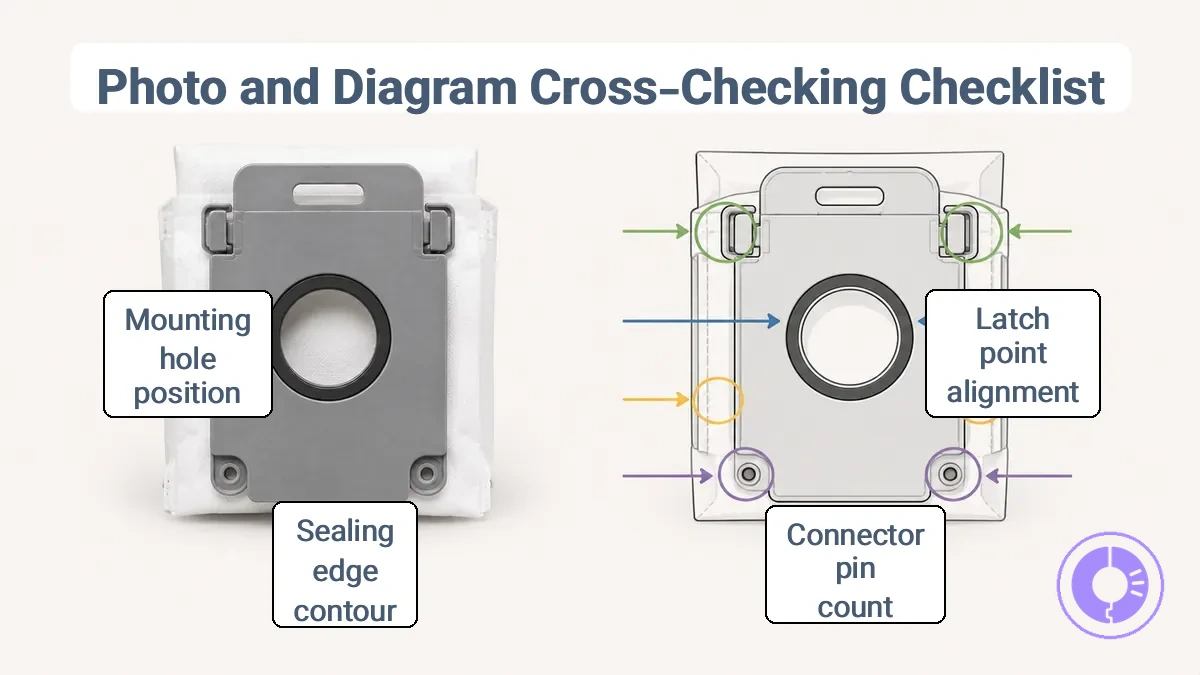
To verify compatibility, match the part using a diagram by comparing specific features between the part photo and the diagram reference. This checklist compares key interface features that should match for a Roomba or iRobot model series.
- Latch points — Compare the shape and location of tabs or clips. Pass if the photo and diagram align; fail if offset.
- Connector type — Verify the number and arrangement of pins or slots. Pass if identical; fail if mismatched.
- Sealing edges — Check the outline and any gasket channels. Pass if the contour matches; fail if different.
- Mounting holes — Confirm the position of screw or peg holes relative to the part edge. Pass if distances match; fail if off.
When a seller photo shows a part that looks similar but belongs to a different variant, the photo may not reflect the current interface. This mismatch indicates the need for additional verification before ordering.
Listing claims that commonly signal compatibility risk
Vague fit claims and missing interface evidence are common compatibility risk signals. When a listing states compatibility without specifying the exact model series or connector layout, confidence drops.
Each bullet pairs the risky phrase with the missing evidence needed to confirm fit.
Many buyers assume a listed model match guarantees proper fit, but interface differences often cause misfit. Performing quality and fit checks before buying can lower risk, and knowing when genuine parts matter most helps decide between replacement options because evidence beats wording.
- “Fits all Roomba models” – model series, label location, or product code needed.
- “Compatible with 500 series” – side‑connector shape and mounting hole position needed.
- “Replaces OEM part X” – original part number, interface photo, or spec sheet needed.
- “Drop‑in replacement” – clearance dimensions or clip‑type evidence needed.
- “Works with iRobot 800 series” – wiring harness layout and connector pin count needed.
- “No modifications required” – user‑reported fit confirmation or side‑by‑side image needed.
- “Fits across 3 series” – each series interface variation documented or confirmed.
- “Standard size” – measured width, height, and depth relative to the existing part needed.
- “Matches original design” – material type, clip orientation, or spring tension evidence needed.
- “Fits all cleaning heads” – head mount bracket shape or screw pattern evidence needed.
Vague claim – “Fits most Roomba models”.
Specific evidence – “Compatible with Roomba 800 series using two‑pin connector, verified against original part number”.
Quick Arrival Fit-Check Before Installation or Discarding Packaging
A quick arrival fit-check helps you avoid returns and prevents installing the wrong variant. Verifying fit before removing packaging saves time and prevents damage. Check before installing.
Confirm compatibility through non-destructive visual and mechanical checks that focus on model identifiers, interface geometry, and connector alignment.
- Check the model number on the part label and packaging label against your Roomba series. If either mismatches, stop and re-verify your model or series identifier.
- Check physical dimensions, mounting tab layout, and visual features (brush pattern, bumper shape, sensor window) against the original part. If any differ, re-check series compatibility and re-identify your model.
- Check connector type and pin arrangement. If pins do not align, do not force; confirm the revision from your existing connector.
- Check latch engagement points for the same click pattern as the original. If the latch does not seat, compare the interface evidence from your current part.
- Check seating depth by holding the part next to the opening (without installing). If depth or curvature seems off, verify your Roomba series via iRobot or the model label.
- Check for protective inserts or stickers that list compatible series. If missing or inconsistent, verify the correct part online using manufacturer resources.
If any checkpoint fails, do not install—re-check your Roomba model/series and the interface evidence before proceeding further.
Compatibility questions that keep causing wrong-part purchases
When a replacement part arrives and does not fit, the most common cause is a mismatch between the part and the specific Roomba model or series. The following questions address how to identify your model, verify part fit, and understand common compatibility factors.
Compatibility depends on the exact model and series of your Roomba, not just the brand or part name. Verify the model number and series before purchasing a replacement part to reduce the risk of a misfit.
Question: How do I figure out what model my Roomba is?
Answer: The bottom label lists the model number, series, and exact model identifier. You can also find it in the iRobot Home app under device settings.
Question: Is a Roomba side brush necessary?
Answer: A side brush is necessary for cleaning edges and corners, but not all models include one. Check your model's specifications to see if it is needed and which type fits.
Question: Does Roomba have two side brushes?
Answer: Some Roomba models have two side brushes, while others have only one. Verify the brush configuration for your specific model.
Question: Can you put a new battery in a Roomba?
Answer: Yes, most Roomba models allow battery replacement, but the installation method varies by series. Some models use a removable battery pack, while others require disassembly. Check your model's manual or the iRobot support site for the correct battery part number and replacement procedure.
Question: What kind of battery does the Roomba use?
Answer: Roomba batteries are typically lithium-ion or nickel-metal hydride (NiMH), depending on the model. The battery voltage and capacity also differ between series. Use a battery designed for your specific model to ensure proper fit and charging compatibility.
Question: Does a replacement part from a different series fit my model?
Answer: Parts from a different series may not fit due to differences in mounting points, shape, or electrical connections. Even within the same series, revisions can change the interface. Compare the part number and physical dimensions with your original part before purchasing.
Question: How can I verify that a part is compatible before buying?
Answer: Cross-reference the part number with your model number using the manufacturer's compatibility list or a trusted retailer's fitment tool. Look for evidence such as customer reviews that mention the same model. If in doubt, contact the seller with your model number.
Question: What should I do if the part does not fit?
Answer: Double-check that you have the correct model and series. If the part is clearly mismatched, return it under the seller's return policy. Use that experience to avoid similar issues with future purchases.