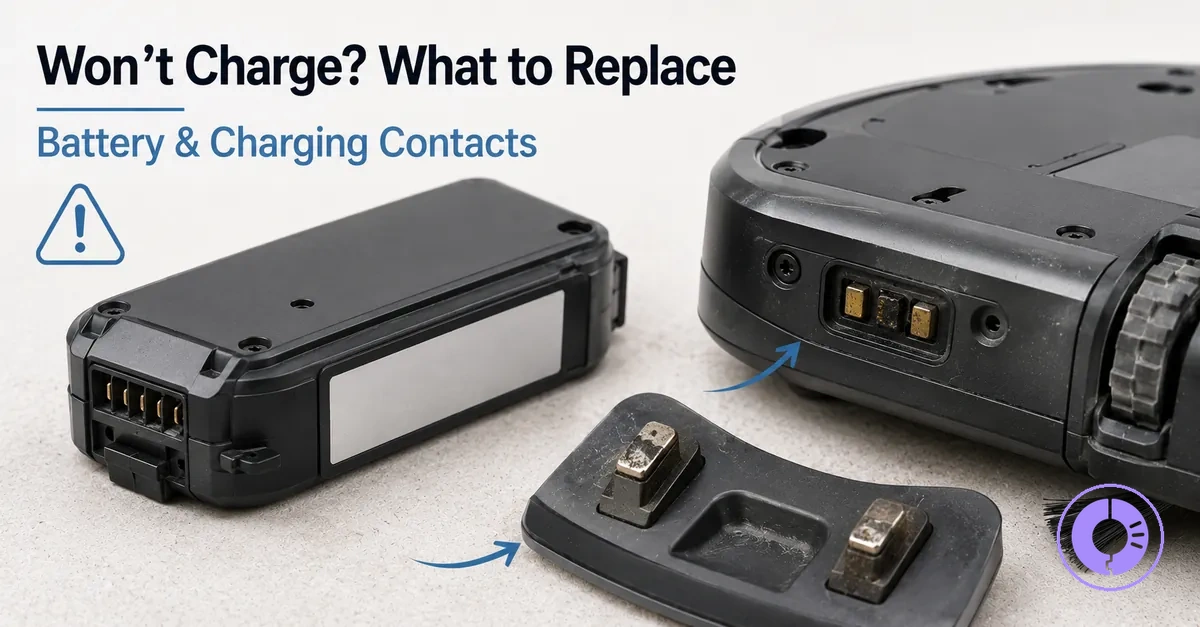
Roomba not charging troubleshooting: which parts to replace to restore charging
Roomba not charging usually points to a disruption in the charging path—the sequence from the power outlet through the charging dock (the Home Base), the charging contacts, the battery, and the connector. The charging path provides the framework for deciding which part to replace first.
For each segment of the charging path, the replace-first approach means: identify the symptom, perform a quick check, then determine if the part has reached its replacement threshold. If the charging dock’s power adapter shows no light or the charging contacts are visibly corroded, replacing those components may restore charging before moving to the battery or connector. However, the actual outcome depends on the Roomba model, the amount of wear, and whether the issue is intermittent or constant. The Roomba replacement parts hub provides broader context for components across different models.
A Roomba that won’t start can be a downstream effect of no charging, but if the charging path tests clear, the problem may extend beyond the charging system. The focus remains on charging-path parts.
Roomba charging system components and where charging failures usually originate
Charging a Roomba requires three segments to work together: power delivery from the dock and power adapter, conductivity through the charging contacts and contact pads, and integrity of the battery and its connector.
The annotated image labels the charging system components.
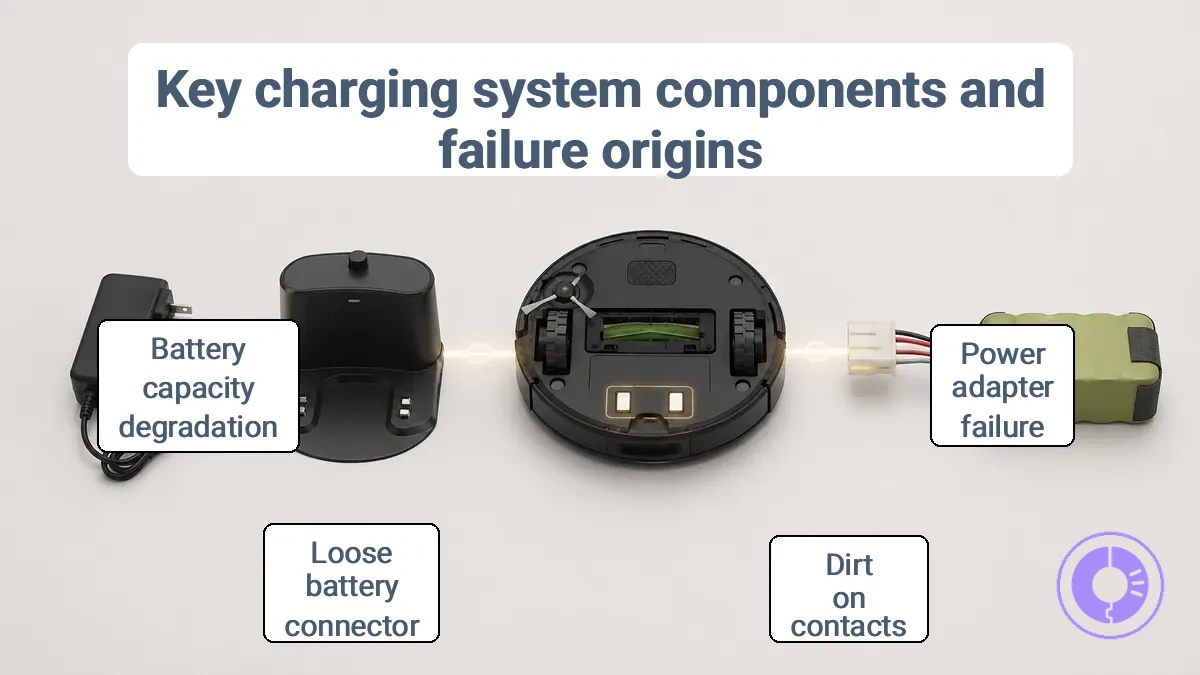
The charging system components and their typical failure signals are:
- Home Base and power adapter: Supply the stable power needed to start charging. Failure often leads to no charging or intermittent charging.
- Charging contacts on dock: Transfer power to the robot. Poor conductivity or misalignment can cause intermittent or no charging. Proper seating between the dock and Roomba helps maintain consistent conductivity.
- Contact pads on Roomba: Receive power from the dock. Dirt or wear can block conductivity, leading to slow or failed charging.
- Battery connector: Links the battery to the Roomba’s internal circuit. A loose or corroded connection may prevent charging or cause short runtime.
- Battery: Stores energy. Degraded capacity or internal fault can lead to short runtime or failure to start.
For example, a Roomba that stops charging after a few minutes could have a weak power adapter or a failing battery connector—two different weak links that produce similar symptoms. Understanding the charging path segments helps isolate the problem source; to identify charging-related components, check each segment.
Pre-replacement checks that confirm a charging-path problem
Pre-replacement checks reduce false positives before you replace any charging-related part. These quick checks run from the easiest controls—like verifying dock power and LED behavior—to the most discriminating signals, such as contact cleanliness and alignment, to rule out simple issues before assuming component failure. Outcomes vary by model and wear, so these checks are confirmatory signals, not proof.
Pre-replacement checks include a visual inspection of the dock and robot. The image shows correct docking alignment and contact seating to reduce misdiagnosis.
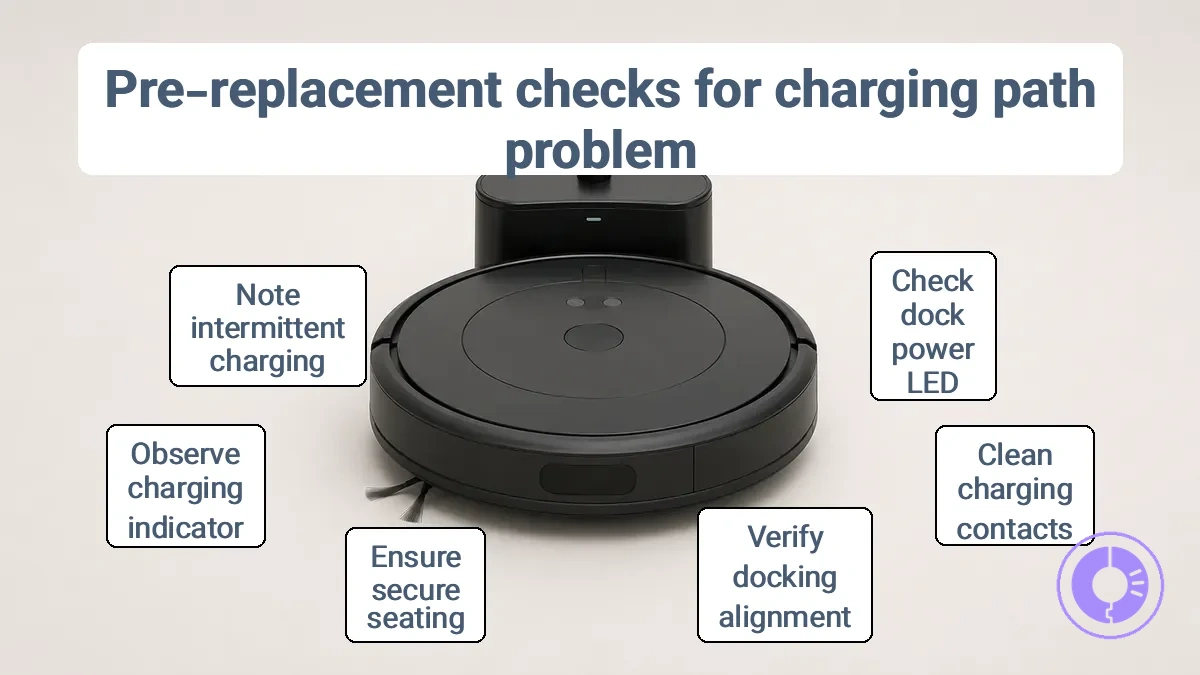
The following checks help confirm whether the charging path is the problem.
- Observe the dock power LED: if it is off, verify the outlet and cable. This can confirm power availability. If the LED is off, treat it as a control failure; if it is on but the robot does not charge, treat it as part-likelihood.
- Check the charging contacts on both the dock and robot for dirt, corrosion, or debris. Clean contacts confirm conductivity. If contacts are dirty, cleaning may restore stable charging; if clean and still no charge, the issue likely lies elsewhere.
- Inspect the alignment of the robot on the dock. Proper docking alignment ensures the contact pads meet. If alignment is off, the connection may be intermittent; if alignment is correct but charging does not start, the problem may be internal.
- Check the compatibility checklist for power parts to see if your robot model is listed; if listed, the part matches; if not, treat it as a compatibility issue.
- Verify the robot is fully seated on the dock with no rocking. Good seating confirms mechanical alignment. If the robot is not seated, the connection may be unstable; if seated but charging does not initiate, the charging circuit may be faulty.
- Watch for the charging indicator on the robot. A steady or blinking LED indicates a charging attempt. If the indicator does not light, the charging path may be blocked; if it lights but charging stops intermittently, suspect a loose connection or worn contacts.
- Notice if charging starts and stops repeatedly. If the pattern is consistent, treat it as a confirmatory signal of a charging-path problem rather than a random glitch.
After performing these checks, if the robot still does not charge, the issue may be internal. Move to symptom interpretation only after completing these pre-replacement checks.
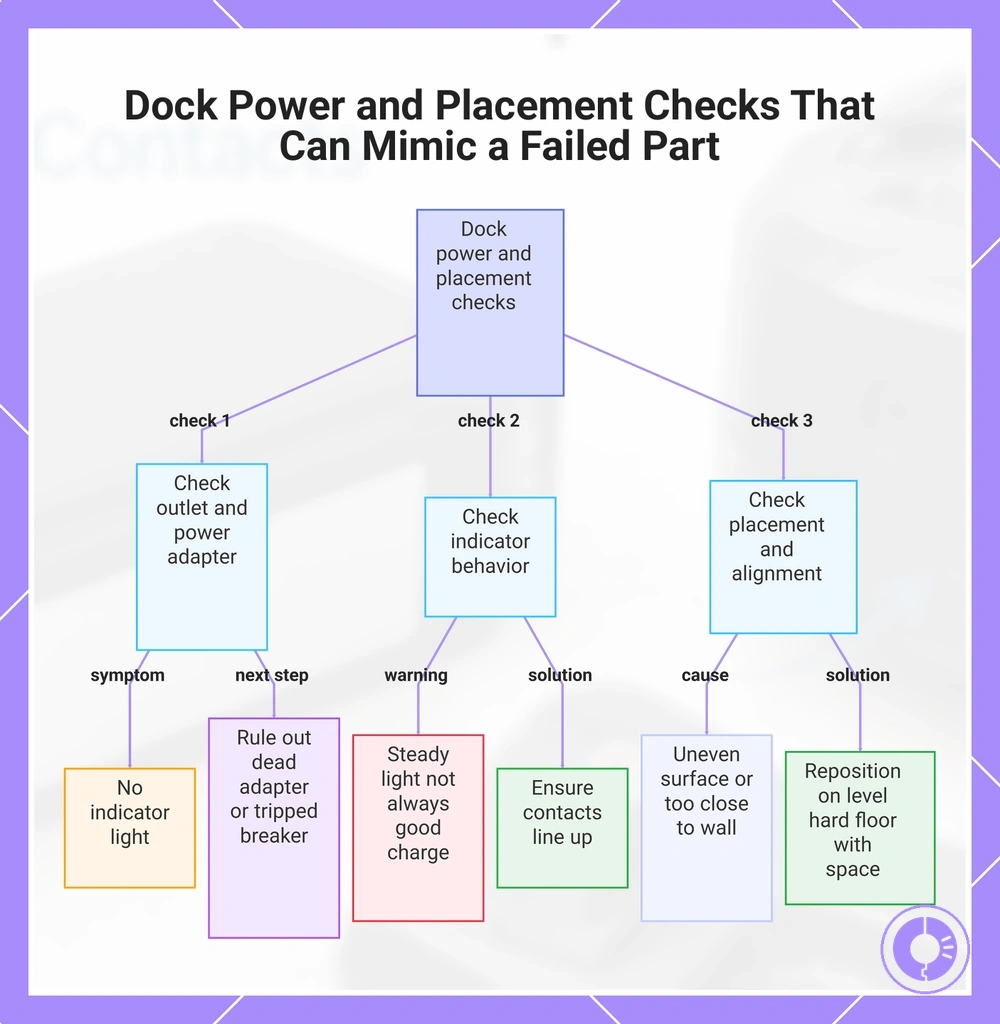
Dock power and placement checks that can mimic a failed part
Dock power and placement issues can mimic a failed battery or damaged charging contacts, even when those parts are functional.
Checking these first can help avoid replacing a good part.
- Check the outlet and power adapter. If the dock shows no indicator light, it may not be getting dock power. Rule out a dead power adapter or a tripped circuit breaker. Plug the adapter into a known working outlet before assuming a part is faulty.
- Check the dock's indicator behavior. A steady light doesn't always mean a good charge; poor docking alignment can mimic a bad battery. Make sure the robot's contacts line up with the dock's prongs for a proper charging attempt.
- Check the dock's placement and alignment. If the robot repeatedly starts and stops charging, the dock may be on an uneven surface or too close to a wall. Reposition the charging base on a level, hard floor with enough space for a straight approach. Poor placement can prevent contact and mimic a power failure.
This chart shows the three main checks for dock power and placement issues that can mimic a failed battery or damaged charging contacts, helping avoid unnecessary part replacement.
Charging contact condition checks that separate cleaning from replacement
When charging issues persist, checking the condition of the charging contacts helps distinguish surface contamination from actual contact wear, focusing on wear and conductivity rather than repair steps. Look for signs of wear, pitting, or weak spring tension on the charging contacts and contact pads, as these can compromise stable charging.
To decide whether cleaning may restore reliable charging or replacement is needed, inspect for these signs of wear:
- Charging contacts show surface pitting or oxidation that does not lift with gentle cleaning
- Contact pads have visible wear grooves or a green/copper discoloration that often indicates deep corrosion that may require replacement
- Spring tension in the contact pads feels weak, which can cause intermittent contact and an inconsistent charging signal
- Intermittent charging persists after thorough cleaning, indicating reduced conductivity that can prevent a stable charging signal
- Alignment between the robot’s contact pads and the dock’s contacts is visibly off, which can prevent proper seating
Recurrence of charging errors after thorough cleaning is a stronger signal that the charging contacts or contact pads need replacement rather than further cleaning.
Symptom Patterns That Identify the Most Likely Failed Charging Component
Symptom patterns are probabilistic signals that should be cross-checked with pre-replacement controls like visual inspection, contact cleaning, and dock power verification. This visual guide organizes them by the most likely failed component.
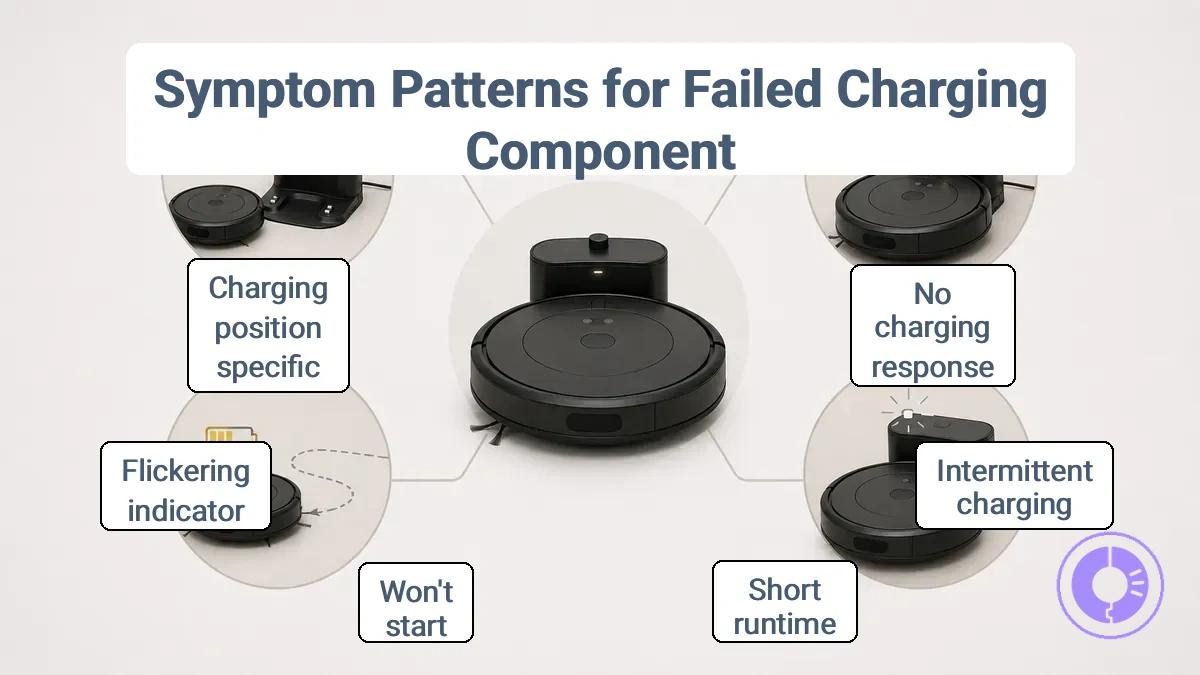
The symptom patterns cover no charging, intermittent charging, and short runtime scenarios. Each pattern points to the most likely faulty component and includes a confirm check and a conditional replace-first implication.
- No charging indicator with no device response suggests a dock power or contact detection issue. Confirm by checking the dock LED and cleaning contacts. Replace-first suggestion: the dock power board or contact pins if damaged.
- Charging indicator lights but no charging points to poor contact conductivity or alignment. Confirm by reseating and removing debris from contacts. Replace-first suggestion: the charging contacts or connector assembly.
- Intermittent charging that starts and stops repeatedly indicates conductivity problems from worn contacts or inconsistent alignment. Confirm by cleaning contacts and testing with slight adjustments. Replace-first suggestion: the contact assembly.
- Short runtime after a full charge signals battery capacity loss or voltage instability. Confirm by running a battery diagnostic if available. Replace-first suggestion: the battery.
- Device won't start after a full charge suggests a battery or connector failure, or a stuck power state. Confirm by trying a different charging source and inspecting connector pins. Replace-first suggestion: the battery or connector board.
- Charging light flickers or blinks erratically indicates an intermittent connection at the dock contacts. Confirm by checking dock spring pins for wear and reseating. Replace-first suggestion: the dock contact assembly.
- Charging only in a specific position suggests alignment issues or worn contact surfaces. Confirm by inspecting contact surfaces for wear or debris. Replace-first suggestion: the contact set on device or dock.
- No charging after a power outage or dock reset may be due to a tripped circuit in the dock. Confirm by unplugging and replugging the dock. Replace-first suggestion: the dock power supply if reset does not restore.
Compare these patterns to your symptoms and pick the evidence branch that fits most consistently. Overlapping symptoms can reflect multiple weak links, so treat each pattern as a probabilistic guide. When ambiguous, stage replacements starting with the least expensive or most accessible part. For cases where explicit error codes appear, check the error codes and charging fixes section for additional guidance.
No Charging Indication vs Intermittent Charging Behavior
No charging indication and intermittent charging behavior are two distinct signals that point to different root causes and different replace-first priorities. This comparison helps organize the diagnostic approach rather than proving a single fault.
No indication- More consistent with dock power failure or contact detection issue
- Prioritize checking dock power and contact presence before considering battery replacement
- Charging light remains off or shows an unusual color with no charging
- Often no voltage at the charging terminals
- More consistent with unstable conductivity or weak storage capacity
- Prioritize assessing contact alignment and connection integrity
- Charging light may illuminate briefly then turn off
- Charging may stop after a few seconds due to poor energy retention
- Conductivity issues at the dock or terminals can produce similar stop-start behavior
For example, a worn battery may accept charge for a few seconds then stop, while a misaligned dock can cause the same symptom by breaking electrical contact mid-charge.
Won’t start vs won’t charge: the overlap that changes what you replace first
Won’t start may stem from no charging, but when no power state is visible, the replacement priority changes.
The observable power state determines which replacement to prioritize first:
- No power at all: prioritize battery and its connector.
- Powers on but won’t charge: prioritize dock and contact points.
- Inconsistent boot after a charge attempt: connection integrity is the more plausible cause.
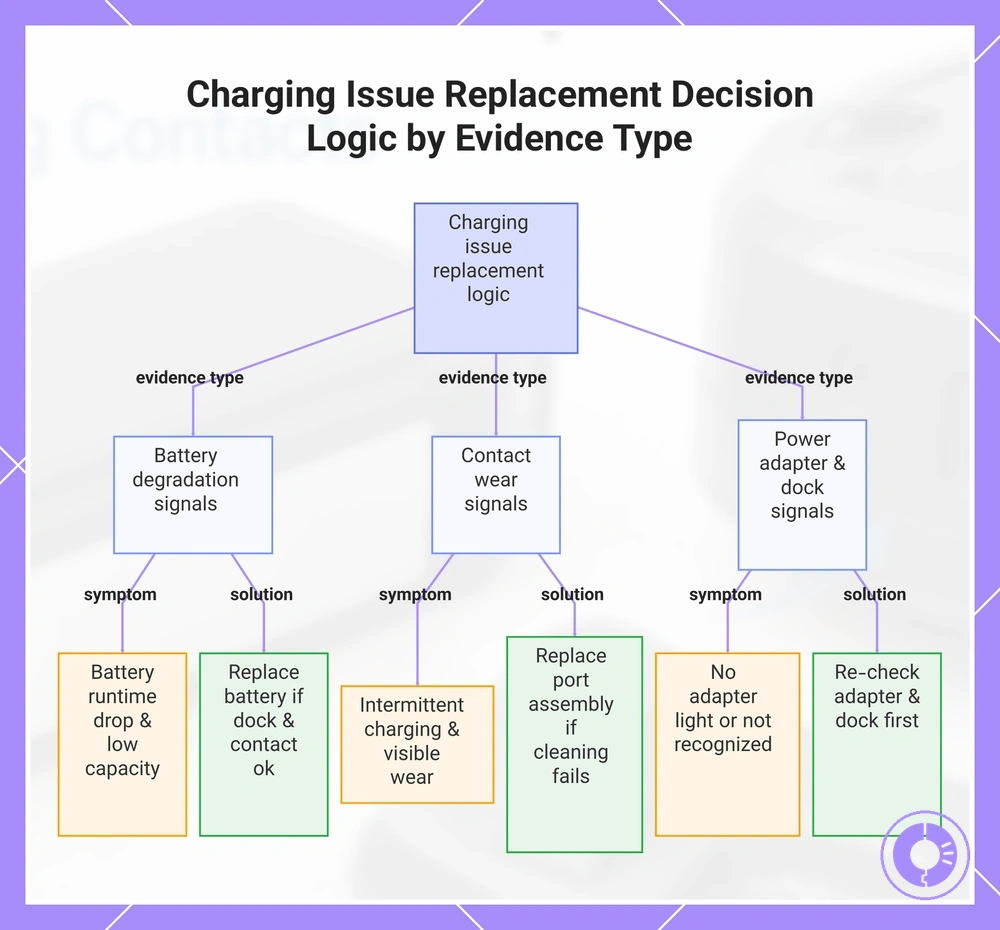
Replacement decision logic for charging issues
Replacement order follows a decision flow based on the strongest symptom-and-check evidence rather than guesswork. The threshold for replacing a component depends on evidence strength: clear battery signals suggest a battery replacement, while intermittent charging often points to contact wear.
Replacement decision logic groups charging problems by evidence type and sets a replace-first threshold for each.
- When battery runtime drops significantly and capacity appears low (battery signals), degraded cells are likely. Replace the battery if contact and dock checks are normal.
- When charging is intermittent and port contacts show visible wear (contact wear), poor conductivity is likely. Replace the DC-in board or port assembly if cleaning does not restore stable charging.
- When the power adapter shows no indicator light or the device does not recognize it (dock power), a block in the power delivery path is likely. Re-check the adapter and dock before replacing internal components.
- When the device boots on battery but shows "not charging" when plugged in, a communication failure between the battery and logic board is likely. Run a battery management system test before replacing the board.
- When the problem persists after replacing the battery and DC-in board, a logic board or SMC fault is likely. Replace the logic board only after confirming that all other parts are functional.
- When multiple symptoms appear together (mixed battery signals, contact wear, and weak dock power), isolate one variable at a time. Test the adapter first, then the port, then the battery, and finally the logic board to reduce unnecessary swaps and repeat failures.
This chart shows the main evidence types that guide which charging component to replace, with symptom checks and recommended actions.
When a replacement battery is the highest-probability fix
A replacement battery is the highest-probability fix when a Roomba stops charging or runs only briefly after a charge, provided the charging contacts and power supply have already been verified. That makes careful battery selection and safe replacement the logical next step. Contact conductivity can mimic battery weakness, so treat prior contact checks as a control variable. These grouped signals indicate when the battery itself may be at fault.
- Performance signals: Short runtime after a full charge, rapid drop from full to empty within minutes, and reduced battery capacity that no longer holds stable voltage can indicate storage degradation.
- Usage history signals: Heavy cycle exposure beyond typical service life correlates with higher failure probability, justifying a replacement battery sooner.
- Connection-fit signals: Intermittent power behavior and failure to start reliably often trace to poor connection fit or degraded internal contacts.
- Won't start after sitting idle, even after a full charge cycle, may point to elevated self-discharge.
When charging contacts or contact assemblies should be replaced
Replacing charging contacts or the contact assembly is justified when repeated cleaning and alignment checks do not restore consistent conductivity. This threshold separates temporary contamination from physical degradation such as wear or corrosion.
- Visible wear or corrosion that does not clean off, or a drop in conductivity after cleaning, may indicate metal degradation that calls for replacement.
- Spring weakness — Contacts that do not spring back fully can cause intermittent charging due to insufficient connection pressure.
- Intermittent charging — A pattern of charging that starts and stops without physical disturbance may point to contact assembly issues.
- Alignment problems — Poor seating on the dock requiring manual adjustment each time suggests damaged contacts or housing.
- Recurrence after cleaning — Charging problems that return within days after thorough cleaning may indicate underlying wear.
When the Home Base, power adapter, or internal connector is the likely replacement
When battery contacts and dock alignment checks do not explain a failure to initiate charging, isolate the first failing segment. Match symptoms to observable cues. The likely cause is among the Home Base, power adapter, or internal connector.
- Home Base or charging dock
- No initiation when the dock is powered and contacts are clean suggests unstable power delivery from the dock.
- Inconsistent engagement upon repeated placement points to a seating issue rather than a power supply problem.
- No power presence at the dock (no indicator lights) may indicate a dock fault.
- Power adapter
- Power stability issues—such as the charger running hot or failing under load—point to the adapter as the likely segment.
- A total lack of power at the dock output, after ruling out the dock's internal connections, suggests adapter failure.
- No initiation of charging despite correct voltage at the barrel connector suggests the adapter may be providing insufficient or intermittent current.
- Internal connector
- Looseness at the device's power jack leads to intermittent transfer—charging may work only when the cable is held at a certain angle.
- If the robot sometimes charges and sometimes does not, with no pattern related to dock seating, an internal connector or solder joint is a likely candidate.
- A conservative service boundary applies when internal damage risk is suspected (e.g., visible pin damage or broken housing), as further testing without disassembly may not be safe.
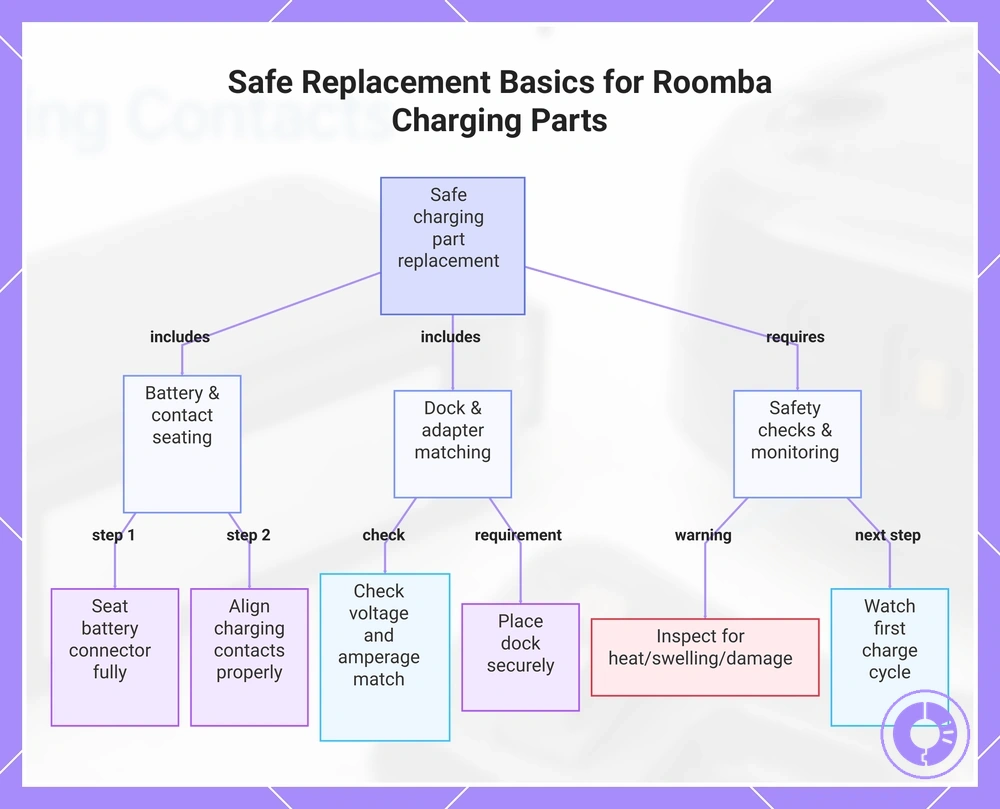
Safe replacement basics for charging-related Roomba parts
Safe replacement basics for charging-related Roomba parts lower the risk of damage and help prevent recurrence. These guidelines cover general handling for battery and connector seating, contact alignment, and dock or adapter matching. The steps focus on safe execution, not model-specific teardown or detailed diagnosis.
- Seat the battery connector fully to create a secure connection for stable power transfer.
- Handle the charging contacts carefully and align them properly to maintain good conductivity and stable charging.
- When replacing the dock or adapter, check that the voltage and amperage match, and place it securely to ensure reliable charging initiation.
After seating the battery and aligning the contacts, performing quality checks to avoid repeat failures helps confirm that connections remain secure before moving on.
- Before reassembly, inspect for heat, swelling, or damaged wiring. Stop immediately if you see any.
- After reassembly, watch the first charge cycle to confirm charging begins normally.
Caution: Stop immediately if you see heat, swelling, or damaged wiring during the process.
This chart shows the main guidelines for safely replacing charging-related Roomba parts, including battery seating, contact alignment, dock matching, and safety checks.
Handling and fit checks that prevent repeat charging failures after replacement
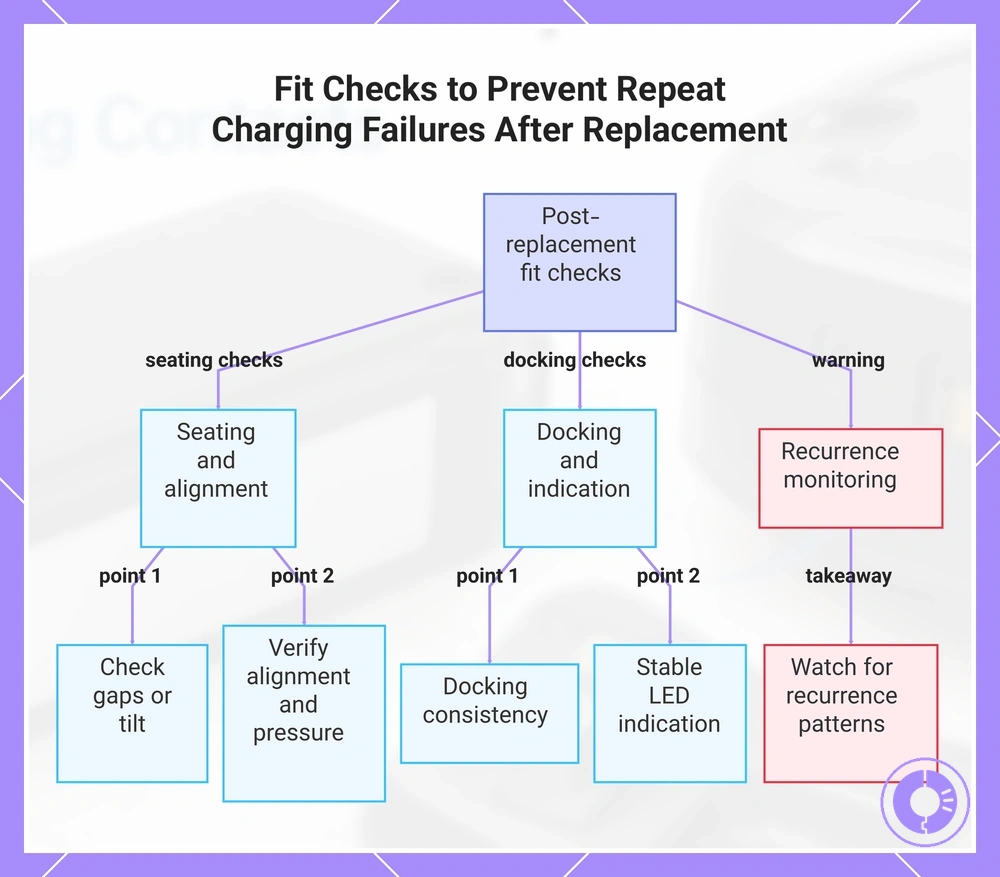
Post-replacement handling and fit checks confirm proper seating and stable contact, reducing recurrence by detecting alignment or pressure issues early. They confirm stable charging indication within a short observation window.
Handling and fit checks verify charging stability during the observation period:
- Confirm proper seating and alignment of the replaced part with charging contacts.
- Check for gaps or tilt that may cause intermittent contact or start-stop cycling.
- Check docking consistency by verifying reliable charging initiation after each placement.
- Look for stable charging indication (e.g., steady LED) within the short observation window.
- Verify alignment and pressure at the charging interface produce no unusual resistance.
- A single successful charge is a strong signal but not absolute proof; watch for recurrence patterns over subsequent charges.
This chart outlines the key fit and handling checks after a charging component replacement to confirm stable contact and avoid recurrence.
When replacing charging parts does not resolve the issue
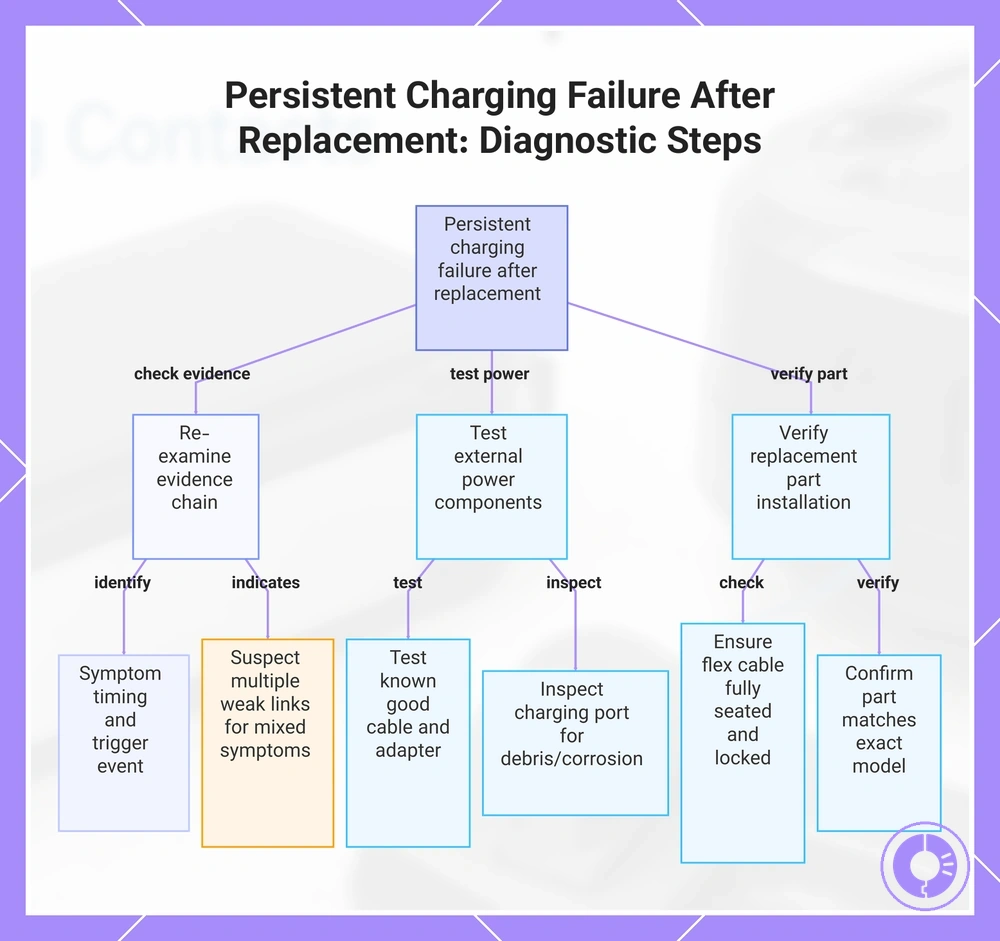
Persistent failure after replacement suggests a misidentified problem in the evidence chain or a fault outside the parts you swapped—such as debris, a damaged cable, or board-level damage.
A structured approach, rather than repeated part swaps, helps avoid replacement loops.
To prevent random swapping when the issue does not resolve, use a decision checklist that re‑examines the evidence chain and guides you to the next plausible segment for staged isolation.
- Re‑check the evidence chain: what symptoms appeared and when? Did the problem start after a specific event (e.g., drop, liquid exposure)?
- Test with a known good cable and power adapter before assuming the port is the problem – a weak power source can mimic a faulty port.
- Inspect the device charging port for debris, bent pins, or corrosion that could prevent a proper connection.
- If you performed the replacement yourself, ensure the flex cable is fully seated and the connector locked – loose connections are a common cause of persistent failure.
- Confirm the replacement part matches your Roomba’s exact model and version; mismatched parts may cause improper fit or charging issues.
- When mixed symptoms appear – for example, charging fails and other functions stop working – suspect multiple weak links and use staged isolation to replace one variable at a time.
- When the problem is recurring, shift to edge‑case identification only after completing the prior steps.
This chart shows the structured diagnostic approach to identify the root cause of persistent charging failure after replacing charging parts, including re-examining evidence, testing external components, and verifying installation.
Charging-Related Errors and Edge Cases That Require a Different Fix Path
When error-like behaviors appear, the next step is not another parts swap.
These categories are identification cues for such errors and edge cases. For a full reference of specific symptoms, see the dedicated page on error codes and charging fixes.
- Intermittent charging — likely scope: contact issue — next action: inspect and clean charging contacts.
- No power response when docked — likely scope: power delivery or contact issue — next action: escalate to specialized guidance.
- Charging starts then stops — likely scope: charging control — next action: escalate to specialized guidance.
- Overheating during charge — likely scope: power delivery or charging control — next action: stop use and escalate to service.
Escalation threshold for service when the charging path checks pass
Escalation is appropriate when safety risks appear or when evidence no longer supports safe replacement attempts. An escalation threshold helps you decide when to stop—it is a decision boundary, not a definite diagnosis of the exact fault. This escalation threshold checklist defines when to stop self-service and contact professional service.
- Heat from the battery or charging port: indicates a safety risk. Stop and escalate to service.
- Swelling of the battery: indicates internal damage and safety risk. Stop and contact service.
- Visible physical damage to the charging connector or battery: suggests a hazard. Stop and escalate to service.
- Repeated failure after all charging path checks pass: points to a low-confidence replaceable fault. Service is recommended.
- Signs of internal connector damage, such as bent pins, cracks, or broken plastic: risk of further damage if you proceed. Have the unit serviced.