Roomba wheel replacement for traction problems: what to replace and why
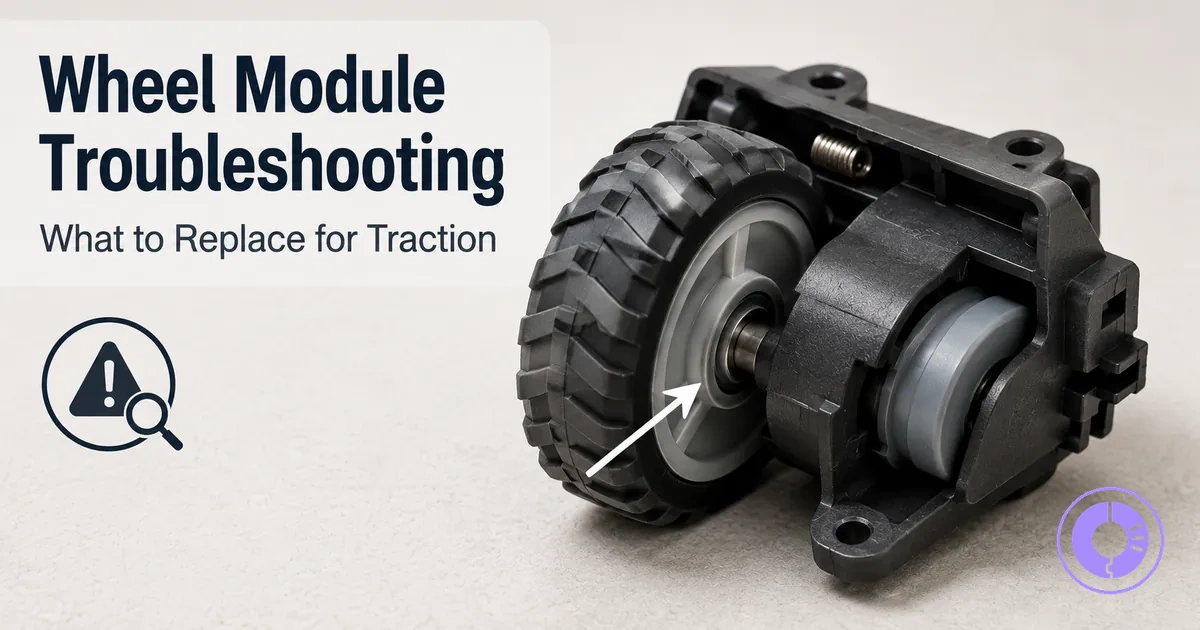
Traction problems with Roomba wheels are most often solved by servicing or replacing the drive wheel module when wear or restriction is confirmed. The main sources of traction loss are drive wheel modules, wheel tread condition, and the front caster, not suction, brushes, or battery performance.
For a Roomba, traction means the wheels' ability to maintain stable forward or turning movement without slipping on smooth, hard, or carpeted surfaces. A loss of wheel grip is a mobility problem, not a traction control fault. For related topics and part selection, see the Roomba replacement parts hub.
Wheel slippage can happen when debris, hair, or floor texture prevent the rubber tread from catching the surface, or when the wheel module itself no longer rotates freely. Actual outcomes vary by model, floor type, and debris load.
Different causes produce distinct traction symptoms. Identifying the cause determines the needed action.
- Recognize symptoms of traction loss specific to Roomba drive wheels.
- Confirm whether the wheel module, tread, or caster is the cause.
- Choose between cleaning the wheel assembly or replacing the affected part with a compatible option.
Traction Problems in a Roomba: Wheel Grip and Mobility, Not ‘Traction Control’ Faults
Traction problems in a Roomba involve wheel grip and mobility, not electronic traction-control faults. Reduced wheel-floor contact or insufficient friction leads to slipping and mobility loss.
A spinning or stalled wheel is often misinterpreted as an electronic fault, but the issue is typically inadequate grip or a mobility obstruction.
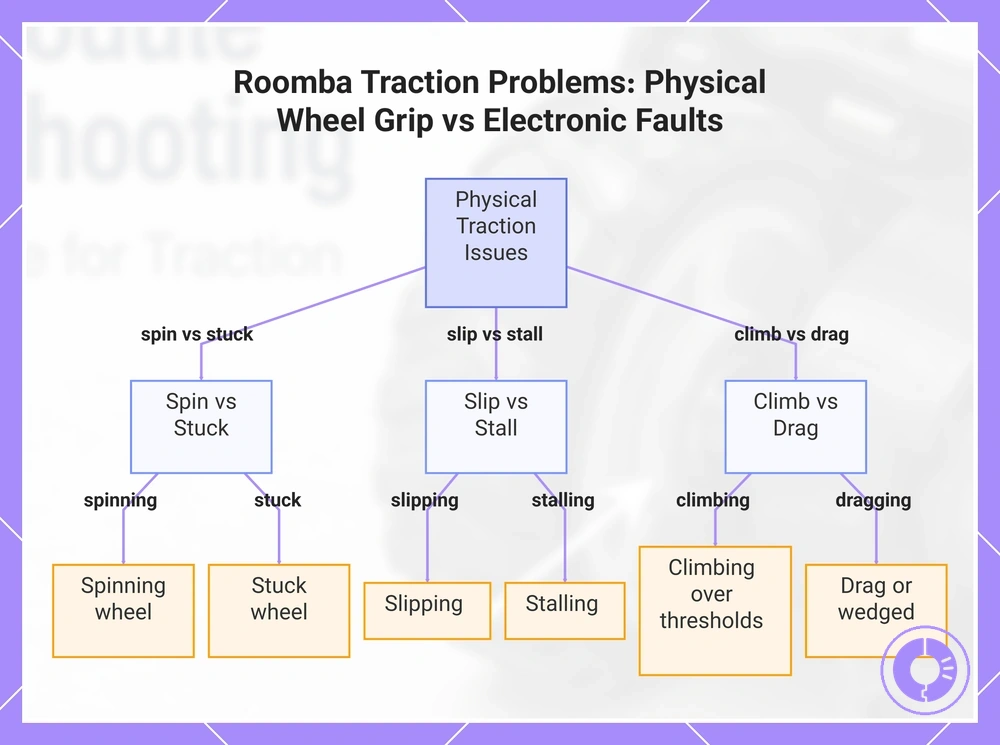
- Spin vs. Stuck: A spinning wheel often indicates limited grip on a smooth or wet floor, while a stuck wheel usually stops moving altogether due to a physical obstruction or low clearance.
- Slip vs. Stall: Slipping happens when the wheel loses friction and rotates without forward progress; stalling occurs when the robot cannot move at all, even though the wheel tries to turn.
- Climb vs. Drag: A Roomba that climbs over thresholds needs sufficient grip and momentum; one that drags or gets wedged under furniture may have reduced mobility from low clearance or a slippery surface.
This chart shows the main physical traction issues in Roombas and how to distinguish between similar symptoms like spinning vs stuck, slipping vs stalling, and climbing vs dragging.
How Roomba Drive Wheels Create Traction and What Wheel Slippage Usually Indicates
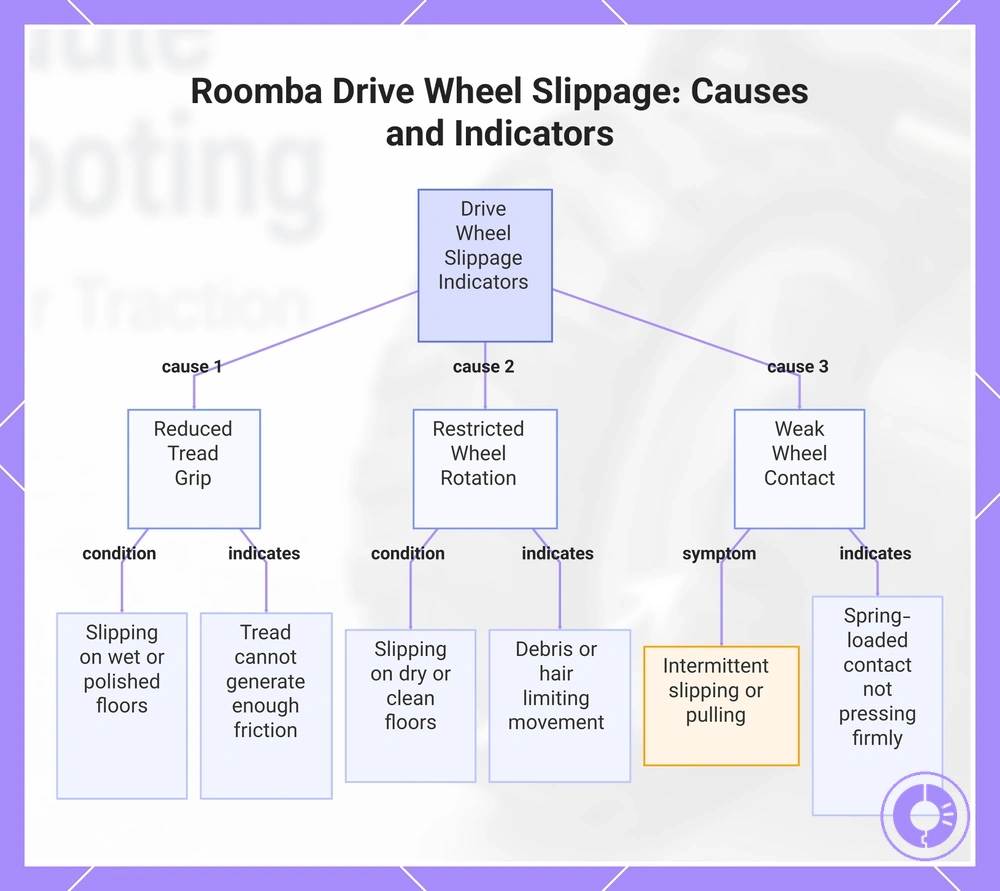
Slippage most often indicates reduced tread grip, restricted wheel rotation, or weak wheel contact with the floor.
The wheel module uses a spring-loaded suspension to press the drive wheel against the floor for consistent traction, and the tread maintains friction on common flooring types. When rotation is free and the tread has good grip, the wheel module moves reliably.
- Reduced tread grip – slipping on wet or polished floors usually indicates the tread surface cannot generate enough friction.
- Restricted wheel rotation – slipping that occurs even on dry, clean floors often points to debris or hair limiting free movement of the wheel module.
- Weak wheel contact – intermittent slipping or pulling to one side can signal that the spring-loaded contact is not pressing the wheel firmly against the floor.
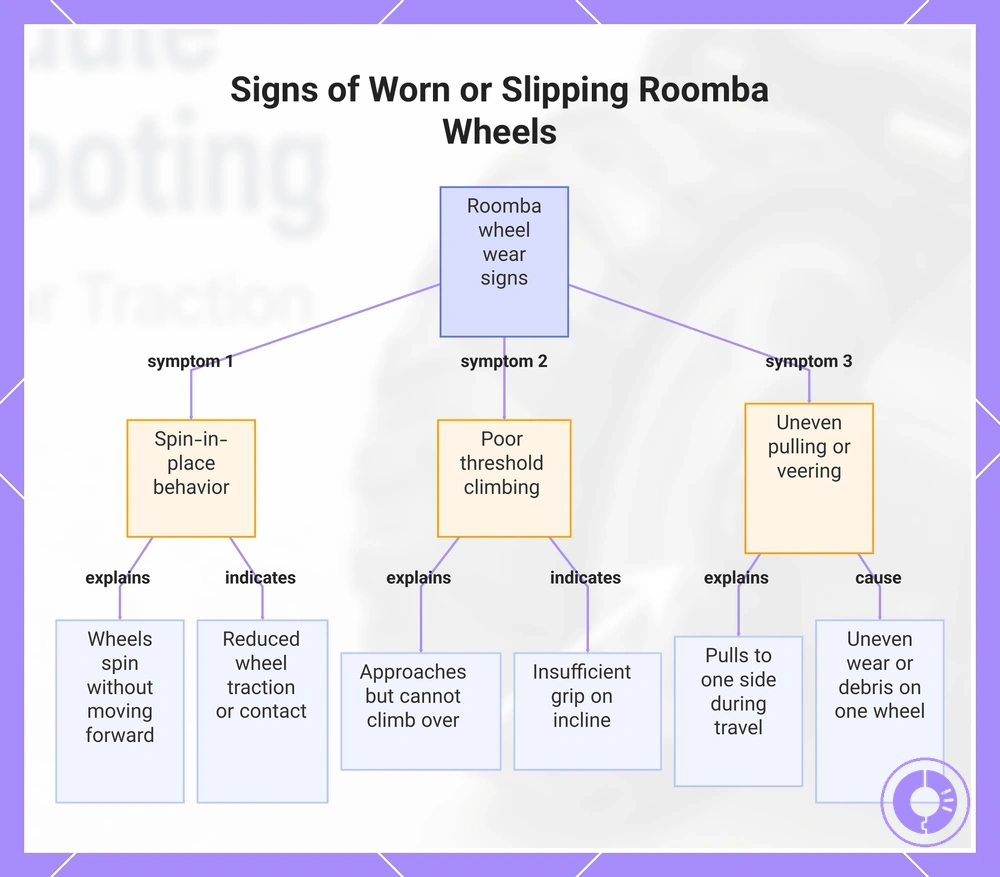
This chart shows the three main causes of Roomba drive wheel slippage and the specific conditions or symptoms that indicate each cause.
Signs your Roomba wheels are worn or slipping
Signs that wheels may be worn or losing traction include spin in place, slipping on smooth floors, poor threshold climbing, and uneven pulling.
On hard floors with high hair load or on transition strips, wheel grip can degrade faster.
If symptoms extend beyond wheels, see symptom-led troubleshooting for performance issues.
- Spin-in-place or slipping behavior
- Roomba spins in place, or wheels spin without moving forward.
- This pattern may indicate reduced wheel traction or contact.
- Poor threshold climbing or backing off
- Roomba approaches a threshold or transition strip but cannot climb over it.
- The robot repeatedly backs off before reaching the top.
- Wheel grip may be insufficient to maintain forward drive on the incline.
- Uneven pulling or veering
- Roomba pulls to one side during straight travel.
- One wheel may drive more slowly or with less force than the other.
- Uneven wear or debris on one wheel can cause this veering pattern.
This chart shows the three main symptoms that indicate Roomba wheel wear or loss of traction.
Wheel Parts That Affect Traction and What Each Replacement Changes
Traction fixes usually involve the drive wheel modules and sometimes the front caster. The table lists each component's common traction issue, its effect on movement, and the typical fix.
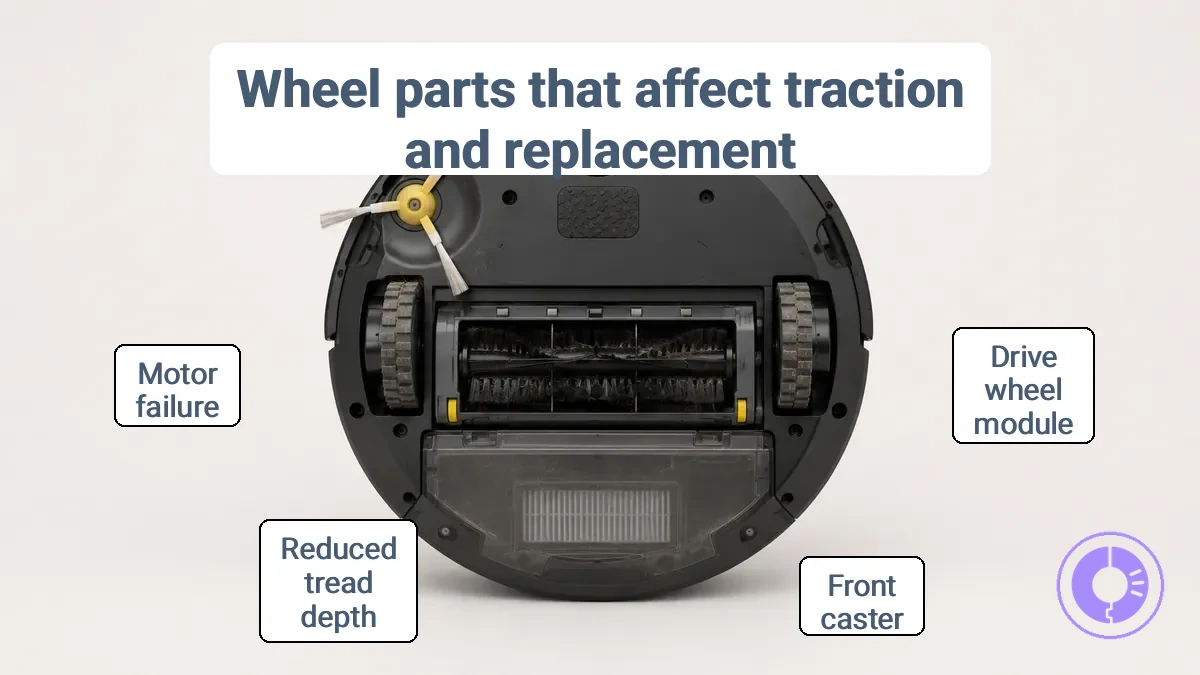
You can identify wheel parts using a diagram to confirm the part name before proceeding.
| Part | Common Issue | Traction Effect | Typical Fix |
|---|---|---|---|
| Drive wheel module (left/right) | Reduced tread depth | Slipping on smooth floors; inconsistent forward movement | Clean tread first; replace module if tread is worn |
| Drive wheel module (left/right) | Debris wrapped around axle | Intermittent loss of traction; wheel may stop spinning | Clean debris from axle; re-seat module if needed |
| Front caster | Hair or debris buildup | Drag or veer in one direction; reduced turning accuracy | Clean caster wheel and housing |
| Front caster | Worn or stuck wheel | Dragging motion; poor maneuverability | Replace caster assembly if cleaning does not restore free rotation |
| Drive wheel module (left/right) | Motor failure | No movement from that wheel; robot drives in circles | Replace drive wheel module |
Drive wheel module vs wheel tread vs front caster wheel
The drive wheel module, wheel tread, and front caster each have a distinct role in traction and mobility. Slipping, reduced grip, or veering each points to a different component.
- Drive wheel module: Provides propulsion and traction. Slipping can indicate a mechanical issue with the module.
- Wheel tread: The rubber surface that contacts the floor. Reduced grip often points to tread wear or debris buildup.
- Front caster: Supports stability and smooth turning. Drag or debris on the caster may cause veering during navigation.
Left vs right wheel modules and common mis-identification points
Left and right wheel modules are not typically interchangeable across sides or between Roomba series. A mismatched module may cause turning issues or prevent movement—use these cues to verify the module:
- Check for a clear side marking (often 'L' or 'R') on the module casing.
- Compare the connector orientation—it may be angled differently between left and right modules.
- Match the module’s mounting tab shape and position to your robot’s wheel well.
- Check the module’s connector pin layout to ensure it matches the side.
- If no side marking is visible, check the tread direction or hub shape as additional cues.
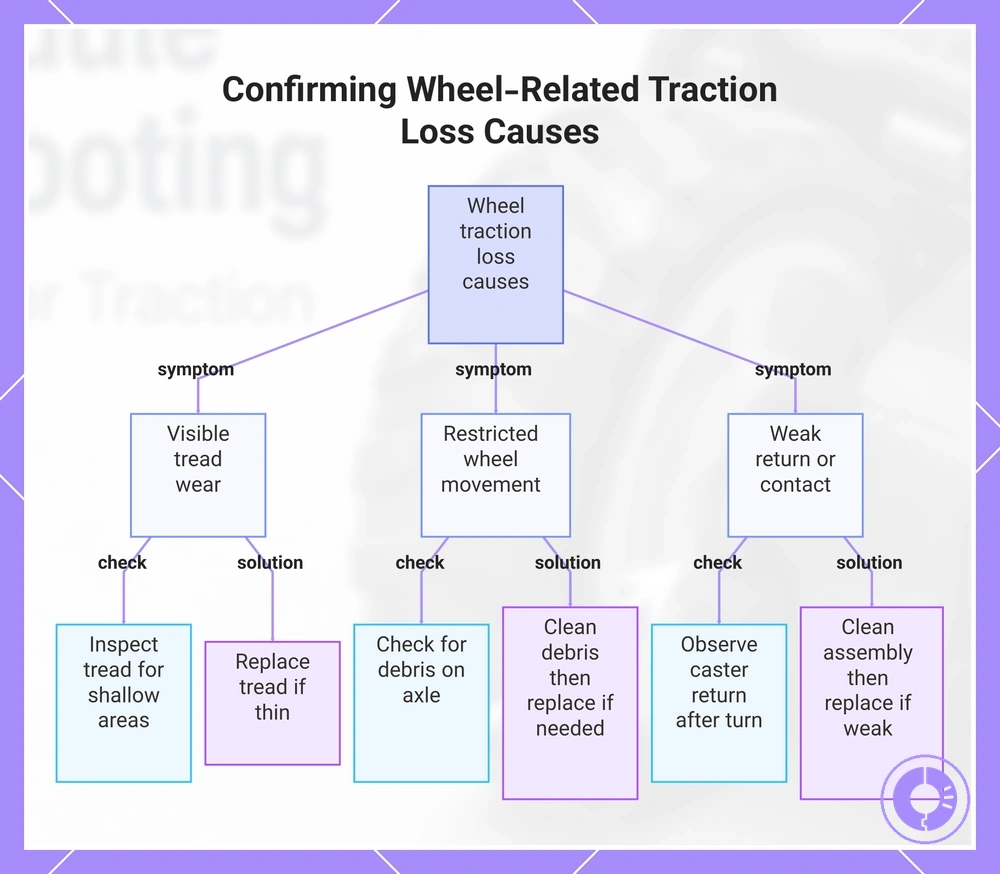
Wheel-related causes of traction loss you can confirm before buying parts
The most common signs you can confirm are visible tread wear, restricted wheel movement, or weak return/contact behavior. The checklist provides simple tests for each cause.
Debris often mimics wear, so start by cleaning a wheel that does not rotate smoothly. If cleaning does not restore smooth rotation, replacement may be needed.
- Test: Inspect wheel tread for noticeable shallow areas. Meaning: Worn tread can cause slipping on smooth surfaces. Action: Replace if tread is noticeably thin.
- Test: Check for hair or debris wrapped around the wheel axle. Meaning: Obstructions restrict rotation and reduce traction. Action: Clean all debris from the axle and wheel hub.
- Test: Manually rotate the wheel to feel for resistance. Meaning: Stiff or uneven rotation suggests hub debris or bearing wear. Action: Clean first; if resistance persists, reinstall or replace.
- Test: Observe how the caster returns to center after turning. Meaning: Weak return or poor contact indicates worn bearings or debris. Action: Clean the caster assembly; if weak return continues, replace the caster.
- Test: Listen for clicking or grinding during wheel rotation. Meaning: These sounds suggest trapped debris or bearing wear. Action: Clean thoroughly; replace if noise continues after cleaning.
- Test: Examine the wheel contact patch for uneven wear. Meaning: Uneven wear suggests alignment or mounting issues. Action: Re-seat the wheel; if uneven wear continues, replace the wheel.
- Test: Check if the wheel spins freely when lifted. Meaning: Restricted spin indicates bearing damage or debris in the assembly. Action: Clean the assembly; replace if still restricted.
- Test: Inspect the caster socket for dirt accumulation. Meaning: Dirt reduces caster movement and traction. Action: Clean the socket and reinstall the caster.
This chart shows the three main signs of wheel traction loss and the tests to confirm each cause, along with recommended actions.
Tread wear or smooth wheel surface reducing grip
Worn tread or a smooth wheel surface lowers friction, reducing grip and potentially causing slipping. If reduced grip persists after cleaning, replacement may be needed.
- A visibly smooth or shiny contact surface means the tread has worn down, reducing floor grip.
- Shallow or missing groove depth on the wheel surface lowers friction, making slipping more likely on smooth or wet floors.
- Uneven wear across the wheel surface can cause inconsistent traction, which may lead to drifting or hesitation during turns.
- Cracks or hardening of the rubber compound can reduce the wheel's flexibility and grip on uneven surfaces.
Hair and Debris Inside the Wheel Module Restricting Wheel Movement
Hair and debris inside the wheel module can restrict rotation, leading to movement that mimics worn treads or motor issues. Before replacing parts, check these common accumulation points. Cleaning can often restore normal traction and avoid unnecessary replacement.
- Main wheel axle – hair and debris wrapped around the axle can restrict rotation, causing uneven movement or a dragging sensation.
- Wheel housing – fine dust buildup inside increases friction and can trigger overload errors.
- Front caster wheel axle – tangled hair around the axle can jam the wheel, leading to circling or difficulty docking.
- Caster wheel cavity – debris lodged in the cavity can prevent free spinning, affecting steering.
- Side wheels (if present) – hair or string caught in compartments can restrict rotation and may produce scraping noises.
Wheel module sticking, play, or uneven spring tension affecting floor contact
Wheel module contact describes how evenly and consistently the drive wheel presses against the floor. Uneven contact may cause slipping or loss of traction.
- Press the wheel module down and release: a slow return may indicate sticking in the pivot or weak spring tension.
- Rock the wheel module side to side: noticeable play may indicate abnormal clearance in the wheel module assembly.
- Spin the wheel freely: if it wobbles or catches, the axle or bearing may be uneven.
- Place the robot on a flat floor and look at the wheel gap from the front: if one side sits higher, the module may be binding or the spring tension uneven.
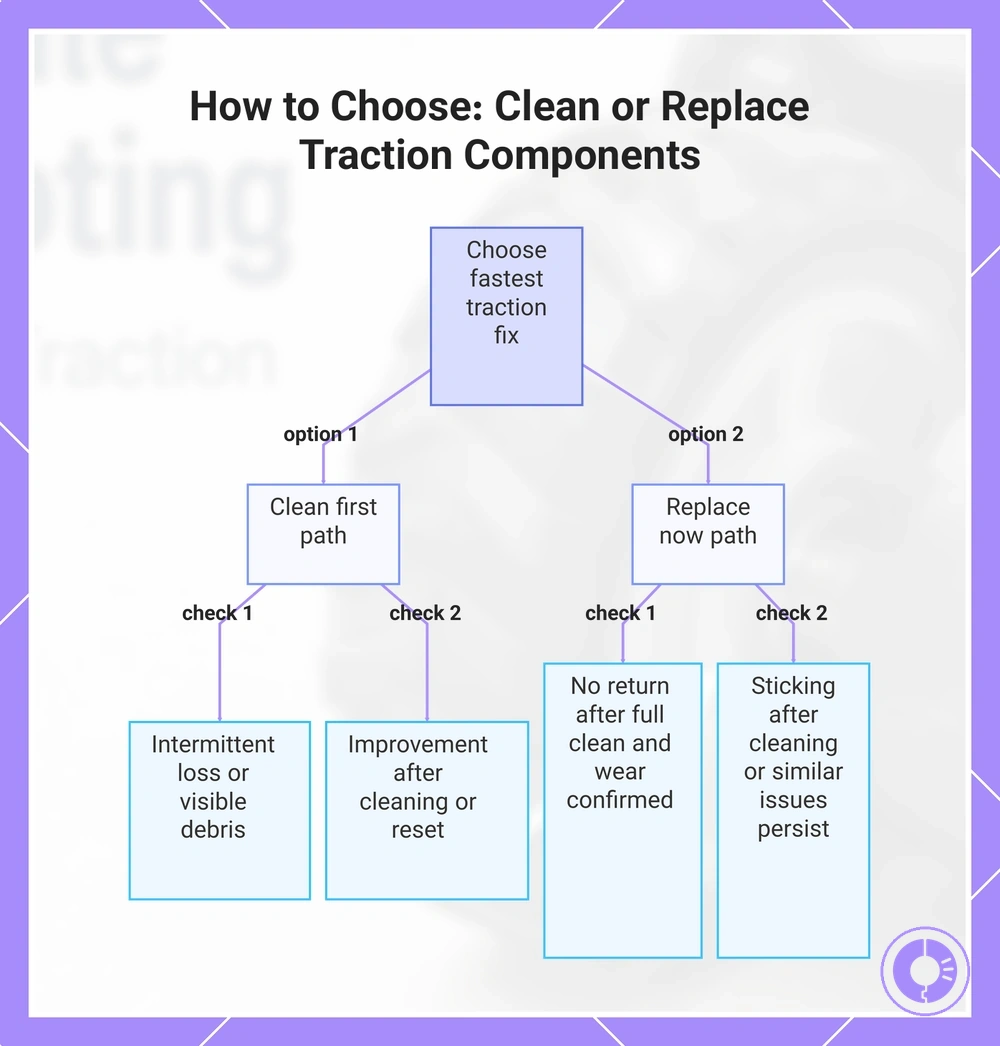
Clean, service, or replace: choosing the fastest traction fix
Replacement makes sense when traction does not return after cleaning and you see confirmed wear or sticking. The decision splits into two paths: clean first or replace now.
Replacing parts without checking for wear first often wastes time and money. Use the checklist below to decide whether cleaning is enough or replacement is the better move.
Clean first
- Traction loss is occasional or intermittent.
- Debris or dirt on sensor surfaces is visible.
- After cleaning, a reset or retest shows improvement.
- You find and tighten loose wiring connections.
- The problem does not reappear after a short run.
Replace now
- Traction does not return after a full clean and retest.
- Sensor or component shows confirmed wear (scratches, cracks).
- Sticking is present in moving parts after cleaning.
- Similar issues occur with the same part in your environment.
- Cleaning has been tried multiple times with no lasting improvement.
This chart shows the key conditions that help decide whether to clean first or replace now when fixing traction loss.
When Cleaning the Wheel Area or Re-seating the Module is Enough
Cleaning the wheel area or re-seating the module often restores traction without needing replacement.
- Cleaning is enough when visible debris, brake dust, or grime is present on the wheel barrel or inside the wheel well.
- Re-seating is enough when a module is not fully seated and appears loose after inspection.
- Re-seating is enough when the module was dislodged during previous work and can be reinstalled without force.
- Cleaning and re-seating together may be enough when both debris and module misalignment are present.
- Confirm after: retest the wheel's traction after cleaning and re-seating to see if traction returns.
When Replacing the Wheel Module or Wheel Assembly Is the Correct Fix
Replace the wheel module or wheel assembly when cleaning does not resolve the issue.
- Worn tread that no longer provides traction persists after cleaning, indicating the wheel module needs replacement.
- Sticking or intermittent movement even after debris cleaning indicates a worn internal mechanism needing replacement.
- Visible play in the wheel assembly that does not tighten after cleaning indicates structural wear needing replacement.
- Wheel does not return to neutral position after pressing, often indicating a damaged spring or housing needing replacement.
- Persistent error messages after cleaning, such as a left wheel error, indicate a sensor or module fault that cleaning may not resolve.
- Grinding or clicking noise that continues after cleaning often signals bearing or gear damage needing replacement.
Choosing the correct replacement wheel module without creating compatibility risk
The replacement wheel module must be compatible with your Roomba model or series and be selected for the correct side (left or right). A mismatch can lead to poor fit or continued mobility issues.
Choosing the correct replacement wheel module without creating compatibility risk requires verifying side orientation and connector placement. The image below clarifies left and right wheel module orientation and connector placement.
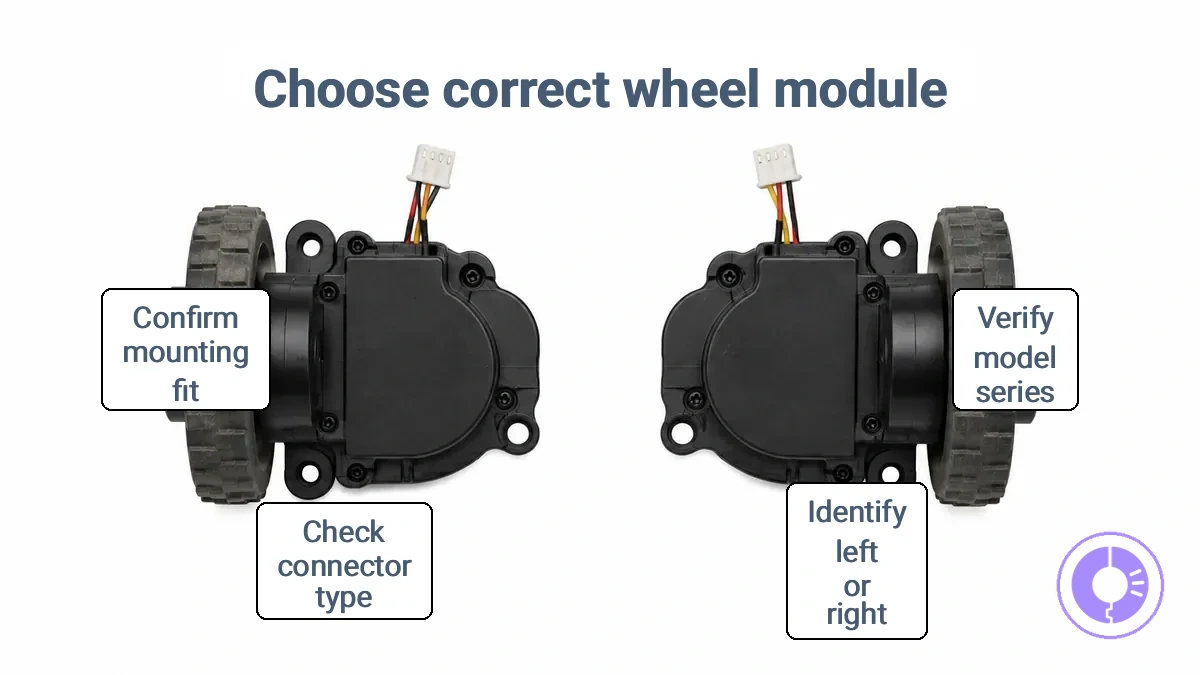
Use the compatibility checklist for wheel modules to reduce misfit risk.
- Confirm your Roomba model number and series.
- Identify the correct side (left or right).
- Verify the connector type matches the original module.
- Check shape and mounting points for fit.
- Compare dimensions to the wheel housing.
- Confirm the module is compatible with your robot's series.
- Avoid assuming cross-series compatibility without direct verification.
- Consult the manufacturer's compatibility guide or a verified parts list.
Match the wheel module to your Roomba model or series
To match a wheel module to your Roomba, first confirm the model or series. Use this checklist to reduce the risk of ordering the wrong component.
- Check the label on the bottom of your Roomba to confirm the model and series.
- Verify that the replacement module is designed for your specific series.
- Match the module description or part number to your series.
Fit and Quality Cues That Influence Traction Longevity
To reduce repeat slipping and premature wear after a wheel replacement, focus on fit and quality cues that influence traction longevity — a deeper checklist is in the quality checklist to avoid premature wear.
- Tread texture maintains grip over time without excessive wear.
- Smooth movement does not bind or drag during rotation.
- Consistent return to a neutral position prevents misalignment.
- Clean seating prevents wobble during installation.
- Material quality resists premature wear.
- Fit ensures proper alignment between the wheel and the chassis.
Replacing a Roomba Wheel Module to Restore Traction
Replace the wheel module to restore traction by removing the old module, installing a replacement, and verifying the new unit contacts the floor and moves freely. Ensure you have the correct replacement module for your Roomba series and the necessary screwdriver.
Because the design of the wheel module area can vary by model, the exact number of screws and the location of fasteners may differ on your Roomba. These steps focus on the general removal and install process; for the broader process, refer to the general replacement steps.
This image shows the underside access area and wheel module placement to illustrate what 'seat and secure' means.
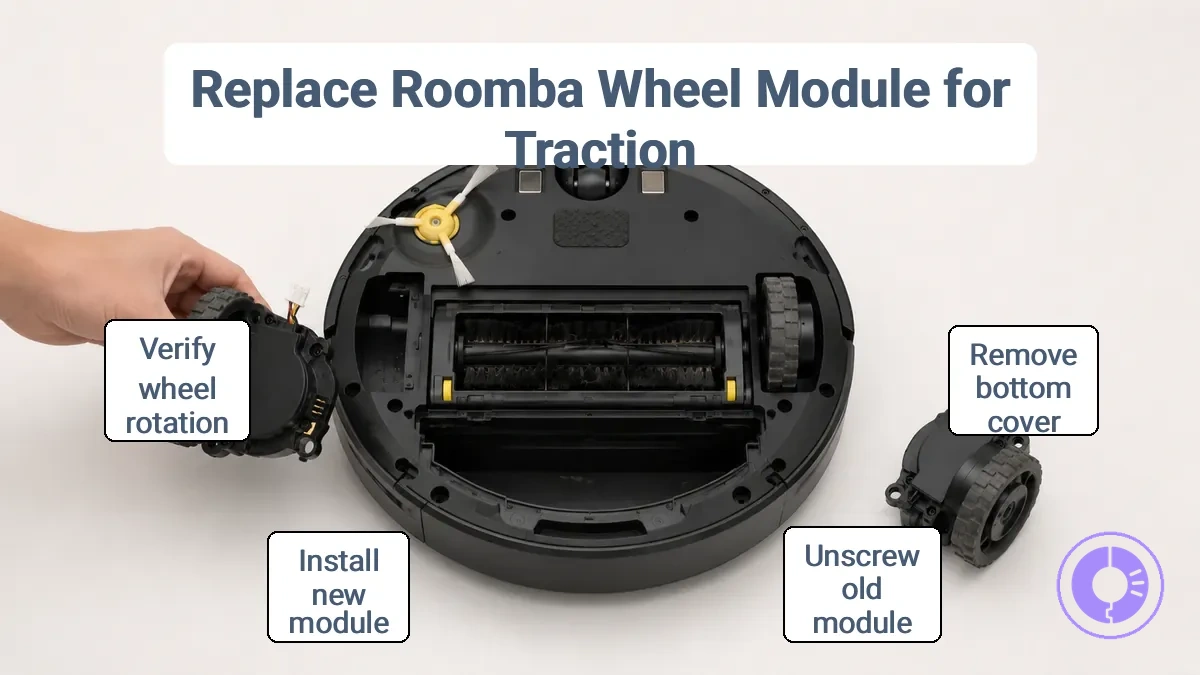
- Remove the side brush and any screws that hold the bottom cover in place to access the wheel module area.
- Take out the battery and set it aside to expose the wheel module mounting screws.
- Unscrew the fasteners that secure the wheel module to the chassis.
- Lift the old wheel module out of the housing and disconnect any wiring clip if present.
- Install the new wheel module by positioning it into the housing and seating it fully so it sits flush against the chassis.
- Secure the module by tightening the screws evenly, ensuring it does not shift.
- Reinstall the battery and bottom cover, tightening all screws to their original tightness.
- Verify that the wheel rotates freely by spinning it by hand; there should be no binding.
- Test the contact and traction by placing the Roomba on the floor and watching it drive during a cleaning cycle.
Power-down, access, and safe handling before opening the underside
Power down the device completely before opening the underside. Use this checklist to avoid damage when setting up your workspace and gathering tools.
- Remove the battery to disconnect electrical power.
- Turn off any connected charging dock or power source to prevent accidental start-up.
- Clear your workspace and ensure good lighting for safe handling.
- Gather the tools you need and keep them within easy reach before opening.
- Keep the underside stable on a flat, non-slip surface to prevent it from moving.
- If available, check the manual for model-specific precautions.
Remove the old wheel module and install the new one
Screw placement and connector style may vary by model — check your unit before proceeding.
- Remove the screws securing the old wheel module and detach the wiring connector.
- Lift the module out of its housing, being careful not to stress the surrounding frame.
- Align the new wheel module with the mounting points and slide it into position.
- Reconnect the connector, ensuring it seats fully and clicks into place.
- Install the screws to secure the module, tightening them evenly to avoid binding.
- Seat the module by pressing it into its housing, then rotate the wheel to confirm smooth travel and that alignment is correct.
Reassembly checks that prevent repeat slipping after replacement
These checks confirm free rotation, stable contact, and no rubbing or binding.
- Free rotation and binding check — Spin the wheel manually in both directions. Pass: smooth, consistent, and free motion in both directions with no hesitation. Fail: binding, sticking, or friction indicates mis-seating or debris.
- Stable contact check — Place the robot on a flat surface and press down gently on the module. Pass: wheel base contacts the floor evenly with no rocking. Fail: uneven contact indicates the module is tilted or misaligned.
- Rubbing check — Rotate the wheel and listen or feel for friction. Pass: no rubbing against housing or internal components. Fail: rubbing may mean clearance is too tight; reassembly is needed.
- Seating verification — Make sure the wheel module snaps fully into place. Pass: module is secure and doesn’t move when pushed. Fail: if loose, remove and re-seat until it locks.
- Clean-and-retest — If any check fails, remove the module and clean the mounting area and wheel hub. Pass after cleaning: reassemble and re-run the checks. Fail persists: reassess module fit or consider replacement.
Post-replacement traction checks and wheel upkeep to prevent future slippage
Run a mobility test and clean the wheel area when needed to preserve traction and reduce recurrence.
Driving on loose surfaces or in wet conditions can cause debris buildup that gradually reduces traction. Use the checklist below to confirm the fix now and prevent recurrence later.
Confirm Now
- Run a mobility test on a dry, clear surface to confirm smooth traction return.
- Retest after the first few drives under normal acceleration and turning to ensure the replacement holds.
- Listen for unusual sounds or vibrations that may point to incomplete seating or loose hardware.
Prevent Later
- Clean the wheel area when visible hair or debris builds up around the hub or sensor openings.
- Inspect tire tread depth and pressure when wear is noticeable — worn tires reduce traction.
- Rinse the wheel area after driving on muddy or salted roads to remove grit that could interfere with traction sensors.
A quick traction test to confirm mobility improvement
This test confirms mobility improvement by seeing if the original symptom comes back under the same conditions. The test passes or fails based on observable wheel slip.
- Place the device on the same floor surface where you first noticed the mobility issue.
- Start a manual cleaning cycle or drive command and watch how the wheels respond.
- If the wheel slips or stalls at the same spot, the test fails.
- If the wheel moves forward without slipping and crosses the problem area, the test passes.
Cleaning Habits That Preserve Wheel Grip and Reduce Repeat Wear
Dirt, hair, and debris trapped around the wheels and front caster can drag against surfaces, reducing traction and accelerating wear. Cleaning when buildup is visible prevents drag and keeps grip consistent without a rigid schedule.
- Clean the front caster wheel when debris or hair wraps around its axle.
- Remove visible hair and debris from the main drive wheels when buildup is noticeable.
- Wipe the wheel treads with a damp microfiber cloth when fine dust or sticky residue is visible.
- Check the caster housing for compacted debris and clean it out when the wheel feels stiff.
- Use a soft brush or compressed air to dislodge visible particles from wheel wells and axle gaps without disassembling the module.
- Inspect the wheel surface for polished or flattened spots that indicate uneven wear, and adjust cleaning frequency if those areas appear.
- Sweep or vacuum the floor near the wheel module when loose debris is visible to prevent it from entering the wheel area.
Wheel replacement timing questions that affect what to buy
How often to replace the wheel module depends on the condition of the current wheels and the robot’s operating environment. These questions cover common timing considerations before you replace it.
Question: How often should I replace the wheel module?
Answer: Whether you need to replace the wheel module depends on how often the robot runs, the types of floors it cleans, and the amount of debris it encounters. Heavy use on carpet with pet hair may wear the wheels faster than light use on hard floors.
Question: Should I replace the entire wheel module or only the damaged part?
Answer: Whether you should replace the entire module or only the damaged part depends on the specific damage and the availability of separate parts. If the wheel module has multiple worn components, replacing the whole unit may be more reliable. Partial replacement can work when only one part shows wear, but the condition of the remaining parts should be considered.
Question: Should I clean the wheels first before replacing them?
Answer: If debris buildup is causing reduced traction, cleaning the wheels first may resolve the issue. Clean first and replace only if the problem persists.
How often do Roomba wheels or wheel modules typically need replacement?
Replacement frequency varies by usage, floor type, and debris load, and is indicated by persistent slipping combined with visible wear or restricted movement. Unusual sounds during movement often indicate tread wear. Uneven performance suggests the module needs attention. Inspect the wheels when these symptoms persist rather than following a fixed schedule.
Can you replace just the wheels, or do you replace the full wheel module?
Traction fixes often require replacing the full wheel module, but partial replacement depends on the model design and failure location. Tread-only wear may allow partial replacement, whereas internal restriction typically requires cleaning first, and contact/return issues usually need the full module. Check fit before ordering.