Roomba Replacement Parts for Pet Hair: What to Replace to Reduce Tangles
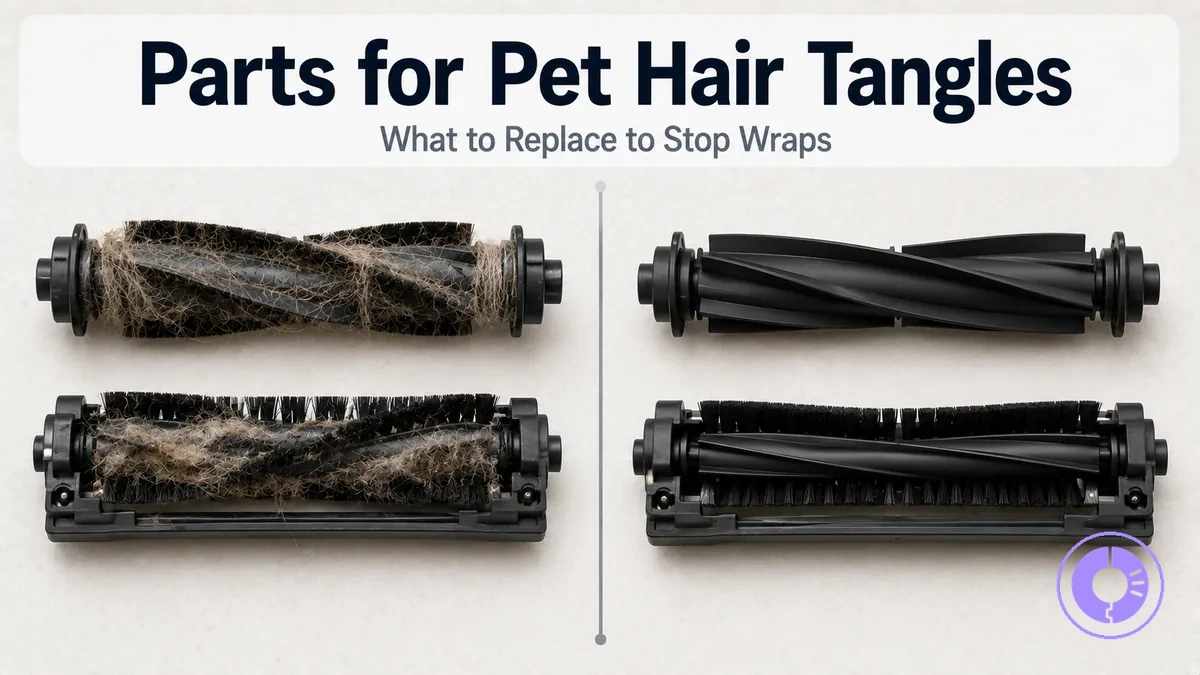
Roomba replacement parts for pet hair are the components that directly affect how well your robot picks up hair and how often tangles occur. This selection guide focuses on the parts most likely to reduce hair wrap — rollers, brushes, filters, and the side brush — and explains when replacement makes a difference rather than assuming all tangles come from too much hair.
Deciding which part to replace first depends on the symptoms your Roomba shows: whether hair wraps around the rollers, collects on the outside of the unit, or clogs the airflow path. Working from the symptom to the likely cause, then to the replacement type that addresses it, and then to maintenance, helps delay further wear. For a broader overview of compatible accessories across series, the Roomba replacement parts hub covers general selection, while the focus here narrows to pet hair tangles and their specific remedies.
What changes and what usually does not change when you replace tangle-prone parts:
- What often changes is the robot's ability to maintain consistent pickup once the filter is clean and the rollers are intact, especially on carpets where hair tends to clump.
- What usually does not change is the need to verify compatibility — a roller set designed for the 800 series may not fit the i or j series without the correct cleaning head module.
- What this page does not do is serve as a product catalog; it helps you diagnose which type of part your robot needs before you shop.
Tangling does not always mean the robot is failing to pick up dirt. Hair that wraps around the rollers can still be swept off the floor, but it reduces airflow and causes debris to collect elsewhere — often on the outside of the unit or around the wheel. Recognizing this difference can help you avoid unnecessary full replacements and focus on the part that needs attention.
Why Pet Hair Tangles Roomba Rollers and Reduces Pickup
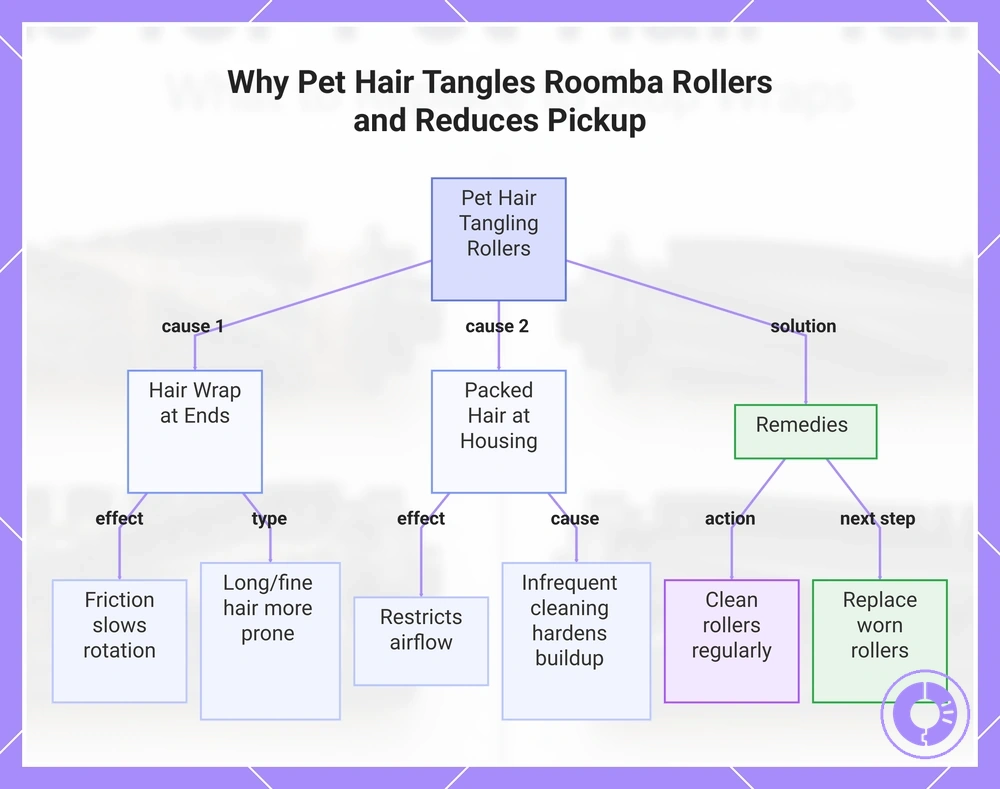
Pet hair often tangles Roomba rollers at the roller ends, where strands wrap tightly around rotating components. This wrap increases friction, slowing rotation and reducing agitation needed to lift hair from carpets and hard floors, which can lower pickup and leave clumps behind.
Long or fine pet hair that packs tightly between the roller and housing restricts airflow. Restricted airflow reduces pickup and increases operating noise as the motor works harder. Cleaning the rollers regularly can prevent buildup, but if tangling continues after cleaning, the rollers or end caps may be worn. Cleaning can restore normal pickup, but if tangling persists, replacing worn rollers may be needed.
- Hair wrap at roller ends increases friction and can stall rotation.
- Packed hair between the roller and housing restricts airflow.
- Restricted airflow from packed hair forces the motor to work harder, increasing noise and reducing pickup.
- Increased drag from tangled hair at the roller ends raises operating noise.
- Worn roller surfaces or damaged end caps can amplify tangling even after cleaning.
- Long or fine pet hair is more likely to wrap tightly than coarse hair.
- Infrequent roller cleaning allows buildup to harden and can seize moving parts.
This chart shows the main causes of pet hair tangling on Roomba rollers and the steps to resolve reduced pickup.
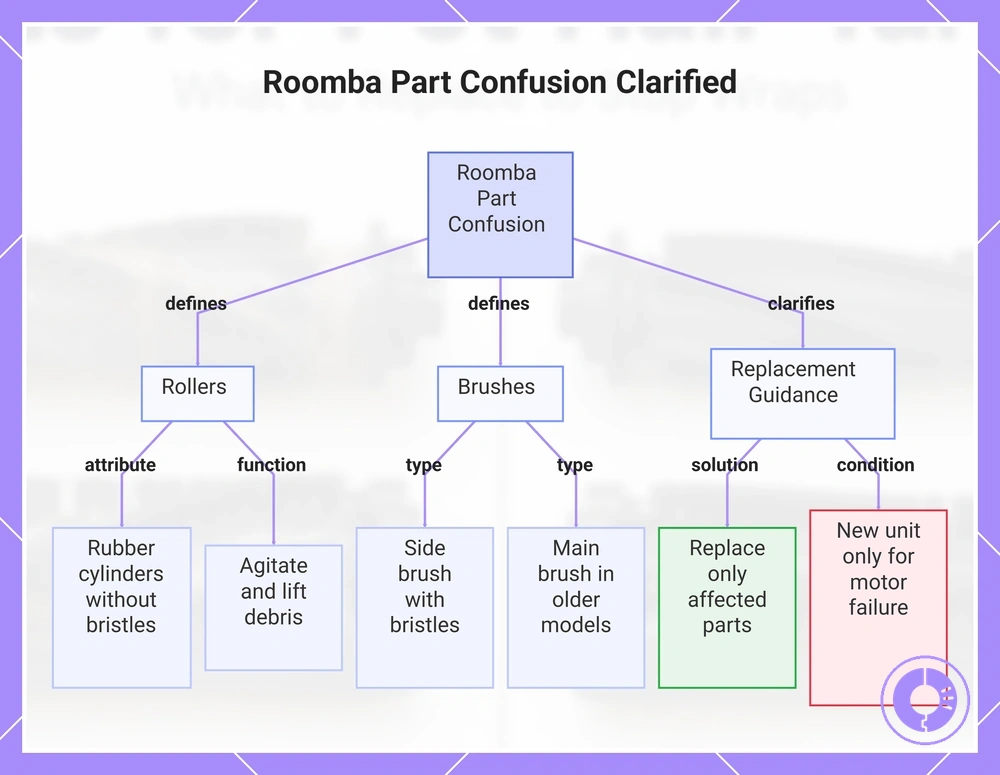
Clarifying common confusions: replacing a Roomba vs replacing parts, and what “rollers” means
Replacing a Roomba unit is not the same as replacing its parts, especially when your goal is to reduce hair tangles. The components that directly interact with hair—such as rollers and brushes—are the ones that wear and require replacement.
Question: What are rollers (or extractors) on a Roomba?
Answer: Rollers are the cylindrical rubber pieces underneath the robot that rotate to agitate and lift debris. In many Roomba series, they are called dual rollers or extractors. They sit inside the cleaning head module and affect how well the vacuum picks up pet hair. They are often misidentified as brushes, but brushes have bristles.
Question: What are brushes on a Roomba?
Answer: Brushes refer to the side brush (the small spinning arm with bristles) and, in older models, a main brush with bristles. The side brush sits at the corner of the robot and sweeps debris toward the rollers. The main brush (if present) works alongside the rollers. People often confuse the side brush with the rollers, but they serve different functions and sit in different locations.
Question: What is the cleaning head module?
Answer: The cleaning head module is the assembly underneath the Roomba that holds the rollers and, in some models, the main brush. It is the housing that directs debris into the suction path. In series that use dual rubber rollers, the cleaning head module may be called the extractor housing. Replacing the entire module is rarely needed; only the rollers or brushes inside it require replacement.
Question: Is “roller” the same as “brush”?
Answer: No. Rollers are solid rubber cylinders without bristles; brushes have bristles. On a Roomba with dual rollers, there is no main brush; the rollers agitate. On models that include a main brush, it is separate from the rollers. Using the wrong part (e.g., buying a brush when you need a roller) can cause fit issues or reduce cleaning performance.
Question: Do I need a new Roomba to fix tangles?
Answer: No. Tangles are almost always caused by hair wrapping around the rollers or brush, not a failing robot. Replace only the affected rollers, brushes, or occasionally the cleaning head module if damaged. Buying a new Roomba is unnecessary unless the robot has a motor or electronic failure—uncommon for tangle issues.
This chart clarifies the differences between Roomba rollers and brushes and explains when you need to replace parts versus the whole unit.
The Roomba parts that most often need replacing in pet-hair homes
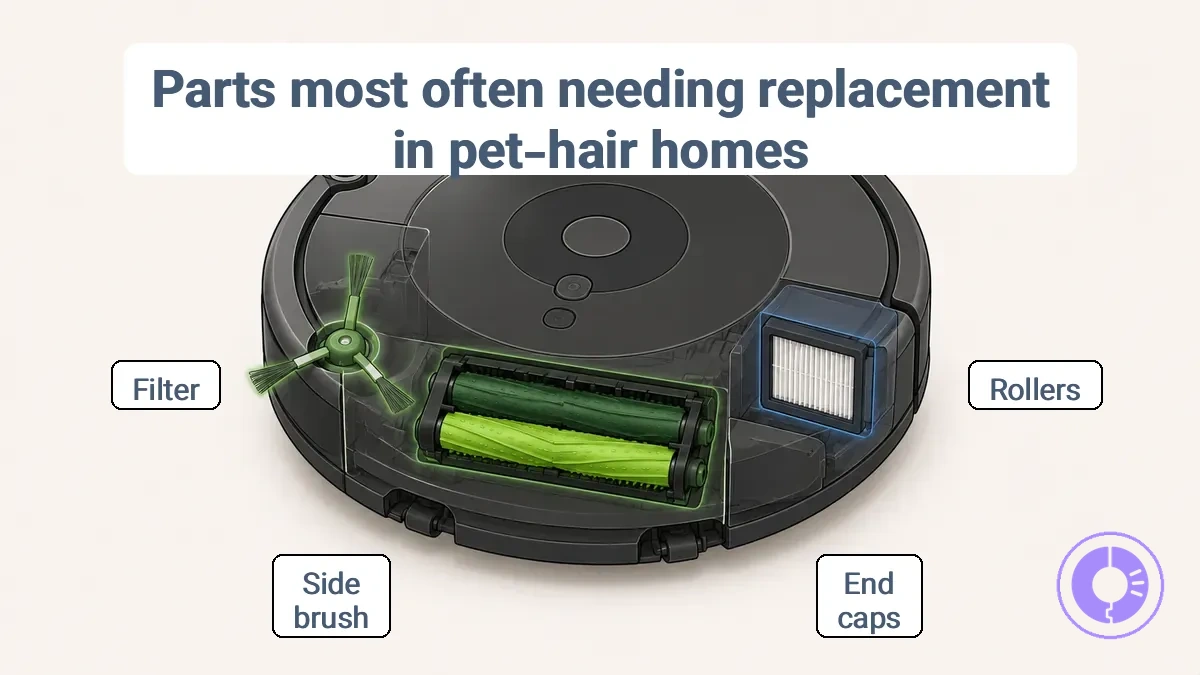
The Roomba parts that most often need replacing in pet-hair homes are the rollers, end caps, side brush, and filter. Each part helps maintain pickup and bin airflow, and each shows specific symptoms before performance drops. Common symptoms, impact, and replacement cues for each part are shown in the table below.
| Part | Common symptom | Impact | Replace when… |
|---|---|---|---|
| Rollers | Hair wrapped tightly around the roller; reduced debris pickup | Loss of cleaning efficiency; may leave dirt behind | Hair cannot be easily removed, or rubber surface starts shedding |
| End caps / bearings | Noisy operation; end cap looseness or excessive play | Increased friction; can stop roller rotation altogether | End cap shows visible wear or bearing feels rough when spun |
| Side brush | Brush does not spin freely; hair tangled at the base | Poor edge cleaning; debris accumulates along walls | Brush arm is bent, broken, or cannot spin without resistance |
| Filter | Bin fills quickly; clumps of hair redeposited on the floor | Reduced bin airflow; robot may stop cleaning early | Filter appears clogged after normal cleaning and does not clear when tapped |
Common first-check parts:
- Rollers – inspect for wrapped hair and wear on the rubber fins.
- Filter – check for heavy clogging that limits airflow.
- Side brush – ensure it spins freely and has no bent arms.
Checking these parts first helps restore normal operation.
The parts that most often need replacing are shown in the image below, which labels the rollers, side brush, and filter location.
Main rollers and roller brush assemblies as the primary tangle point
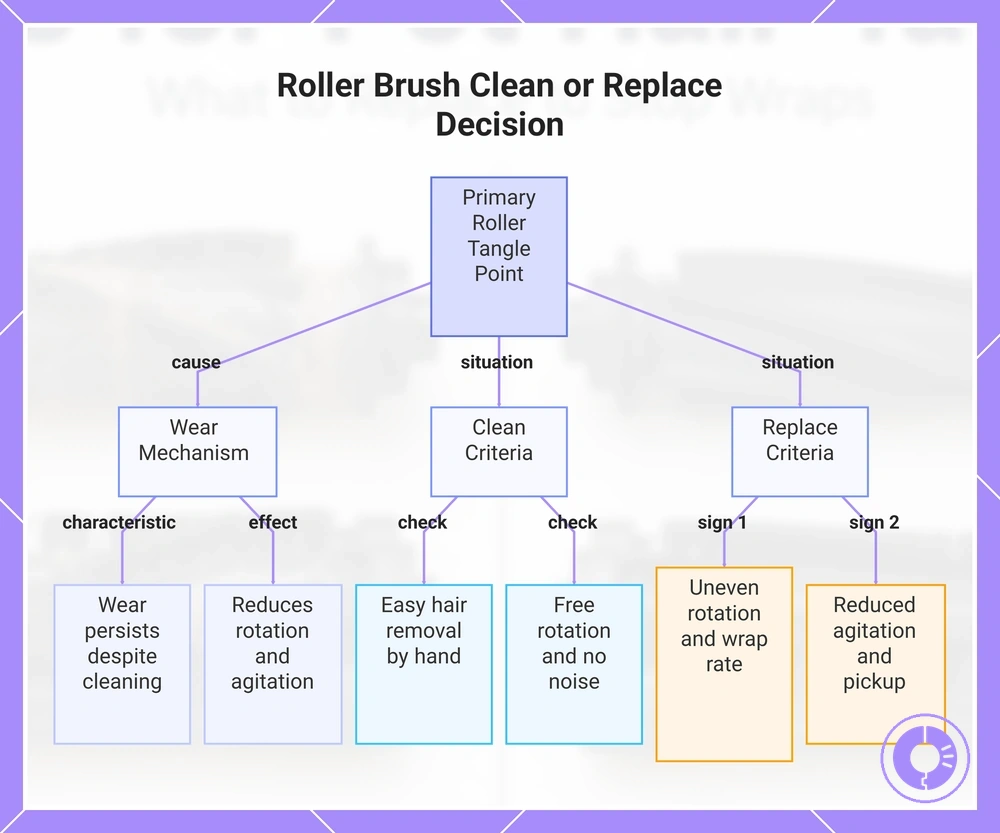
The main rollers often become the primary tangle point when visible wear or deformation at the roller ends persists despite regular cleaning. This condition masks deeper issues, as repeated cleaning cannot resolve underlying wear. Over time, the resulting resistance slows rotation, reduces carpet agitation, and lowers pickup performance on carpet and hard floors.
Before deciding, consider two situations:
- Clean first: when wraps consist of recently shed hair and debris that comes off easily by hand, and the roller rotates freely with no noise.
- Replace instead: when visible wear, deformation, or rough rotation persists after thorough cleaning, especially on carpets where agitation matters most.
The following signs often indicate that replacement is more appropriate than continued cleaning:
- Roller ends show visible cracking or fraying.
- Rotation feels uneven or requires extra effort compared to a new brush.
- Wrap rate remains high after you remove all visible hair and debris.
- Surface of the roller brush appears flattened or worn down in spots.
- Noise during operation changes, such as scraping or thumping sounds.
- Debris builds up faster on one end than the other, indicating uneven wear.
- Agitation on carpet is visibly reduced when the brush roll is clean.
- Pickup performance drops noticeably on hard floors despite a clean brush.
When these signs appear, the replacement criteria often follow the guidance in brushes and rollers for hair buildup.
This chart shows the underlying wear problem and the conditions for cleaning or replacing the roller brush based on observable signs.
Roller End Caps, Bearings, and Small Wear Points That Trigger Repeat Jams
Worn end caps and bearings increase friction, leading to uneven rotation and hair packing around the axle area—this often causes repeat jams. Over time, that buildup can result in stalls, unusual noise, and reduced pickup performance.
- Check if the end cap spins freely by hand; resistance may indicate bearing wear or debris packing.
- Inspect the end cap for visible scoring, cracks, or discoloration that suggest ongoing friction.
- Look for hair tightly wrapped around the bushing area; this often signals uneven rotation caused by bearing drag.
- Run the rollers briefly on a hard surface and listen for chirping or grinding near the ends.
- After cleaning, feel the end cap area for unusual heat after a short run—excess warmth may indicate friction.
- One side repeatedly gathering end-wrap while the other stays clean may indicate uneven wear on that side's cap or bearing.
A red flag to watch for: jams that return within a few minutes after a full roller cleaning often point to end friction rather than surface dirt, meaning that replacing the worn end cap or bearing is usually more effective than further cleaning.
Side brushes for edge hair buildup and corner debris pull-in
Hair lines along baseboards with normal center pickup often indicate worn side brushes that have lost edge reach.
Bristles may lose stiffness or shape, reducing how well they guide debris toward the roller. Corner sweep may weaken even though center pickup looks normal. Edge lines often point to side brush wear, while corner clumps may also depend on room layout and furniture placement.
- Hair lines along baseboards: bristles flattened or deformed → reduced edge reach → check for bending or breakage
- Hair accumulation only near walls: missing arms → uneven sweep → check for broken or missing bristles
- Debris stays in corners after cleaning: brush may not reach tight spaces → check if it spins freely and reaches the corner
- Visible gaps in swept path along edges: uneven bristle wear → inconsistent edge pickup → compare bristle length around the brush
- Side brush rotates but leaves hair behind: bristles may have lost stiffness and cannot flick debris inward → replace if bristles feel soft or bent
- Corner debris clumps vary by room: performance may interact with furniture gaps and cleaning patterns → test in an open corner first to isolate brush issue
Filters and bin airflow parts that affect pet hair pickup and clumping
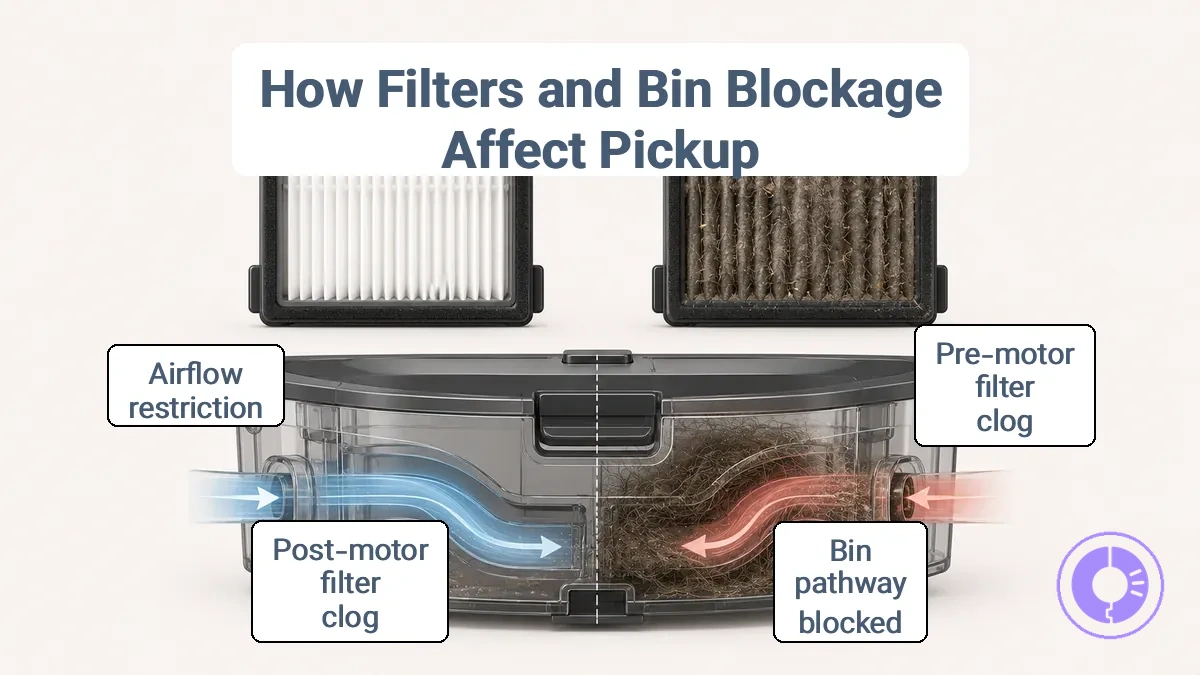
Airflow restriction from a clogged filter or packed bin pathway can reduce pet hair pickup even when the brush roll looks clean.
| Symptom | Likely cause | What changes | Replace when |
|---|---|---|---|
| Suction drops noticeably on carpets | Pre-motor filter is clogged with fine dust | Airflow decreases, reducing the vacuum's ability to lift embedded hair | Filter appears dark and airflow does not improve after cleaning |
| Hair clumps form inside the bin instead of being drawn into the canister | Bin pathway is partially blocked by packed hair or debris | Airflow is restricted, causing hair to tumble and clump rather than being pulled through | Bin pathway shows visible blockage that cannot be cleared by emptying |
| Vacuum runs hotter than usual or shuts off mid-clean | Post-motor filter is clogged, reducing cooling airflow | Motor works harder, heat builds up, and suction efficiency drops | Filter is visibly dirty and cannot be cleaned |
How filter condition affects airflow and pickup is covered in the guide on filters that affect airflow and pickup.
Visible filter loading versus hidden bin pathway blockage—shown in the image below—can help identify the source of pickup loss before replacing parts.
Choosing Replacements That Resist Hair Wrap Without Creating Fit Problems
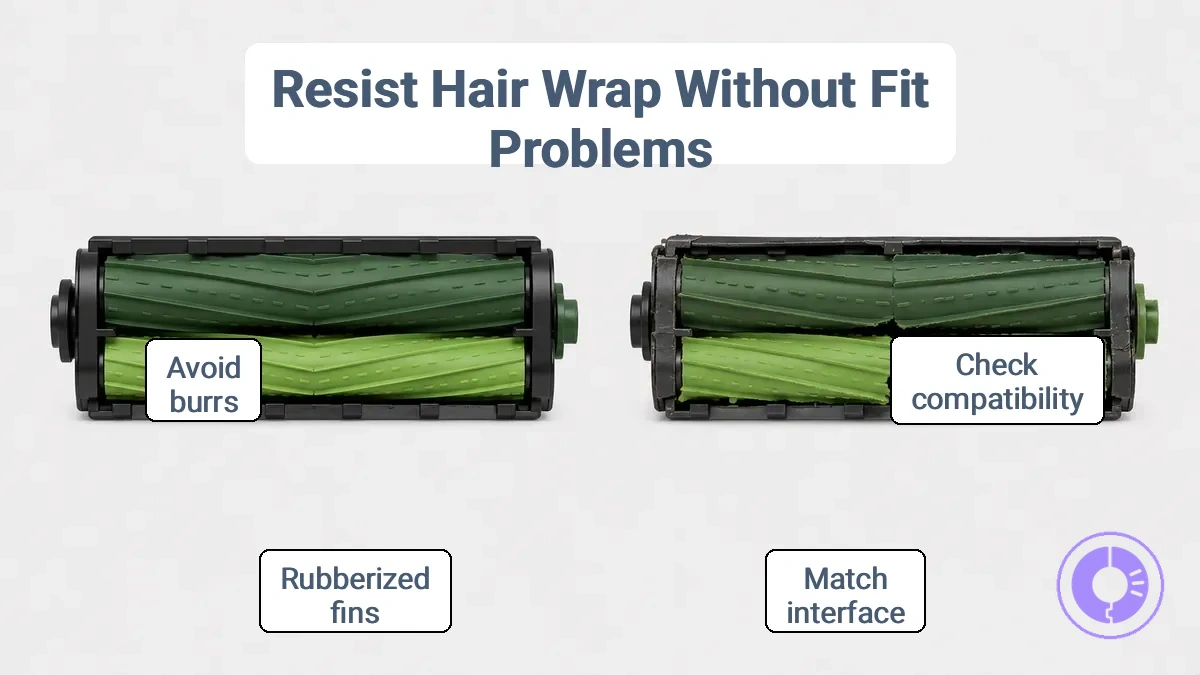
Focus on fit and interface match first, then evaluate anti-wrap design cues. A part that does not seat properly may create friction, increase noise, and reduce airflow stability, regardless of any tangle-resistant features.
Compatibility and Fit
- Verify the part matches your Roomba series and interface shape; even small differences in mounting points or brush end caps can cause misfit.
- Check tolerance against the original part; excessive play or tightness often signals a poor fit that may affect rotation and suction.
- Confirm the brush roll or filter contour aligns with the debris path; a mismatch can strand hair in the gap rather than guiding it to the bin.
When choosing replacements that resist hair wrap without creating fit problems, visually checking shape and contact points helps prevent misreading part fit from packaging descriptions alone.
Design and Material Cues
- Look for brush roll materials that resist hair adhesion, such as rubberized or silicone-like fins, which may reduce tangling.
- Evaluate the geometry; continuous bristle patterns or ridges can help shed hair compared to segmented or rough-edged designs.
- Check whether the part includes internal channels or smooth transitions that limit catch points where hair typically wraps.
Quality and Risk Signals
- Inspect for flashing, burrs, or uneven seams that may snag hair and accelerate wrap buildup.
- Compare weight and stiffness against the original; lighter or flimsier parts can wear faster and may compromise durability.
- Consult a quality checklist for longer-lasting parts to help spot premature wear signals that could lead to repeat tangles and increase return risk.
Durability, noise, and pickup may shift depending on part material and flooring type.
Compatibility checks that matter most for rollers, brushes, and filters
Confirm interface and shape match before relying on any ‘pet hair’ claims. Use the following checklist to verify fit from labeling, photos, and your old part’s geometry.
- Verify series label matches your Roomba model.
- Confirm brush interface shape matches original part.
- Check seal alignment before locking into place.
- Ensure filter frame fits snugly without gaps.
- Compare brush end caps for matching geometry.
- Test that roller spins freely when installed.
- Check that filter seals firmly against housing.
- Verify side brush clip engages securely.
A common mismatch occurs when series naming differs across markets, so comparing the old and new part visually is more reliable than trusting a single label.
Design and Material Cues That Influence Hair Shedding from Rollers
Hair shedding from rollers refers to the tendency of hair to release or slide off the roller surface, often increasing cleaning effort and causing tangles or jams when hair wraps unevenly. The degree of shedding depends on how the roller's surface and edge profile interact with the hair shaft, affecting grip, wrap rate, and the force needed to remove the roller.
- Smooth, low-friction surface texture: Rollers with a polished or coated surface tend to reduce how tightly hair clings, making it easier to unwind and clean.
- Rounded or tapered edge profile: A rounded edge lets hair slide off more freely, while a sharp or ridged edge can trap strands and increase jam frequency during removal.
- Firm material with minimal flex: Rollers made from rigid materials hold their shape under tension, creating uneven pressure points and increasing shedding as hair releases abruptly; softer materials tend to distribute tension more evenly and reduce shedding.
- Wide spacing between bristles or teeth: Wider gaps reduce the number of contact points, lowering friction and grip, leading to easier shedding but also weaker grip on fine or short hair.
- Non-porous material surface: Non-porous finishes (such as sealed plastic or silicone) tend to allow hair to slide rather than catch on microscopic imperfections, reducing shedding compared to porous or textured surfaces.
- Short bristle length: Shorter bristles engage fewer hair strands at once, decreasing wrap rate and making it easier to release hair without pulling or tangling.
Do not assume that product labels like “shed-resistant” or “easy-release” guarantee fit or performance across different hair types and roller diameters. Actual shedding behavior often varies by hair length, texture, and styling technique.
Genuine vs third-party trade-offs when hair tangles are the main issue
Genuine and third-party replacement parts affect tangle recurrence differently through tolerance, fit stability, and friction. Genuine parts typically have tighter tolerances, reducing the friction that leads to hair wrapping around rollers or brushes. Third-party alternatives vary in fit stability, and a looser fit can increase the risk of tangles over time. The trade-off is not universal — it depends on the part type and the aftermarket manufacturer's consistency.
| Criterion | Genuine tendency | Third-party tendency | What to verify |
|---|---|---|---|
| Tolerance and quality | Typically consistent, tight tolerances | Varies by brand and batch | Check reviews for fit reports on your model |
| Fit and friction | Typically low friction, stable seating | May introduce extra friction or play | Confirm mounting points match original specs |
| Tangle recurrence risk | Lower when installed correctly | Higher if fit is loose or surface is rough | Inspect after first few cleaning cycles |
| Replacement frequency and cost-value | Typically longer intervals, higher per-unit cost | May need more frequent swaps, lower per-unit cost | Compare total cost over several months |
What to replace first to stop tangles based on the symptom pattern
To stop tangles, replace the part that most often matches the dominant symptom pattern.
Each symptom—like noise, a drop in pickup, or edge hair left behind—points to a likely cause class, and a quick confirmatory check can verify it before ordering a replacement. If hair wraps around the brush roll occasionally, cleaning it and checking the end caps can often resolve the issue before a replacement is needed.
| Symptom Pattern | Confirmatory Check | First Replacement |
|---|---|---|
| Hair wraps tightly around brush roll; cleaning quality drops or leaves clumps | Remove brush roll and inspect for buildup that cleaning cannot remove; check if wraps recur after cleaning | Brush roll assembly (if cleaning does not restore performance or wraps recur indicating worn bearings) |
| Noisy operation with clicking or scraping during cleaning | Check brush roll ends and bearings for hair jams; spin freely | Brush roll end caps or bearing assembly |
| Pickup drops—skips spots or leaves visible hair clumps | Inspect pickup opening for hair clogs; if clear but issue persists | Brush roll (may be worn or out of balance) |
| Edge hair not collected along walls | Examine side brush for tangled hair; test rotation | Side brush assembly |
| Vacuum jams frequently during cleaning | Check filter and bin for clogs; if jam is brush-roll related after cleaning | Brush roll or brush roll end caps |
For symptom patterns not listed here, refer to troubleshoot poor pickup and hair jams for broader diagnostics.
Frequent Roller-Jam Stoppages and Hair Wrapped at the Ends
Frequent roller-jam stoppages with hair wrapped at the ends often result from increased friction at the roller end caps or wear on the roller end components.
The pattern helps distinguish between simple hair removal needs and recurrent issues tied to rotation resistance or uneven roller movement. If end-wrap persists after cleaning, the jam frequency often points to component wear.
- Check for end-wrap after each cleaning session, noting whether hair re-accumulates at the same roller ends.
- Inspect the end caps for visible hair accumulation, cracks, or deformation that can increase friction.
- Test roller rotation by hand; feel for resistance or unevenness between the two ends.
- Look for signs of uneven rotation, such as wobbling or stalling during manual spin.
- If the jam returns after thorough cleaning, the issue is likely beyond simple hair removal and points to component wear.
- Examine the roller end cap surfaces for smoothness; replace them if they appear worn or damaged.
- Monitor jam frequency over several cleaning cycles to confirm whether resistance consistently reoccurs at the same location.
Noisy cleaning head, reduced carpet pickup, and hair left in streaks
A robot vacuum that sounds louder than usual, leaves visible streaks of hair, and picks up less often points to friction in the brush assembly or reduced airflow from a blocked filter or nozzle. On hard floors, noise may come from debris dragged across the surface, but streaks and weak pickup are more typical of carpet cleaning.
- Listen for rattling or grinding, which may signal hair wrapped around the brush roll.
- Check the brush roll for visible hair, thread, or debris.
- With the power off, cut away any wrapped hair and clean the roll.
- Check the air filter for dust or debris that may reduce suction (airflow restriction).
- Examine the nozzle opening and suction channel for blockages.
- Look at the squeegee blade for nicks or buildup that could leave streaky lines.
Edge Hair Left Behind Despite Normal Center Pickup
When edge hair is left behind despite normal center pickup, a worn or damaged side brush is often the cause. The side brush sweeps debris from edges and corners toward the main rollers, so reduced performance affects edges while center pickup stays acceptable.
- Check for visible deformation or bending of the bristles or rubber arms.
- Verify that none of the brush arms are missing or broken off.
- Assess whether the brush still reaches the baseboard line and sweeps corners effectively.
- Inspect the brush tip for wear that reduces its sweep of the baseboard line.
Suspect the side brush when the issue is limited to edges and corners; suspect the main rollers when center pickup also weakens or when carpet cleaning drops noticeably. Qualify expectations for tight furniture layouts and irregular room shapes, where even a properly functioning side brush may miss certain spots.
Replacing the side brush is often the next step when deformation or reduced reach is confirmed and roller inspection shows no problem.
Maintenance actions that reduce tangles between replacements
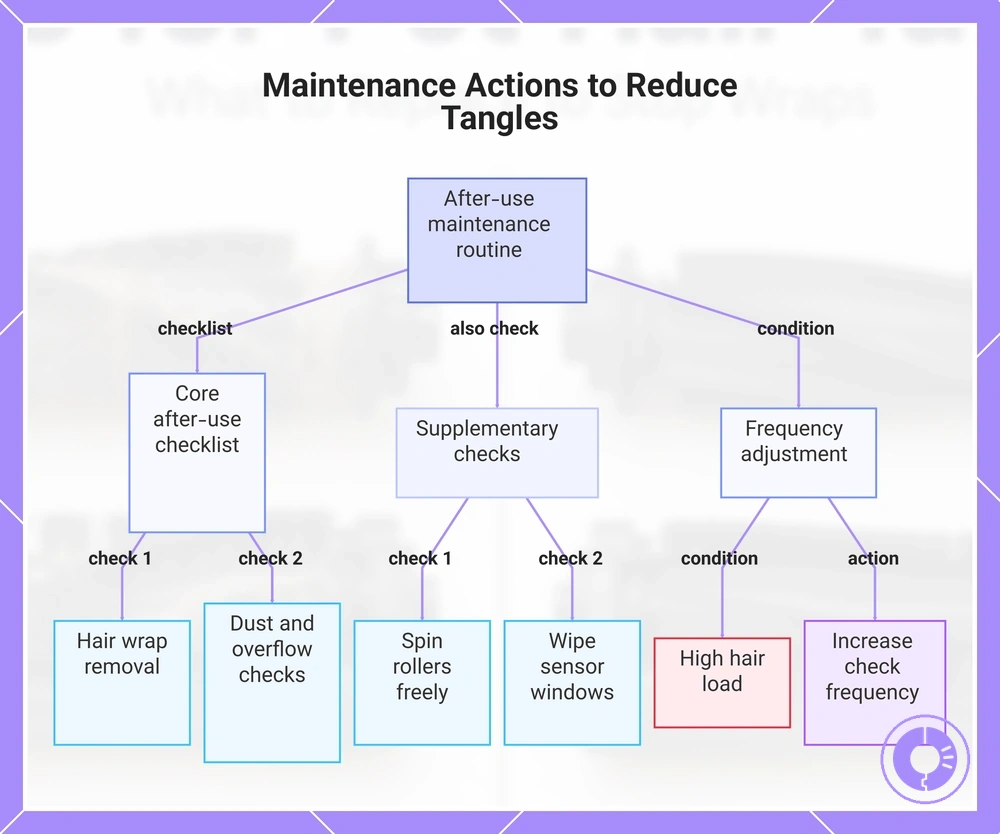
A quick after-use routine removes hair before it builds up, reducing strain on the motor and airflow. These checks take less time than clearing a jammed brush later.
- Clean the roller ends: remove hair from the small gap between the roller and the housing.
- Inspect the filter: tap it gently to dislodge dust clumps.
- Empty the bin: keep it from overflowing.
- Check the side brush: remove any hair wrapped around the arm.
- Spin the rollers by hand: check that rotation is free and even.
- Wipe the sensor windows: help prevent hair dust from blocking navigation.
- Examine the brush deck: clear any debris wedged under the roller.
For homes with a high hair load, increase the frequency of these checks rather than waiting for a set number of days. After each cleaning session, use this inspection checklist:
- Roller ends – check for hair wrap accumulation.
- Filter – assess dust clogs.
- Bin – confirm no overflow.
- Side brush – inspect arm for hair tangles.
- Brush deck – check under roller for debris.
For parts that no longer respond to cleaning, a replacement schedule to prevent tangles can help you decide when to replace.
This chart shows the key after-use checks and frequency adjustments that prevent hair tangles and reduce strain on the motor and airflow.
Hair removal routine for rollers and brushes using the right tools
To remove hair efficiently from rollers and brushes, choose a tool that cuts or lifts hair. This reduces residue and helps keep rotation smooth.
Unplug the vacuum before you begin to avoid accidental activation.
- Remove the roller brush from the vacuum according to your model's instructions.
- Use a cleaning tool such as scissors or a seam ripper to cut through hair wrapped around the roller ends.
- Lift the cut strands away from the bristles, working from the center toward the ends.
- Check the roller ends and bearings for tightly wound hair and trim any remaining residue.
- Wipe the roller with a dry cloth to remove loose debris and fine residue.
- Reinsert the roller and spin it by hand to confirm smooth rotation before reassembling the vacuum.
Cleaning end caps and contact points that trap hair before it mats
End caps and contact points trap hair before tangles become visible, and the resulting friction is the hidden cause of jams and noise. Regular inspection catches debris early, but distinguishing cleanable buildup from wear that requires replacement is essential.
- Loose hair around the end cap area that can be removed with tweezers or a brush
- Packed hair forming a dense layer against the contact point, requiring careful removal
- Visible scoring or discoloration on the end cap surface, a sign of friction damage
- Cracks or deformation in the plastic around the contact point — cleaning cannot reverse these
- Excessive play or looseness when the end cap is gently moved, indicating worn mounting points
A repeat jam after cleaning the same contact point means wear that cleaning can't fix, so replacement is the reliable solution.
Pet-hair adjusted cleaning cadence for filters and bins
Filter and bin maintenance cadence adjusts to pet hair load and run frequency, based on signals like pickup drop, packed bin, or visible filter loading. The loading rate depends on hair volume and run frequency, which determines how quickly these signals appear. When these cues appear, the system is working harder and needs attention before the next full run.
- Pickup drop: If the robot leaves visible hair trails or misses patches it used to catch, the filter is likely loaded and airflow is restricted.
- Bin packing style: When hair clumps tightly into a packed bin instead of settling loosely, the bin needs emptying and the filter should be checked for fine debris.
- Visible filter loading: If the filter surface shows a dense layer of hair and dust, airflow drop is probable and cleaning or replacement is due.
- Run frequency: Daily runs in a high-shed home can load a filter in a few days; weekly runs may stretch that to a couple of weeks.
When to replace vs clean: A washable filter that still passes air after rinsing can be reused; a non-washable filter that shows visible loading or causes a pickup drop should be replaced. A bin that empties cleanly and seals well can be reused; a bin with cracks or warping that lets hair bypass the filter should be replaced.
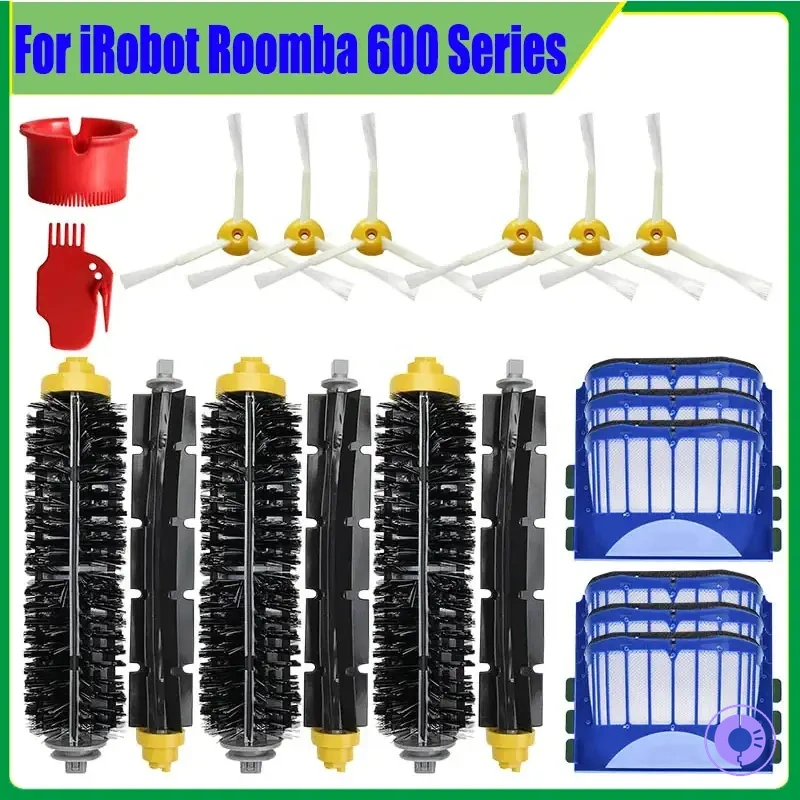
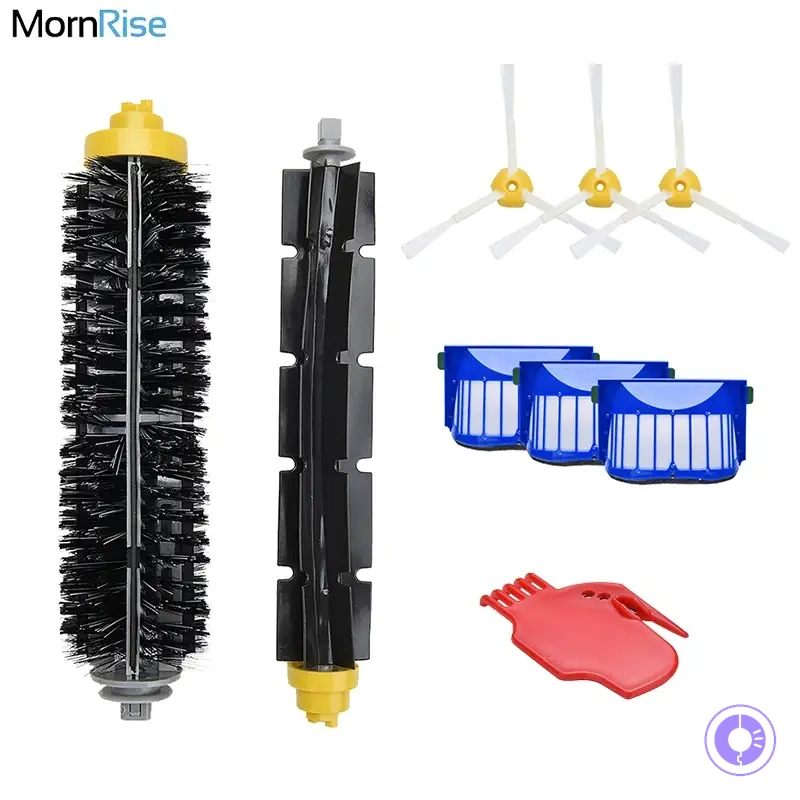
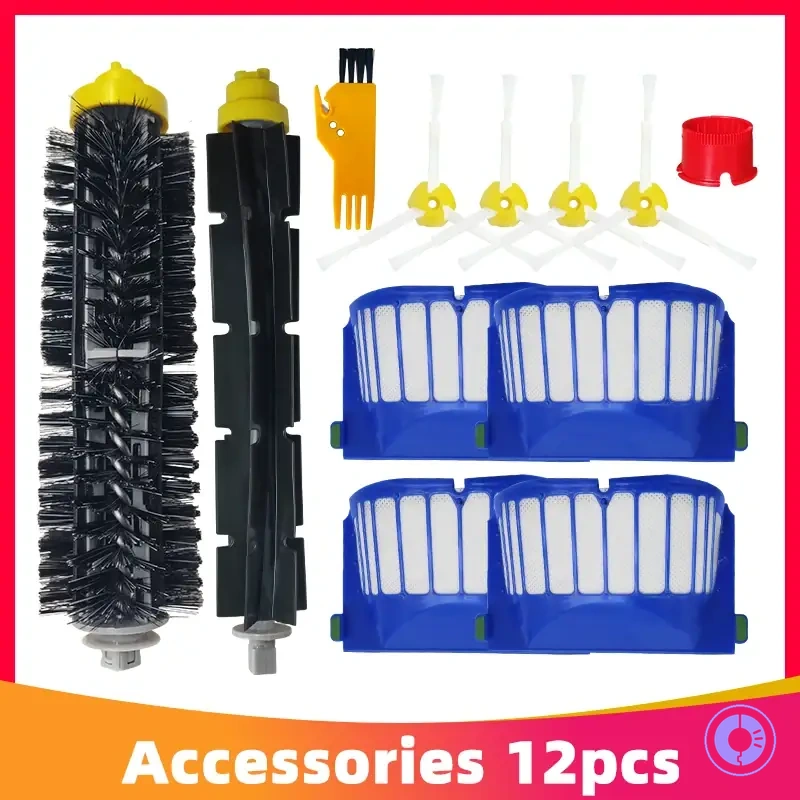
Pet-hair focused replacement set: what to buy together for fewer repeat tangles
To reduce repeat tangles and improve cost-value, buy a bundled set of replacement parts that pair components that commonly wear together under pet-hair load. The cost-value lies in avoiding multiple service interruptions and helping maintain consistent suction between cleanings.
Pairing parts works best when you match the symptom to the likely failure.
| Scenario | Parts to pair | Why the pairing matters | What to verify before buying |
|---|---|---|---|
| Hair wraps around brush roll and reduces suction | Brush roll + filter | Pair to fix friction: a worn brush roll cannot grab hair, while a clogged filter restricts airflow; replacing both can help restore the cleaning path. | Check that the filter shape matches your model and that the brush roll end caps fit the drive gear. |
| Side brush leaves hair lines along baseboards | Side brush + brush roll | Pair to restore airflow: a bent side brush pushes hair into the brush roll path; a fresh brush roll can then capture it instead of tangling. | Confirm the side brush mounting screw size and the brush roll length match your unit. |
| Dustbin fills quickly with fine hair and dander | Filter + dustbin seal | Pair to fix friction: a degraded seal lets hair bypass the filter, causing rapid bin filling; replacing both helps keep debris inside the bin. | Verify the seal gasket contour and the filter frame dimensions against your model. |
These pairings are common but not universal; always verify fit before assuming a bundled set may work. Check part numbers against your model to ensure correct seating.
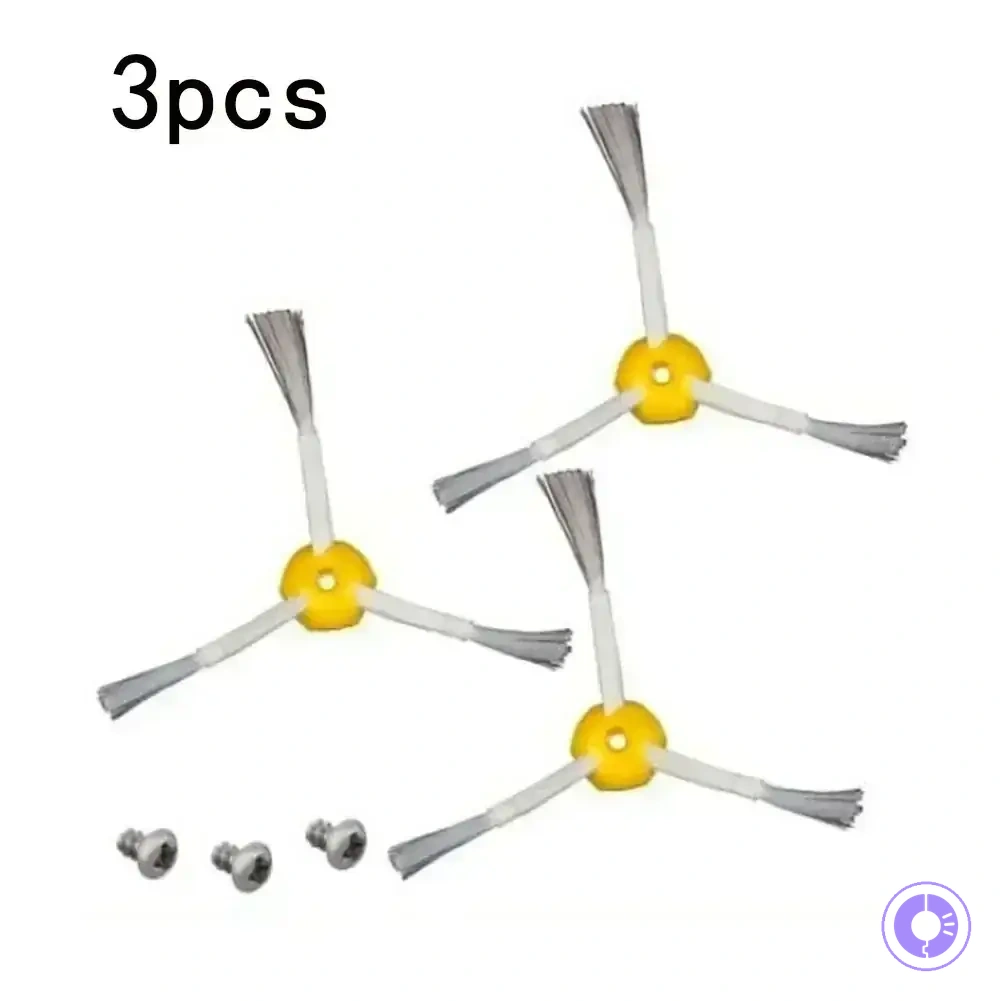
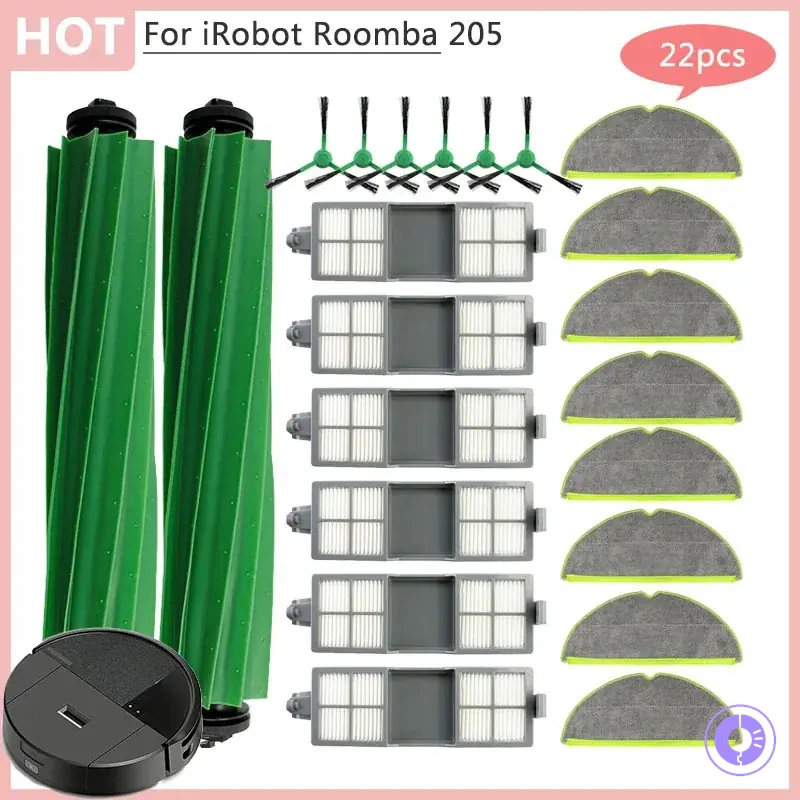
Here are product examples that may make comparison easier. Before buying, always review the compatibility criteria, essential features, and product details.
When tangles persist after replacements: the narrow checks to run before escalating
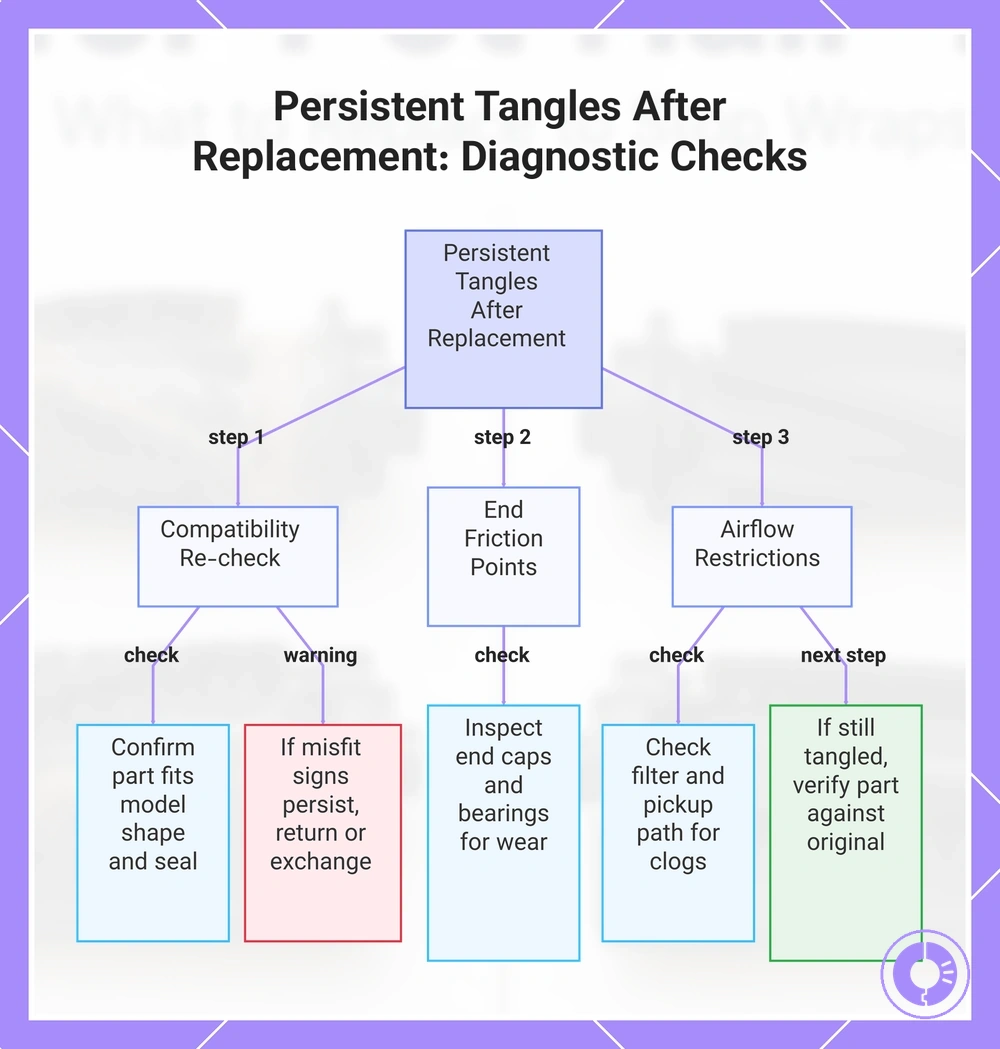
When tangles persist after a replacement, the cause is usually a misfit between the new part and the unit, a missed wear point on an adjacent component, or a maintenance gap that lets debris build up. These three causes account for most recurring jams and can be checked without special tools.
Start with a compatibility re-check before looking at wear or maintenance. If the fit is correct, inspect end friction areas for wear or damage. Next, check for airflow restrictions such as a clogged filter or pickup path. The following checks prioritise these in order of likelihood and impact:
- Compatibility re-check — Confirm the replacement part matches your model’s shape, mounting points, and seal profile. A misfit is a common cause of new tangles after a swap.
- End friction points — Inspect brush end caps, bearings, and side brushes for wear or damage. Friction here can slow rotation and let hair wrap tightly.
- Airflow restrictions — Check the filter, dustbin, and pickup path for clogs. Reduced airflow can leave debris in the brush area, increasing tangle frequency.
If all checks pass and tangles still occur, the safe next step is to verify the replacement part against the original. Compare part numbers or contact support with model details. Persistent misfit indicators — such as visible gaps, unusual noise, or repeated jams at the same point — warrant a return or exchange rather than further in-unit diagnosis.
Misfit signs: visible gap, part does not snap in, noise during rotation. Wear signs: smooth end cap, frayed bristles, bearing wobble.
Here are product examples that may make comparison easier. Before buying, always review the compatibility criteria, essential features, and product details.
This chart shows the three prioritized checks to run when tangles persist after a replacement, in order of likelihood and impact, and the next step if tangles still occur.